


This Osgood doll is made using a similar basic body as the Bill doll (found here) with a different face and clothes (I have also tried to improve the body and added hands)
Difficulty:

Medium - Difficult
You will need:
- A 2.5mm crochet hook
- A 2mm crochet hook
- A 0.8mm crochet hook (if you don't have one of these you can use a 0.6mm and crochet loosely or a 1mm and crochet tightly)
- dk yarn in peach (or a suitable skin colour) and darkish brown (for the hair) (Note: the brown yarn MUST be a yarn that isnt going to felt (100% acrylic is best))
- 4ply yarn in dark blue, black, purple, beige, cream, red, yellow, dark grey, and light green (you will only need a small amount of the last eight of these)
- Embroidery thread in white, medium brown, black, medium pink, darker pink, very light pink, light blue, dark blue, silver, and dark brown (although you can use sewing cotton for the dark brown and very light pink instead)
- Toy stuffing
- A darning needle (or similar)
- A regular sewing needle (preferably thin but with a reasonable large eye)
- A pet brush
- A metal gauze or a sturdy knitting neddle
- A cutting mat or a similar surface that can withstand scratching
- Cling film
- PVA glue
- Scissors
- A black pipecleaner
- A small white and light brown button (If you want to be able to undress the doll)
- Two more small matching white buttons
Note:
- I have decided to re-jig how I write my patterns to (hopefully) make them easier to read. I am assuming that most people reading this pattern will be reasonably experienced with pattern reading, but hopefully this will make sense even if you are not. If you are confused by any parts of this pattern please leave a comment below and I will try to clarify things for you :) The main change I have made is that instead of writing 'sc in the next ... sts' in many cases I have just written 'sc... Eg. 'sc12' means 'sc in the next 12 sts'
- I have also started using brackets more to simplify things further. Eg. '(sc, 2sc in the next st) six times' means you should do everything in the brackets 6 times
- In addition to this 'fasten on, sc12' means ' fasten on, then sc in the same st and the next 11sts'
- 'fasten off neatly' refers to a special way of fastening off which is neater and makes it easier to see where you should be crocheting on the next round (also known as invisible fastening off). This involves pulling up your yarn through your stitch, threading the yarn underneath the second stitch from where you pulled your yarn up, then then threading your yarn back through the top of this stitch and down through the back of the work. There is a very helpful site that explains it clearly found here. Just make sure when you do this that you thread your needle through the SECOND stitch after the last stitch you made, otherwise you will end up with an extra stitch which may mean that all of the following rounds are out of line with each other.
For the body:
For every part of the body, unless specifies, use a 2.5mm hook and peach dk yarn
For the arms (make 2):
Make a magic loop with 6sc
Round 1: sc in the first st, 2sc in the next st, rep to end (9sc)
Round 2 : in each st
Round 3: sc in the first st, sc2tog, rep to end (6sc)
Rounds 4 - 16: (13 rounds) sc in each st
Fasten off neatly
Don't stuff yet
press the hand flat.
For the thumb:
insert your hook through the post of one of the stitches in between rounds 2 and 3 (as shown below)(NOTE: the magic loop you made isn't counted when numbering the rows in the pattern above, so looking at your hand from the end your hook should be inserted between the 3rd and 4th circle). Pull your yarn through, ch1, then make 2sc into where you first inserted your hook. Ch1, then sc2tog through the 2 sts you just made.
Fasten off


For the fingers:
inset your hook through the post of the stitch between the magic loop and round 1 directly above where you made the thumb (as shown below)
pull the yarn though, ch1, then sc into where you inserted your hook. ch1, sc in this st you just made, ch1, sc in this next st you made.
Fasten off

Insert your hook into the spoke between the magic loop and the first row on the other edge of the hand (as shown below)
Pull yarn through, ch1, sc in where you inserted your hook, ch1, sc in this st you just made. Fasten off

You now need to make 2 more fingers in the same way as you made the first one, in between the two fingers you have already made. It doesn't particularly matter where you insert your hook for each st, as long as they end up both being in between the two existing stitches. This will mean you end up with a hand looking similar to the one below.
 |
After you have made the arms mark with either a scrap of yarn or a stitch marker the stitch on each arm directly above the thumb.


For the body:
Make a magic loop with 6sc
Round 1: 2sc in each st (12sc)
Round 2: (sc, 2sc in the next st) six times to end (18sc)
Round 3: (sc2, 2sc in the next st) six times to end (24sc)
Round 4: sc3, 3sc in each of the next 2 sts, sc3, 3sc in each of the next 3sts, sc14 (32sc)
Round 5: sc4, sc3tog twice, sc, sc3tog twice, sc15 (24sc)
Round 6: sc3tog, sc8, sc3tog, sc10 (20sc)
Round 7: sc2tog, sc8, sc2tog, sc8 (18sc)
Round 8: Sc2tog, sc7, sc2tog, sc7 (16sc)
Round 9: sc in each st
Round 10: sc, 2sc in the next st, sc7, 2sc in the next st, sc6 (18sc)
Round 11: sc, 2sc in the next st, sc8, 2sc in the next st, sc7 (20sc)
Round 12: sc2, 2sc in the next st, sc9, 2sc in the next st, sc7 (22sc)
Round 13: sc in each st
Round 14: sc3, 2sc in the next st, sc10, 2sc in the next st, sc7 (24sc)
Rounds 15 - 16: (2 rounds) sc in each st
Fasten off neatly
For the shoulders:
Attach yarn to the body to the stitch before the 'new' stitch you created when yoiu fastened off neatly (this stitch is the one that tightens when you pull the loose end).
Round 17: sc in this st, sc in the next st, sc into one of the arms in the second stitch before the stitch marker. (Image 1) sc in the next 4sts around the edge of this arm, sc in the body in the 3rd st after the last st you crocheted in the body (Image 2),
crocheting around the body: sc4, sc2tog, sc4,
sc in the other arm in the 2nd st before the stitch marker, sc in the next 4sts around this arm, sc in the body in the 2nd st from where you last crocheted (as you did on the other side), sc in the next 6sts around the body. These last 29sts from a new round
Rounds 18 - 20: (3 rounds) sc in each st
stuff the body, and lightly stuff the arms, using a blunt pencil to help you. Make sure you don't over-stuff the arms.
Round 21: sc, sc2tog, sc3tog, sc2tog, sc8, sc2tog, sc3tog, sc2tog, sc6 (21sc)
Round 22: sc, sc5tog, sc6, sc5tog, sc4 (13sc)
Round 23: sc, sc2tog, sc5, sc2tog, sc3 (11sc)
Rounds 24 - 25: (2 rounds) sc in each st
Round 26: slip 3, ch1, sc5.
Fasten off
Stuff the body until you are happy with it, adding stuffing through both the neck hole and the gaps under the armpits. When you are satisfied, sew up these gaps under the armpits.
For the bellybutton:
Make a belly button by making repeated stitches through the centre of the body and pulling it tight. To ensure that you don't get a matching indentation on the other side, try to make your needle emerge in the gap between the stitches and insert it back into the same gap. It also helps to make your needle emerge between different stitches every time you push it through, whereas on the front of the body you should bring your needle up in the same place in the gap between two stitches and then insert it in the gap on the neighbouring stitch.

For the breasts (make 2):
Make a magicl loop with 2sc
Round 1: 2sc in each st (12sc)
Round 2: sc in each st
Stuff these and sew them to the body
Don't yet attach the head to the body
For the nose:
make a magic loop with 2sc. ch1, turn
Row 1: 2sc in this st, ch1, turn
Row 2: 2sc in each of these 2 sts
Fatsen off
Sew this nose to the face, shaping it as you do so to try to make it look as much like Osgood's nose as possible (use the picture below as a reference)


For the ears (make 2):
with a 2mm hook make a magic loop with 3sc, ch1, turn
Row 1: 2sc in the first st, slip 1, 2sc in the last st
Fasten off
Sew these to the sides of the head.

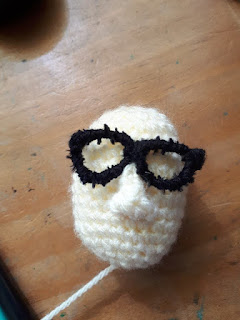
For the glasses:
Curl centre of the pipe-cleaner into the right shape for the front of the glasses, so that they fit nicely over the nose and around the eyes. (They will probably look a bit rediculous at this point as the frames will be very thick but we are going to make them thinner)
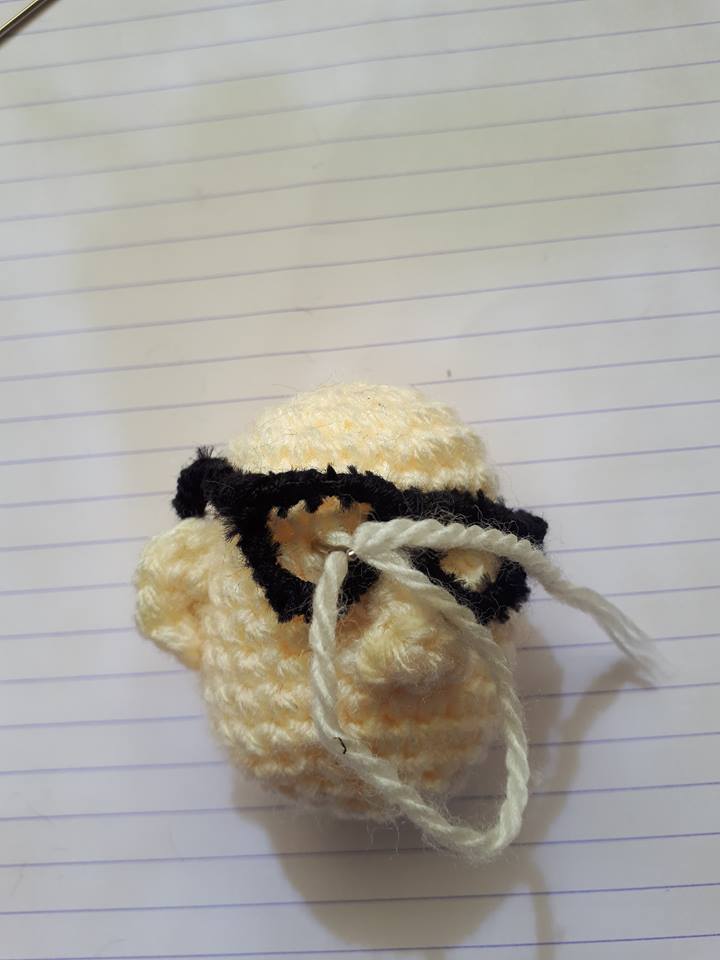
Bend the edges back so that they fit over the ears, but don't trim the ends just yet.

Thread a darning needle with black 4ply yarn and attach it to the frame of the glasses. The easiest way to do this is to just tie the end to the frame of the glasses, leaving a small tail (just make sure that the knot is small so won't make a bump in the glasses when they're finished)
Wind the yarn around the frame of the glasses to cover the pipecleaner. Try to make the yarn as close together as possible to cover up most of the pipecleaner tufts (It probably wont be possible to cover them all but try to do this as best as you can). When you start doing this try to cover up the tail of yarn you left whilst tying it on.
Keep going until you have covered all of the front of the frame. If you run out of yarn on your needle, just secure it by making a few small stitches through a few strands of the yarn you have already looped around the glasses, then fasten off. Secure the new yarn in the same way.

After you have done this you need to cover the arms of the glasses. Attach yarn to one of the corners of the frame (the bit attached to the arm) and cover most of the arm of the glasses in the same way as you did for the frames. Continue in this way up to the bend you made for the ears.

Bend and trim the end of the pipecleaner so that you have a small loop that is the right length to fit behind the ears comfortably.

Wind the yarn around this section, making sure that the pointed end of the pipecleaner is covered by the yarn. When you get to the end of the arm, use your needle to wind the yarn around and through the loop (hopefully this will be clarified by the diagram below)


Repeat this for the other arm.


For the eyes:
Before you make the eyes you need to make the eye sockets by making repated stitches through the head and pulling tight, as you did for the bellybutton.

Round 8: Sc2tog, sc7, sc2tog, sc7 (16sc)
Round 9: sc in each st
Round 10: sc, 2sc in the next st, sc7, 2sc in the next st, sc6 (18sc)
Round 11: sc, 2sc in the next st, sc8, 2sc in the next st, sc7 (20sc)
Round 12: sc2, 2sc in the next st, sc9, 2sc in the next st, sc7 (22sc)
Round 13: sc in each st
Round 14: sc3, 2sc in the next st, sc10, 2sc in the next st, sc7 (24sc)
Rounds 15 - 16: (2 rounds) sc in each st
Fasten off neatly
Attach yarn to the body to the stitch before the 'new' stitch you created when yoiu fastened off neatly (this stitch is the one that tightens when you pull the loose end).
Round 17: sc in this st, sc in the next st, sc into one of the arms in the second stitch before the stitch marker. (Image 1) sc in the next 4sts around the edge of this arm, sc in the body in the 3rd st after the last st you crocheted in the body (Image 2),
crocheting around the body: sc4, sc2tog, sc4,
sc in the other arm in the 2nd st before the stitch marker, sc in the next 4sts around this arm, sc in the body in the 2nd st from where you last crocheted (as you did on the other side), sc in the next 6sts around the body. These last 29sts from a new round
 |
| Image 1 |
 |
| Image 2 |
Rounds 18 - 20: (3 rounds) sc in each st
stuff the body, and lightly stuff the arms, using a blunt pencil to help you. Make sure you don't over-stuff the arms.
Round 21: sc, sc2tog, sc3tog, sc2tog, sc8, sc2tog, sc3tog, sc2tog, sc6 (21sc)
Round 22: sc, sc5tog, sc6, sc5tog, sc4 (13sc)
Round 23: sc, sc2tog, sc5, sc2tog, sc3 (11sc)
Rounds 24 - 25: (2 rounds) sc in each st
Round 26: slip 3, ch1, sc5.
Fasten off
Stuff the body until you are happy with it, adding stuffing through both the neck hole and the gaps under the armpits. When you are satisfied, sew up these gaps under the armpits.
For the legs (make 2):
ch5
Round 1: sc in the 2nd st from hook ,sc in the next 2 chain sts, 3sc in the last chan st, sc in the back of the previous two chain sts you crocheted into, 2sc in the back of the first chain st you crocheted into (10sc)
Round 2: 2sc in the first st , sc in the next 2sts, 2sc in each of the next 3 sts, sc in the following 2sts, 2sc in each of the next 2 sts (16sc)
Round 3: (this is slightly less than one round) sc in the first 5sts, sc5tog, sc in the next 6sts (12sc)
Round 4: sc3, sc5tog, sc3 (8sc)
Round 5: sc2tog, sc in the next 6sc (7sc)
Round 6: (this is slightly less than 1 round) sc in the first 6sts
Round 7: sc in the first 2sts, 2sc in the next st, sc in the next 3sts, 2sc in the next st (9sc)
Round 8: sc in each st
Round 9: sc in the first 2sts, 2sc in the next st, sc in the last 6sts (10sc)
Round 10: sc in the first 2sts , 2sc in the next st, sc in the last 7sts (11sc)
Round 11: sc in the first 3sts, 2sc in each of the next 2 sts, sc in the last 6sts (13sc)
Round 12: sc in the first 4sts, sc2tog, sc in the last 7sts (12sc)
Round 13: sc in the first 4sts, sc2tog, sc in the last 6sts (11sc)
Round 14:(this is slightly more than 1 round) sc in the first 4sts, sc3tog, sc in the last 3sts (9sc)
Round 15: sc in the first 4sts, sc2tog, sc in the next 3sts, 3sc in the last st (10sc)
Round 16: (this is slightly more than 1 round) sc in the first 8sts, sc3tog (8sc)
Round 17: sc in the first 3sts, 2sc in the next st, sc in the following 3sts, 2sc in the last st (10sc)
Round 18: sc in the first 3sts, 2sc in the next st, sc in the following 5sts, 2sc in the next st, sc in the last 2sts (12sc)
Round 19: sc in each st
Round 20: sc in the first 9sts, 2sc in the next st, sc in the last 2sts (13sc)
Round 21: sc in each st (13sc)
Round 22: sc in the first 10sts, 2sc in the next st, sc in the last 2sts (14sc)
Round 23: sc in each st
Round 24: sc in the first 6sts
Fasten off
Stuff and sew these to the base of the body
Make a belly button by making repeated stitches through the centre of the body and pulling it tight. To ensure that you don't get a matching indentation on the other side, try to make your needle emerge in the gap between the stitches and insert it back into the same gap. It also helps to make your needle emerge between different stitches every time you push it through, whereas on the front of the body you should bring your needle up in the same place in the gap between two stitches and then insert it in the gap on the neighbouring stitch.

For the breasts (make 2):
Make a magicl loop with 2sc
Round 1: 2sc in each st (12sc)
Round 2: sc in each st
Stuff these and sew them to the body
For the head:
Make a magic loop with 6sc
Round 1: 2sc in each st (12sc)
Round 2: sc in the first st, 2sc in the next st, rep to end (18sc)
Round 3: sc in the first 2 sts, 2sc in the next st, rep to end (24sc)
Rounds 4 - 12: (9 rounds) sc in each st
Round 13: sc in the first 2 sts, sc2tog, rep to end (18sc)
Stuff
Round 14:sc in the first st, sc2tog, rep to end (12sc)
Round 15:sc2tog to end (6sc)
Fasten off
Don't yet attach the head to the body
make a magic loop with 2sc. ch1, turn
Row 1: 2sc in this st, ch1, turn
Row 2: 2sc in each of these 2 sts
Fatsen off
Sew this nose to the face, shaping it as you do so to try to make it look as much like Osgood's nose as possible (use the picture below as a reference)


with a 2mm hook make a magic loop with 3sc, ch1, turn
Row 1: 2sc in the first st, slip 1, 2sc in the last st
Fasten off
Sew these to the sides of the head.

For the glasses:
 |
| You may want to use this image as a reference |
Bend the edges back so that they fit over the ears, but don't trim the ends just yet.

Thread a darning needle with black 4ply yarn and attach it to the frame of the glasses. The easiest way to do this is to just tie the end to the frame of the glasses, leaving a small tail (just make sure that the knot is small so won't make a bump in the glasses when they're finished)
Wind the yarn around the frame of the glasses to cover the pipecleaner. Try to make the yarn as close together as possible to cover up most of the pipecleaner tufts (It probably wont be possible to cover them all but try to do this as best as you can). When you start doing this try to cover up the tail of yarn you left whilst tying it on.
Keep going until you have covered all of the front of the frame. If you run out of yarn on your needle, just secure it by making a few small stitches through a few strands of the yarn you have already looped around the glasses, then fasten off. Secure the new yarn in the same way.

After you have done this you need to cover the arms of the glasses. Attach yarn to one of the corners of the frame (the bit attached to the arm) and cover most of the arm of the glasses in the same way as you did for the frames. Continue in this way up to the bend you made for the ears.

Bend and trim the end of the pipecleaner so that you have a small loop that is the right length to fit behind the ears comfortably.

Wind the yarn around this section, making sure that the pointed end of the pipecleaner is covered by the yarn. When you get to the end of the arm, use your needle to wind the yarn around and through the loop (hopefully this will be clarified by the diagram below)
 |
| In the diagram above the grey represents the pipe-cleaner and the black represents the yarn (although you should try to make this more bunched up) |


Repeat this for the other arm.


For the eyes:
 |
| The eye above can be used as a reference |
Before you make the eyes you need to make the eye sockets by making repated stitches through the head and pulling tight, as you did for the bellybutton.
 |
| You may want to keep the glasses on the face when you start doing this to make sure that the eyes are in the right place to line up with the glasses. |

Once you are happy with the eye sockets you need to embroider the eyes on. Use white embroidery thread or 3ply yarn to embroider the whites of the eyes

Next embroider the iris using medium brown and outline this with dark brown, using two strands of embroidery thread for the iris and one strand for the outline.

Next embroider the pupil in the centre of the iris using 2 strands of black embroidery thread.
Add highlights to each pupil using a single strand of white embroidery thread.


For the mouth:
 |
| Use the image above as a reference when making the mouth |

Once you've done this I find it useful to just pull the needle through to the back of the head and leave the thread out of the way but still attached (since I often find I need to add and change things when adding other colours.)
After you've done the base you can start adding more detail. How you do this is up to you, but this is what I did:
First I used two strands of a darker salmon-y pink to outline the lips and embroider through the centre of them (to make them look more like two individual lips). (Images 1/2)
I then used a pale pink to add highlights to the lips (Image 3), before finally using the medium pink I used for the background to extend the lips slightly and pull them in to make them fuller.
 |
| Image 1 |
 |
| Image 2 |
 |
| Image 3 |
For the hair:
Note: try to attach the hair before you attach the head to the body as this makes it a LOT easier
Cut out a rectangle of cardboard approximately 22 cm long and wind you dark brown yarn around it.
Cut all of the strands at one end so that you have half as many 44cm long strands.
Use these strands to make yarn wefts for your dolls hair in the same way as is done in this video
(I used a knitting needle instead of a gauze to hold the yarn in place as I brushed it)


After you have a bunch of these wefts you need to start attaching them to the head. You can glue the strands to the head if you want, but I prefer to sew them on.
It is important to make sure that all of the strands have dried properly before you do this, otherwise they may fall apart whilst you are attaching them to the head.
Take a needle and dark brown sewing cotton and use backstitch to sew over where the strip of glue is, attaching the wefts to the head. Sew them on so that they look like they're facing the wrong way, then fold the hair back so that it covers the place where the glue is. Start from the front and sides of the head and slowly work backwards until you have covered most (but not quite all) of the head.
 |
| carefully sew the hair to the head, making sure that all of the strands are attached securely |
 |
| The hair should be sewn on facing forwards and then folded back on itself |
 |
| It will look very odd at first when you have very little hair |

 |
| I worked down one side of the head first before doing the other side of the hair |

Once the majority of the head has been covered sew the head to the body and then start attaching the hair from the bottom up, covering up a little of the neck as well. This only needs to be a few wefts but it makes sure that the hair looks good when you tie it in a ponytail. You will end up with a section in the lower centre of the head that just has the glued ends of the wefts but this doesn't matter since it will be hidden once the hair is tied up.


After all of the hair is attached, use a spare strand of brown yarn (preferably one that you have brushed so that it matches the rest of the hair) to tie the hair up in a ponytail. After you've done this you may need to style the hair some more. If you feel that the hair is too thick (Which I did), you may want to use the pet brush you used for the wefts to brush the hair as a whole. When doing this, firmly grip the place when the hair is tied, to make sure you don't pull any of the strands out of the hair as you brush.

You will also most likely need to cut the hair to make it a little shorter. Trim the hair to the correct length using scissors. After this use the pet brush to brush the hair as described before, so that it looks more natural. You may also want to tie the hair up again using a strand of 4ply yarn over the top of where you tied it before, to make it tighter (the 4ply yarn will be stronger as well since the brushing will weaken the brown yarn)


For the trousers:
For the trouser legs (Make 2):
With dark green 4ply yarn and a 2mm hook ch 23
Round 1: sc in the first chain st you made, then sc in every following chain st to make a loop.
Rounds 2 - 27: (26 rounds) sc in each st
Fasten off neatly
Rejoin yarn to one of the stitches on one of these trouser legs.
Round 31: sc16 around this leg. Sc in a stitch on the other trouser leg, then sc in the next 15 sts around this leg. (32sc)
Round 32: sc in the first st of the last round, then sc in every following st (32sc)
Round 33 - 41: (9 rounds) sc in each st
Fasten off neatly
For the shirt:
with a 2mm hook and white 4ply yarn ch30
Round 1: sc in the first chain st you made, then sc in every following chain st to make a loop (30sc)
Rounds 2 - 16: (15 rounds) sc in each st
Round 17: (sc4, 2sc in the next st) six times to end (36sc)
Round 18: sc in each st
Round 19: (sc5, 2sc in the next st) six times to end (42sc)
Round 20: sc in each st
fasten off
Round 21: skip the next 3sts, fasten on, sc17, fasten off, skip 3, fasten on, sc19. Fasten off
Rounds 22 - 23: (2 rounds) do as you did for round 21, skipping the three stitches on round 20, crocheting over the sc17, skipping the next 3 stitches of round 20, then crocheting over the sc19 and fastening off.
From now on, when you reach the end of a section, 'fasten off, skip3, fasten on' means you shgould fatsen off, skip the three stitches on row 20, then fastening on to the first st of the next section of crochet.
Round 24: skip 3, fasten on. sc7, sc in the back loop only of the next 2sts, Fasten off. Fasten on to the front loop of the first st you crocheted in to the back loop only of (Image 1), sc in the front loop only of this st, sc in the front loop only of the next st (Image 2), sc in both loops of the next 7sts, fasten off, skip 3, fasten on. Sc19, fasten off
 |
| Image 1 |
 |
| Image 2 |
Round 26: skip3, fasten on, sc9, fasten off. fasten on to where you fastened on to on the last round (above where you crocheted in to the front loop only), sc9, fasten off. Skip 3, fasten on, sc7, sc3tog, sc7. Fasten off
Rounds 27 - 28: (2 rounds) skip3, fasten on, sc9, fasten off. Fasten on above where you fastened on for the previous round, sc9, fasten off. Skip3, fasten on, sc15. Fasten off
Round 29: skip 3, fasten on, sc2tog, sc7, fasten off. Fasten on to where you fastened on for the previous round, sc7, sc2tog, fasten off. Skip3, fasten on, sc15, fasten off
Round 30: skip3, fasten on, sc8, fasten off. Fasten on above where you fastened on for the previous round, sc8, fasten off. Skip3, fasten on, sc15. Fasten off
Weave in loose ends
Attach yarn to the central front st, as shown below
 |
| I haven't weaved in all my loose ends here but it makes it a lot easier to see what you're doing if you do |
Round 31: sc8, ch3, (skip 3,) sc15 on next section, ch3, (skip 3,) sc8 on next section. fasten off (37sc)
Round 32: Rejoin yarn to front edge (above where you joined it before), sc4, sc2tog, sc, sc5tog (three of the stiches involved in this will be chain sts), sc, sc2tog, sc7, sc2tog, sc, sc5tog (again involving 3 chain sts), sc, sc2tog, sc4. Fasten off
Rounds 33 - 35: (3 rounds) Rejoin yarn to front edge, sc25, fasten off
Round 36: rejoin yarn to the other side of the front edge, to the back loop of the second stitch when looking at it from the inside of the jumper (as shown below), sc23 around the neckline in the back loop only of each st. Fasten off
(Note: You will need to crochet in the opposite direction as you have been doing for the shirt so far)


Rounds 37 - 38: (2 rounds) Fasten on to both loops of the first st you made in the last round (as shown below). Sc23 in both loops, fasten off

Sew in all remaining loose ends
For the sleeves (make 2):
Ch14
Round 1: Sc in the first chain st you made, sc in every following chain st to make a loop (14sc)
Rounds 2 - 4: (3 rounds) sc in each st
Round 5: Sc8, Fasten off
Rows 6 - 9: (4 rows) rejoin to the start of the sc8 section, sc8, fasten off
Row 10: rejoin to start of the sc8 section, sc2tog, sc4, sc2tog, fasten off (6sc)
Row 11: rejoin to start of this section, sc2tog, sc2, sc2tog, fasten off (4sc)
Alternative rows 6 - 11: If you aren't planning on taking the jumper off you can save yourself lots of effort sewing in the loose ends by doing the following (this will mean it doesn't look as good but if you are planning on keeping the jumper on it won't matter:
Rows 6 - 9: ch1, turn, sc8
Row 10: ch1, turn, sc2tog, sc4, sc2tog (6sc)
Row 11: ch1, turn, sc2tog, sc2, sc2tog (4sc)
Fasten off
Sew in loose ends
Sew sleeves to armholes
 |
| The shirt should also have a collar on but I made the collar after the sleeves so it isn't in this picture |

If you want to take the jumper off and have her just wearing the shirt you may want to add a small white button to the shirt and add a small length of chain sts to the other side of the shirt to act a a button loop, so that the shirt stays in place when the jumper isn't on.
For the jumper:
With a 2mm crochet hook and golden-y brown dk yarn, ch4
Row 1: sc in the 2nd loop from hook, sc in the next 2 loops. Ch1, turn (3sc)
Rows 2 - 32: (31 rows) sc in the loop behind the back loop (also known as the third loop) (see diagram below) of each st. ch1, turn

Row 33: sc in the loop behind the back loop of each st
Fasten off
With light brown dk yarn and 2.5mm hook attach yarn to the corner of this strip

Round 1: sc in the same st as you joined on, sc34 more sts along the long edge of this section (35sc)

Round 2: sc in the first st of the last round, sc in each of the next 34sts to make a loop (35sc)
Rounds 3 - 12: (10 rounds) sc in each st
Round 12.5: sc12, fasten off.
Round 13: skip3. fasten on, sc15, fasten off, skip 3, fasten on, sc14, fasten off
The jumper then continues in a similar way to the shirt, where 'fasten off, skip3, fasten on' means you should fasten off at the end of one section, skip the 3 sts on round 13, then fasten on to the beginning of the next section.
Rounds 14 - 16: (3 rounds) Skip3, fasten on, sc15, fasten off. Skip3, fasten on, sc14, fasten off
You now need to decide if you want to be able to take your jumper on and off.
If you want to be able to undress your doll:
Rounds 17 - 19: (3 rounds) Skip3, fasten on, sc15, fasten off. Skip3, fasten on, sc7, Fasten off, rejoin yarn to the next st, sc7, fasten off
Sew in loose ends
Round 20: skip 3, fasten on, sc15, ch4, (skip3,) sc7 along the other side, fasten off, attach to next section, sc7, ch4,
Round 21: (this is slightly more than 1 round) (skip3,), sc into the first st of the next section, sc2tog, sc9, sc2tog, sc2tog, sc3tog, sc2tog, sc5, fasten off, rejoin to next section, sc5, sc2tog, sc3tog, sc2tog
Round 22: sc2tog, sc8, sc2tog three times, sc3, fasten off, fasten on to next section, 4. sc2tog three times. Fasten off neatly
Sew in loose ends
Make the neckband and attach it to the jumper. Using a 2mm hook and golden brown yarn ch6 and attach this small chain to the back edge of the neckband. Sew a small button to the oppositte side, and make sure that the loop will go over the botton to seccure the jumper. Make the chain smaller or larger if it needs it.
If you aren't bothered about being able to undress your doll:
Rounds 17 - 19: (3 rounds) skip 3, Fasten on, sc15, fasten off. Skip3, fasten on, sc14, fasten off
Sew in loose ends
Round 20: Skip3, Fasten on, sc15, ch4, (skip 3,) sc14 along the other side, ch4 (37sc)
Put the jumper on your doll (make sure you put the shirt on first). The last ch4 should be on the right hand side looking at the doll from the front

Round 21: (this is slightly more than 1 round) (skip 3,) sc into the first st on the next section, sc2tog, sc9, sc2tog, sc2tog, sc3tog, sc2tog, sc10, sc2tog, sc3tog, sc2tog (28sc)
Round 22: sc2tog, sc8, sc2tog three times, sc7, sc2tog three times. Fasten off neatly
For the neckband:
With a 2mm crochet hook and golden-y brown dk yarn, ch3
Row 1: sc in the 2nd loop from hook, sc in the next loop. Ch1, turn (2sc)
Rows 2 - 23: (22 rows) sc in the loop behind the back loop (also known as the third loop) (see diagram below) of each st. ch1, turn
Row 24: sc in the loop behind the back loop of each st
Fasten off
Sew this neckband to the inside of the neck edge of the jumper
If you don't intend to take the jumper off you may want to sew the collar of the shirt in place over the jumper to make it look neater. Do this using a sewing needle and sewing cotton, and make a few small stitches in the front of the collar to keep it lying flat
For the sleeves (Make 2):
With a 2mm crochet hook and golden-y brown dk yarn, ch4
Row 1: sc in the 2nd loop from hook, sc in the next 2 loops. Ch1, turn (3sc)
Rows 2 - 14: (13 rows) sc in the loop behind the back loop (also known as the third loop) (see diagram below) of each st. ch1, turn
Row 15: sc in the loop behind the back loop of each st
Fasten off
With light brown dk yarn attach yarn to the corner of this strip, as you did for the body of the jumper
Round 1: sc in the same st as you joined on, sc14 more sts along the long edge of this section (15sc)
Round 2: sc in the first st of the last round, sc in each of the next 14sts to make a loop (15sc)
Rounds 3 - 12: (10 rounds) sc in each st
Round 12: sc10, fasten off
Round 13: skip5, fasten on, sc2tog, sc6, sc2tog, fasten off
From now on, skip5, fasten on' means you need to skip the same 5 sts you skipped in round 13 and then join you yarn to the start of the next (or in this case the same) section (as you have done before for the shirt and jumper)
From now on, skip5, fasten on' means you need to skip the same 5 sts you skipped in round 13 and then join you yarn to the start of the next (or in this case the same) section (as you have done before for the shirt and jumper)
Rounds 14 - 15: (2 rounds) skip5, fasten on, sc8, fasten off (8sc)
Round 16: skip5, fasten on, sc2tog, sc4, sc2tog, fasten off (6sc)
Round 17: skip5, fasten on, sc2tog, sc2, sc2tog, fasten off (4sc)
Round 18: skip5, fasten on, sc2tog, sc2tog, fasten off (2sc)Sew these sleeves to the armholes
 |
| Ignore the boots for the minute we will get to them later |
For the lab-coat:
With a 2mm hook and white 4ply yarn ch48
Row 1: sc in the 2nd loop from hook, sc in every following chain st. ch1, turn (47sc)
Rows 2 - 18: (17 rows) sc in each st. ch1, turn
Row 19: Sc, ch2, skip2, sc44. ch1, turn
Rows 20 - 28: (9 rounds) sc in each st. ch1, turn
Row 29: Sc, ch2, skip2, sc44. ch1, turn
Rows 30 - 35: (6 rounds) sc in each st. ch1, turn
Row 36: Sc10. ch1, turn
Row 37: Sc2tog, sc8. ch1, turn (9sc)
Rows 38 - 39: (2 rows) sc9. ch1, turn
Row 40: Sc2tog, sc7. ch1, turn (8sc)
Row 41: Sc8. ch1, turn
Row 42: Sc2tog, sc6. ch1, turn (7sc)
Row 43: Sc7. ch1, turn
Row 44: Sc2tog, sc5. ch1, turn (6cs)
Rows 45 - 47: (3 rows) Sc6. ch1, turn
Row 48: sc6
Fasten off
Attach yarn to row 35, to the 10th st from the other side (as shown below)

Row 36: sc in this st, sc9 to end. ch1, turn
Row 37: sc8, sc2tog. ch1, turn (9sc)
Rows 38 - 39: (2 rows) sc9. ch1, turn
Row 40: sc7, sc2tog. ch1, turn (8sc)
Row 41: Sc8. ch1, turn
Row 42: sc6, sc2tog. ch1, turn (7sc)
Row 43: Sc7. ch1, turn
Row 44: sc5, sc2tog. ch1, turn (6cs)
Rows 45 - 47: (3 rows) Sc6. ch1, turn
Row 48: sc6
Fasten off
Attach yarn to row 35 to the 4th st from one of these sections (as shown below)


Row 36: sc in the first 21sts. ch1, turn
Row 37: Sc2tog, sc17, sc2tog. ch1, turn (19sc)
Row 38: Sc19. ch1, turn
Row 39: Sc2tog, sc15, sc2tog. ch1, turn (17sc)
Rows 40 - 49: (10 rounds) Sc17. ch1, turn
Row 50: Sc, hdc2, dc3. ch2, turn
Row 51: Hdc2, sc, ch1, slip1
Fasten off
Rejoin yarn to row 49 in the 6th st from this section you have just made (as shown below)

Row 50: Ch2, dc3, hdc2, sc, turn
Row 51: Slip3, ch1, sc, hdc2
Fasten off
Sew the shoulder seams together


For the sleeves (make 2):
ch18
Round 1: sc in the first chain st you made, sc in every following vhain st to make a loop.
Round 2: slip the next st, ch1, turn, sc in the slip st, sc17, slip the first st of the round you just made
Rounds 3 - 17: (15 rounds) ch1, turn, sc in the slipped st, sc17, slip the first st of this round
Row 18: turn, slip 2, ch1, sc14. ch1, turn
Row 19: sc2tog, sc10, sc2tog. ch1, turn (12sc)
Row 20: sc in each st
Row 21: sc2tog, sc8, sc2tog. ch1 turn (10sc)
Rows 22 - 23: (2 rows) sc in each st. ch1, turn
Row 24: sc2tog, sc6, sc2tog (8sc)
Row 25: sc2tog, sc4, sc2tog (6sc)
Fasten off
Sew these to the armholes
For the collar:
Join yarn to the bottom left-hand corner of the coat, then sc112 up and around the neckline of the coat to the bottom right-hand corner (as shown below)


All of the following sections are made by crocheting along this row of stitches, perpendicular to the direction of stitching for the rest of the coat.
join yarn to the back loop of the 31st st from the bottom right- hand corner of the coat (the back loop looking it from the inside of the coat (i.e. it is the outer loop of the stitch))
Row 1: sc13 (in the back loop of each st) up the coat. ch1, turn
Row 2: sc2tog, sc6, slip1, ch1, turn
Row 3: skip 1, slip 2, sc2, sc2tog.
Fasten off
attach yarn to the back loop of the last st you crocheted into when you did the sc13 into the back loops on the previous section

Row 1: in the back loop only of each st sc28 around the back of the neck. ch1, turn
Row 2: sc28. ch1, turn
Row 3: sc2tog ,sc4, 2sc in each of the next 2sts st, sc12, 2sc in each of the next 2sts, sc4, sc2tog. ch1, turn (30sc)
Row 4: sc2tog, sc6, 2sc in each of the next 2sts, sc10, 2sc in each of the next 2sts, sc6, sc2tog (32sc)
Fasten off
attach yarn to the back loop of the same st you crocheted into last when you did sc28 in the back loops on the previous section (as shown below)

Row 1: in the back loop only of each st sc13. turn
Row 2: slip 5, sc6, sc2tog. ch1, turn
Row 3: sc2tog, sc2, slip1
Fasten off
Sew in loose ends.

ch7
Row 1: 3sc in the 2nd loop from hook, sc4, 3sc. ch1, turn (10sc)
Row 2: 2sc in each of the first 2sts, sc6, 2sc in each of the last 2sts (14sc)
Rows 3 - 13: (11 rows) ch1, turn, sc16
Fasten off
Don't yet sew this pocket to the coat
For the scarf:
With a 2mm hook and yellow 4ply yarn ch6
Row 1: sc in the 2nd loop from hook, sc in the next 4 loops (5sc)
Rows 2 - 131 (130 rows) : ch1, turn, sc5
These 131 rows must be done in the following colours, with the number in front of each colour representing how many rows of that colour are in each block.
i.e. Rows 1 and 2 should be done in yellow. You should then fasten off and fasten on the red 4ply yarn. Row 3 should be done in red yarn. The red should then be fastened off and the (dark) grey 4ply yarn fastened on. Rows 4 - 8 should be done in this grey, which should then be fastened off ect.
2 yellow
1 red
5 grey
2 cream
2 purple
3 beige
2 yellow
2 grey
3 red
8 green
3 yellow
1 cream
2 purple
1 red
3 grey
2 beige
6 cream
1 purple
3 green
3 yellow
5 red
2 purple
2 cream
7 beige
1 purple
3 red
1 yellow
2 grey
3 green
1 purple
7 cream
2 red
2 grey
2 yellow
6 green
2 purple
1 beige
3 red
4 cream
1 yellow
3 green
2 purple
3 red
2 yellow
2 beige
6 cream
1 purple
Fasten off
For the tassels:
Cut a strip of cardboard approx. 3cm in width. Wind each of the 7 colours in the scarf around this board 4 - 5 times, then cut all of these loops at each end, leaving you with four or five 6cm long strips of each of your colours.
Attach these to the ends of your scarf, attaching approximately half to each end. Attach them by inserting your hook through one of the stitches on the end of the scarf, folding each strand in half, pulling the loop through slightly and then threading the two ends of the folded strand through the loop, pulling it tight to keep it in place. This is the same way as how you would usually make amigurumi hair.
Attach 3 - 4 to each of the five stitches on each end of the scarf

For the boots (make 2):
With a 2mm hook and black dk yarn ch6
Round 1: sc in the 2nd chain st from hook. Sc in the next 3 chain sts, 3sc in the last chain st (the first one you made). sc in the back loop of each of the previous 3 chain sts you crocheted into in turn, then 2sc in the back loop of the first chain st you crocheted into (12sc)
Round 2: 2sc in the first st, sc3, 2sc in each of the next 3sts, sc3, 2sc in each of the next 2sts (18sc)
Fasten off neatly
Join yarn to the loop behind the back loop of the 7th st after the new st you made when you fastened off neatly
Round 3: sc in the loop behind the back loop of each st
Round 4: sc in both loops of each st
Round 5: sc9, sc2tog, sc7 (17sc)
Round 6: sc8, sc4tog, sc5 (14sc)
Round 7: sc6, sc in the front loop only of the next st, fasten off
Fasten on to the back loop of the same st, sc in the back loop of tjhis st, sc2 (in both loops), sc in the back loop only of the next st. ch1, turn
Rows 8 - 9: (2 rows) sc4. ch1, turn
Row 10: sc4
Fasten off
rejoin yarn to round 6 to the front loop of the second st you crocheted into only the back loop of.
Row 7: sc in the front loop of this st, sc11 (in both loops), fasten off (12sc)
Row 8: rejoin yarn to both loops of the first st of the last row you made. sc10, sc2tog, fasten off (11sc)
Row 9: rejoin yarn to the first st of the last row you made. sc2tog, sc9, fasten off (10sc)
Row 10: rejoin yarn to the first st of the last row you made. sc4, fasten off neatly.
Sew in loose ends
For the inhaler:
with 3 strands of dark blue embroidery thread and a 0.8mm hook ch4
Round 1: sc in the 2nd chain st from hook. Sc in the next chain st, 3sc in the last chain st (the first one you made). sc in the back loop of the prevois chain st you crocheted into, then 2sc in the back loop of the first chain st you crocheted into (8sc)
Fasten off neatly
Fasten on to the back loop of one of these sts
Round 2: sc8 in the back loops only. slip the first st of this round.
Round 3: ch1, sc8 around. slip the first st of this round
Fasten off neatly
Rejoin 3 strands of light blue embroidery thread to one of the stitches
Round 4: sc8 around, slip the first st of this round, fasten off
Stuff this section firmly
With 3 strands of light blue embroidery thread make a magic loop with 8sc
Round 1: 2sc in each of the first 3sts, sc, 3sc in the next st, sc, 3sc in the next st, sc (15sc)
Fasten off neatly
Rejoin to the back loop of the 5th st before the 'new' st you made when you fastened off neatly
Round 2: sc15 in the back loops only, slip the first st of this round
Rounds 3 - 9: (7 rounds) ch1, sc15, slip the first st of this round
Round 10: sc in the st after the slipped st, sc4, slip3, sc4, hdc4, slip1.
Fasten off
Stuff firmly
With 2 strands of silver embroidery thread make a magic loop with 6sc
Round 1: 2sc in each st (12sc)
Fasten off neatly
Attach white embroidery thread to one of these stitches
Rounds 2 - 5: (4 rounds) sc in each st
Fasten off
Sew the white/silver section to the open end of the light blue section, so that the stitching of the blue section is showing. Use thread to shape the blue section so that it matches the shape made by the groove on the bottom (straight along one side then curved). I did this by pulling in the neighbouring stitches along the line I wanted to be straight (Image 1/2)
After this, sew the small section onto the bottom of the flat side of the inhaler (Image 3)
 |
| Image 1 |
 |
| Image 2 |
 |
| Image 3 |

After you've done this, sew the pocket of the labcoat onto the left-hand side of the coat (looking at it from the front), making sure that the inhaler will fit inside easily.
I hope you have enjoyed this pattern. If there are any bits you are unsure about, please don't hesitate to ask me, wither in the comments below or on my instagram or ravelry pages. As always I am open to suggestions of patterns you would like me to make. I have lots of free time over the next few weeks so would love some ideas of what to make.
Please don't re-post this pattern or claim it as your own. Please just use finished products for personal use, since whilst I don't personally have a problem with you selling what you've made, the BBC probably will, so I would recommend you don't. I do, however, have lots of patterns that you are very welcome to sell (anything that isn't of a well known character)


