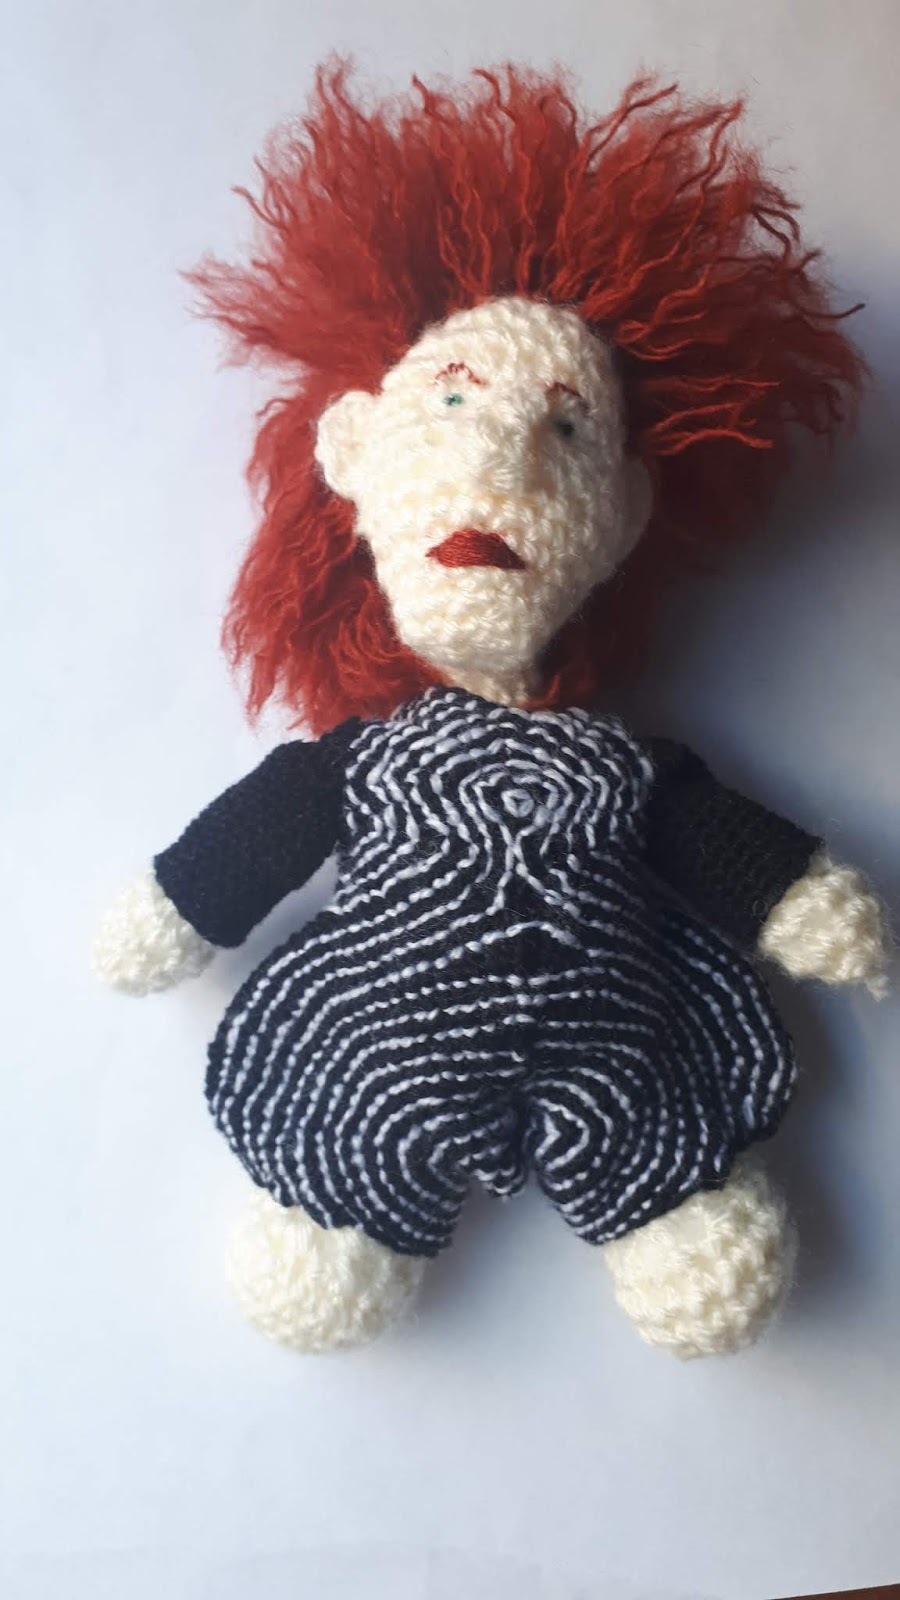
This pattern is part of a series I've been making to celebrate pride month. The figure is made to be the same dimensions as my 'little animals' collection, so the clothes will fit onto any of the animals in that collection. (A full list can be found here, where you can also find details of all the other people and characters I have made)


 |
| Image courtesy of New York Times |
Difficulty:

Medium
You will need:
- A 1mm crochet hook
- A 2.5mm crochet hook (use this unless otherwise specified)
- dk yarn in beige and black
- black and white #10 crochet cotton (although you could also use white 2ply yarn instead)
- reddish brown 4ply yarn
- embroidery thread in black, white, turquoise (DMC number: 992), and reddish-brown (I used DMC number: 3777 but you should try to match it as closely to the hair colour you're using as possible.)
- A small hook and eye (optional)
- A pet brush
- Toy stuffing
- A darning needle
- A pair of scissors
Note:
- 'fasten off neatly' refers to a special way of fastening off which is neater and makes it easier to see where you should be crocheting on the next round (also known as invisible fastening off). This involves pulling up your yarn through your stitch, threading the yarn underneath the second stitch from where you pulled your yarn up, then threading your yarn back through the top of this stitch and down through the back of the work. There is a very helpful site that explains it clearly found here. Just make sure when you do this that you thread your needle through the SECOND stitch after the last stitch you made, otherwise you will end up with an extra stitch which may mean that all of the following rounds are out of line with each other.
- This pattern includes the back-to-front single crochet stitch (bfsc). A video to show you how to do this can be found here. It's pretty simple but if you can't work it out you can just use a regular single crochet stitch, but this will give it a slightly different look..
- The 'loop behind the back loop' refers to the '3rd loop' in the diagram below.


For the body :
With beige make a magic loop with 6sc
Round 1: 2sc in each st (12sc)
Round 2: sc in the first st, 2sc in the next st, rep to end (18sc)
Round 3: sc in the first 2 sts, 2sc in the next st, rep to end(24sc)
Rounds 4 - 9: (6 rounds) sc in each st (24sc)
Round 10: sc in the first 2 sts, sc2tog, rep to end (18sc)Round 11: sc in the first st, sc2tog, rep to end (12sc)
Round 12: sc in the first st, sc2tog, rep to end (8sc)
Rounds 13 - 15: (3 rounds) sc in each st
sc, hdc3, sc, slip3
sc, ch1, hdc3, ch1, sc, slip1
Fasten off
Stuff
Once you've done this I would recommend checking that your tension is correct. The body should be just under 4cm wide. If this is not the case you may wish to change your hook size accordingly, and re-make this section to ensure that the clothes will fit properly when you make them.
For the arms (make 2):Rounds 13 - 15: (3 rounds) sc in each st
sc, hdc3, sc, slip3
sc, ch1, hdc3, ch1, sc, slip1
Fasten off
Stuff
Once you've done this I would recommend checking that your tension is correct. The body should be just under 4cm wide. If this is not the case you may wish to change your hook size accordingly, and re-make this section to ensure that the clothes will fit properly when you make them.
With beige make a magic loop with 6sc
Round 1: sc in the first st, 2sc in the next st, rep to end (9sc)
Rounds 2 - 3: (2 rounds) sc in each st (9sc)
Round 4: sc in the first st, sc2tog, rep to end (6sc)
Round 5: sc in each st
Fasten off black yarn and fasten on grey yarn.
Rounds 6 - 9: (4 rounds) sc in each st (6sc)
Fasten off
For the legs (make 2):
With beige make a magic loop with 6sc
Round 1: 2sc in each st (12sc)
Round 2: sc in the first 3 sts, 2cs in the next st, rep to end (15sc)
Rounds 3- 4: (2 rounds) sc in each st (15sc)
Round 5: sc2tog 3 times, sc in the last 9 sts (12sc)
Round 6: sc in the first 2 sts, sc2tog, rep to end (9sc)
Fasten off. Fasten on in grey yarn
Rounds 7 - 11: (5 rounds) sc in each st (9sc)
Rounds 3- 4: (2 rounds) sc in each st (15sc)
Round 5: sc2tog 3 times, sc in the last 9 sts (12sc)
Round 6: sc in the first 2 sts, sc2tog, rep to end (9sc)
Fasten off. Fasten on in grey yarn
Rounds 7 - 11: (5 rounds) sc in each st (9sc)
Fasten off
Stuff the legs and sew them to the underside of the body
For the head:
with beige ch4
Round 1: sc8 around
Round 2: (sc3, make 2sc in the next st) twice (10sc)
Round 3: sc4, make 2sc in the next st, sc3, make 2sc in the next st, sc (12sc)
Round 4: sc4, make 2sc in the next st, sc5, make 2sc in the next st, sc (14sc)
Round 5: sc5, make 2sc in the next st, sc5, make 2sc in the next st, sc2 (16sc)
Round 6: sc6, make 2sc in the next st, sc, make 2sc in the next st, sc7 (18sc)
Round 7: sc6, make 2sc in the next st, sc3, make 2sc in the next st, sc7 (20sc)
Rounds 8 - 12: (5 rounds) sc in each st
Round 13: (sc4, sc2tog 3 times)twice (14sc)
Round 14: sc2, sc2tog 3 times
Stuff firmly
Round 15: sc2tog 3 times
Fasten off
The fastened off end is on the left-hand side of the head (i.e. on the right when the head is facing you)

For the nose:
with beige make a magic loop with 1sc. ch1, turn
Row 1: sc in this st. ch1, turn
Row 2: make 3sc in this st
Fasten off
Sew this to the face

You should now create eye sockets by pulling back sections of the crochet either side of the nose.

For the ears:
With beige ch3
Row 1: make 2sc in the 2nd loop from hook, then make 3sc in the next chain st
Fasten off
Sew to the sides of the head


For the eyes:
embroider the whites using white embroidery thread

Embroider the irises over the top using turquoise

Embroider the pupils over the top of the irises. Make sure that the left one is significantly larger than the right one.

Use white embroidery thread to add a highlight to each eye, then use black thread to outline parts of the eyes (When I made it I didn't add the outlines until the very end hence why the face is a lot further on in the image below)
For the hair:
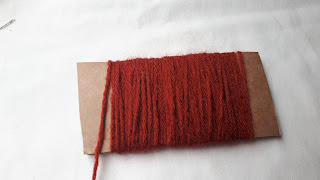
cut a section of cardboard approx. 4.5cm wide and wind the reddish-brown yarn around it repeatedly.
Snip down one side of this so you get a number of 9cm long stands.

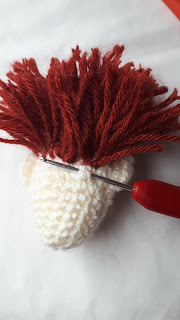
Attach these to the head by folding each strand in half in turn, pulling the looped end through a stitch in the head, then passing the loose ends through the loop you made to seccure it (as shown below.)Attach the strands all over the top, sides, and back of the head.


At some point you will need to sew the head to the body so that you can attach the hair a little way down the neck (and to make sure you haven't attached the hair too far down the head.)


Once you have covered the hair, take the pet brush and brush the hair until it is smooth and fluffy.


For the lips:
embroider the lips in place using the reddish-brown embroidery thread, as shown below.


For the jumpsuit:
Use a 1mm hook and black #10 crochet cotton
For the sleeves:
ch16
Rounds 1 - 10: (10 rounds) sc in each st
Round 11: sc in each st. ch1, turn
Row 12: bfsc11. ch1, turn
Row 13: sc3tog, sc5, sc3tog. ch1, turn
Row 14: bfsc3tog, bfsc, bfsc3tog
Row 15: sc3tog
Fasten off
At this point you may want to check that the sleeves will fit onto your doll. They will likely be tight and not particularly easy to get on, but if they are way too big or small you may wish to adjust the hook size you're using.
For the body of the jumpsuit:
Make a magic loop with 6sc
Round 1: (sc2, hdc in the same st you last crocheted into, sc in this same st, sc in the next st) twice (10sts)
Round 2: sc3, hdc in the same st you last crocheted into, ch1, sc in the same st, sc in the next 5sts, ch1, hdc in the same st you just crocheted into, sc in this same st, sc in each of the next 2sts (16sts (including chain sts))
Round 3: sc4, hdc in the same st, ch1, sc in the same st, sc in the next chain st, sc, hdc4, sc3, ch1, hdc in the same st, sc in the same st, sc in the next 3sts (22sts)
Round 4: sc5, hdc in the same st, ch1, sc in the same st, sc4, hdc4, sc5, ch1, hdc in the same st, sc in the same st, sc in the next 4sts (28sts)
Round 5: sc3, (sc, make 2sc in the next st) 3 times, sc3, hdc4, sc3, (make 2sc in the first st, sc) 3 times, sc3 (34sts)
Row 5.5: sc4, (sc, make 2sc in the next st) 3 times, sc4, hdc. ch1,turn (the purpose of this mini-row is to alter where the subsequent rows begin)
Row 6: bfsc4, (make 2bfsc in the first st, bfsc2) 3 times, bfsc10, (bfsc, make 2bfsc in the next st) 3 times, bfsc5. ch1, turn (40sts)
Row 7: hdc, sc3, (make 2sc in the first st, sc2) 3 times, sc12, (sc2, make 2sc in the next st) 3 times, sc4, hdc, make 2hdc in the last st. ch1, turn (47sts)
Row 8: bfsc8, (make 2bfsc in the first st, bfsc2) 3 times, bfsc2, slip3, bfsc8, (bfsc2, make 2bfsc in the next st) 3 times, bfsc6. ch2, turn (53sts)
Row 9: make 2hdc in the first st, hdc, sc6, (make 2sc in the first st, sc2) 3 times, sc2, slip13, sc2, (sc2, make 2sc in the next st) 3 times, sc6, hdc3, make 2hdc in the last st. ch1, turn (61sts)
Row 10: bfsc13, (make 2bfsc in the first st, bfsc2) 3 times, slip1. ch1, turn (26sts)
Row 11: skip the slipped st, slip2, (sc3, make 2sc in the next st) 3 times, sc8, hdc2, make 2dc in the last st. ch1, turn (29sts)
Row 12: bfsc11, (make 2bfsc in the first st, bfsc3) 3 times, bfsc2, slip1. ch1, turn (29sts)
Row 13: skip the slipped st, slip2, (sc4, make 2sc in the next st) 3 times, sc9, hdc2, dc into the same st you last crocheted into. ch1, turn (32sts)
Row 14: bfsc15, (make 2bfsc in the first st, bfsc4) 3 times, slip1, ch1, turn (34sts)
Row 15: skip the first slipped st, slip2, (sc4, make 2sc in the next st) 3 times, sc15, make 2sc in the last st. ch1, turn (38sts)
Row 16: bfsc14, slip2. ch1, turn (16sts)
Row 17: skip the first slipped st, slip2, hdc6, slip7. ch1, turn (15sts)
Row 18: bfsc13. ch1, turn (13sts)
Row 19: sc2tog, sc3, hdc2, sc6 . ch1, turn (12sts)
Row 20: bfsc9. ch1, turn (9sts)
Row 21: hdc4, sc2, slip1. ch1, turn (9sts)
Row 22: skip the slipped st, slip1, bfsc, ch1, hdc4. ch1, turn
Row 23: sc2, hdc2. ch1, turn
Row 24: bfsc4
Fasten off
Rejoin yarn to the first st of row 9, as shown below:


Row 10: sc13, (make 2sc in the first st, sc2) 3 times, slip1. ch1, turn (26sts)
Row 11: skip the slipped st, slip2, (bfsc3, make 2bfsc in the next st) 3 times, bfsc11. ch2, turn (29sts)
Row 12: make 2dc in the first st, hdc2, sc8, (make 2sc in the first st, sc3) 3 times, sc2, slip1. ch1, turn (30sts)
Row 13: skip the slipped st, slip2, (bfsc4, make 2bfsc in the next st) 3 times, bfsc12. ch2, turn (32sts)
Row 14: dc, then hdc in the same st. hdc in the next st, sc13, (make 2sc in the first st, sc4) 3 times, slip1, ch1, turn (35sts)
Row 15: skip the slipped st, slip2, (bfsc4, make 2bfsc in the next st) 3 times, bfsc15, make 2bfsc in the last st. ch1, turn (37sts)
Row 16: sc7, hdc6, sc, slip2. ch1, turn (16sts)
Row 18: skip the first slipped st, slip2, ch1, bfsc13. ch1, turn
Row 19: slip7, sc6. ch1, turn (13sts)
Row 20: bfsc2tog, bfsc11 (12sts)
Row 21: sc6, 2hdc, sc4. ch1, turn
Row 22: slip3, ch1, hdc4, bfsc2, slip1. ch1, turn (7sts)
Row 23: skip the first slipped st, slip1, sc, ch1, hdc4. ch1, turn
Row 24: bfsc2, hdc2. ch1, turn
Row 25: sc4
Fasten off
You now need to embroider some of the stripes onto the leg sections using white #8 crochet cotton. You should follow the lines between the rows of crochet when you embroider, as shown below. Sew the first 12 of these stripes, then move onto the next section.


Before you sew any more stripes on you will need to sew the two body sections together and make the collar
Sew the shoulder seams of each of these sections, as well as the outer leg seam. Sew the sleeves to the armholes, then sew the front centre seam. Leave the back centre seam half open so that you can still get the jumpsuit on and off.


For the collar:
Join the yarn to the top back left-hand corner, as shown below.

Row 1: sc38 around the neckline. ch1, turn
Row 2: bfsc2tog 3 times, bfsc7, bfsc2tog 6 times, bfsc7, bfsc2tog 3 times (26sts)
Row 3: (sc5, sc2tog, sc4, sc2tog) twice (22sc)
Row 5: (bfsc4, bfsc2tog, bfsc3, bfsc2tog) twice (18sc)
Row 6: sc in each st
Fasten off
You now need to sew the remaining stripes onto the jumpsuit. Use the images below as a reference. Sew the stripes on the front and back of the body of the outfit first, then sew the parallel vertical stripes onto the sleeves.


For the boots:
For the soles:
With a 2mm hook and black dk yarn ch6
Round 1: sc in the 2nd loop from hook and the next 3 chain sts. Make 3sc in the last chain st (the first one you made), then sc in the back loop of each of the 3 chain sts you crocheted into previously in turn. Make 2sc in the back of the first chain st you crocheted into. (12sc)
Round 2: make 2sc in the first st,sc3, make 2sc in each of the next 3 sts, sc3, make 2sc in both of the last 2 sts. (18sc)
Fasten off neatly
Rejoin yarn to the back loop of one of these sts
Round 3: sc in the back loop of this st and the next 17sts
Round 4: sc in each st
Fasten off
Sew to the sole of the shoe, stuffing firmly as you do so.
That's all from this pattern! I hope you have enjoyed it - if you have any questions about this or any of my other patterns please feel free to contact me, either by leaving a comment below or via my Ravelry or Instagram pages and I'll be happy to help. You are very welcome to sell finished products but I do ask that you don't re-post this pattern or claim it as your own. Thank you!!!


Stuff the legs and sew them to the underside of the body
For the head:
with beige ch4
Round 1: sc8 around
Round 2: (sc3, make 2sc in the next st) twice (10sc)
Round 3: sc4, make 2sc in the next st, sc3, make 2sc in the next st, sc (12sc)
Round 4: sc4, make 2sc in the next st, sc5, make 2sc in the next st, sc (14sc)
Round 5: sc5, make 2sc in the next st, sc5, make 2sc in the next st, sc2 (16sc)
Round 6: sc6, make 2sc in the next st, sc, make 2sc in the next st, sc7 (18sc)
Round 7: sc6, make 2sc in the next st, sc3, make 2sc in the next st, sc7 (20sc)
Rounds 8 - 12: (5 rounds) sc in each st
Round 13: (sc4, sc2tog 3 times)twice (14sc)
Round 14: sc2, sc2tog 3 times
Stuff firmly
Round 15: sc2tog 3 times
Fasten off
The fastened off end is on the left-hand side of the head (i.e. on the right when the head is facing you)

For the nose:
with beige make a magic loop with 1sc. ch1, turn
Row 1: sc in this st. ch1, turn
Row 2: make 3sc in this st
Fasten off
Sew this to the face

You should now create eye sockets by pulling back sections of the crochet either side of the nose.

For the ears:
With beige ch3
Row 1: make 2sc in the 2nd loop from hook, then make 3sc in the next chain st
Fasten off
Sew to the sides of the head


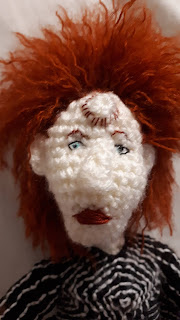
For the eyes:
embroider the whites using white embroidery thread
Embroider the irises over the top using turquoise

Embroider the pupils over the top of the irises. Make sure that the left one is significantly larger than the right one.

Use white embroidery thread to add a highlight to each eye, then use black thread to outline parts of the eyes (When I made it I didn't add the outlines until the very end hence why the face is a lot further on in the image below)

cut a section of cardboard approx. 4.5cm wide and wind the reddish-brown yarn around it repeatedly.
Snip down one side of this so you get a number of 9cm long stands.


Attach these to the head by folding each strand in half in turn, pulling the looped end through a stitch in the head, then passing the loose ends through the loop you made to seccure it (as shown below.)Attach the strands all over the top, sides, and back of the head.


At some point you will need to sew the head to the body so that you can attach the hair a little way down the neck (and to make sure you haven't attached the hair too far down the head.)


Once you have covered the hair, take the pet brush and brush the hair until it is smooth and fluffy.


For the lips:
embroider the lips in place using the reddish-brown embroidery thread, as shown below.


To finish off the head:
embroider the eyebrows using a single strand of reddish-brown embroidery thread.

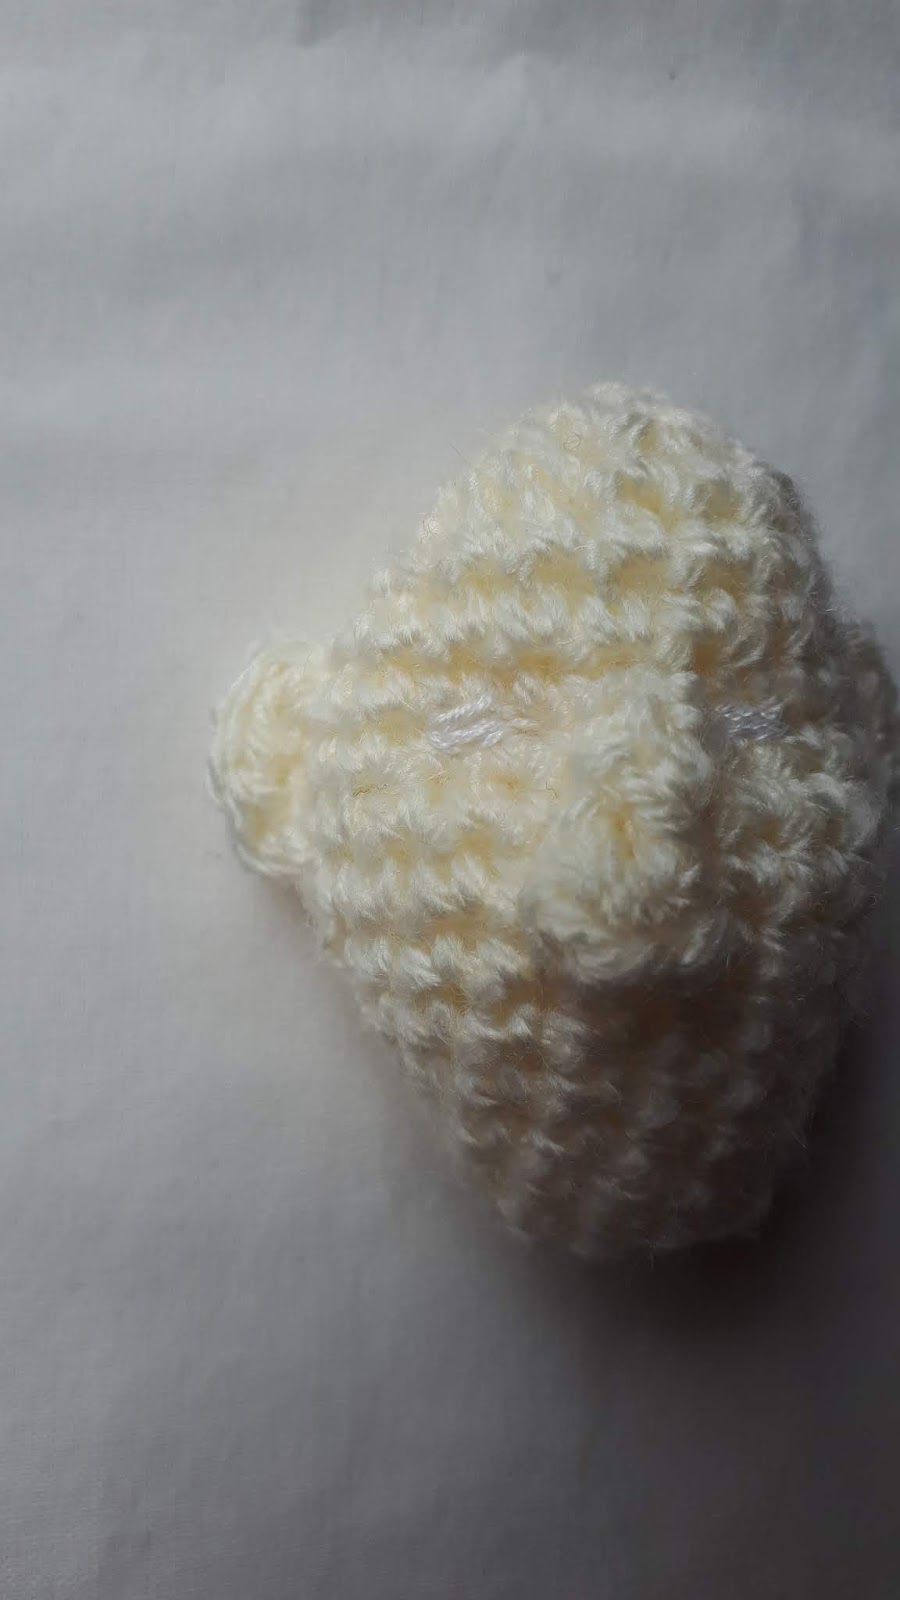
You next need to add the circular patch to the forehead. With beige yarn and a 2.5mm hook make a magic loop with 6sc. Fasten off
Sew this to the head, then add stitches around the edge using red embroidery thread, as shown below.

For the jumpsuit:
Use a 1mm hook and black #10 crochet cotton
For the sleeves:
ch16
Rounds 1 - 10: (10 rounds) sc in each st
Round 11: sc in each st. ch1, turn
Row 12: bfsc11. ch1, turn
Row 13: sc3tog, sc5, sc3tog. ch1, turn
Row 14: bfsc3tog, bfsc, bfsc3tog
Row 15: sc3tog
Fasten off
At this point you may want to check that the sleeves will fit onto your doll. They will likely be tight and not particularly easy to get on, but if they are way too big or small you may wish to adjust the hook size you're using.
For the body of the jumpsuit:
Make a magic loop with 6sc
Round 1: (sc2, hdc in the same st you last crocheted into, sc in this same st, sc in the next st) twice (10sts)
Round 2: sc3, hdc in the same st you last crocheted into, ch1, sc in the same st, sc in the next 5sts, ch1, hdc in the same st you just crocheted into, sc in this same st, sc in each of the next 2sts (16sts (including chain sts))
Round 3: sc4, hdc in the same st, ch1, sc in the same st, sc in the next chain st, sc, hdc4, sc3, ch1, hdc in the same st, sc in the same st, sc in the next 3sts (22sts)
Round 4: sc5, hdc in the same st, ch1, sc in the same st, sc4, hdc4, sc5, ch1, hdc in the same st, sc in the same st, sc in the next 4sts (28sts)
Round 5: sc3, (sc, make 2sc in the next st) 3 times, sc3, hdc4, sc3, (make 2sc in the first st, sc) 3 times, sc3 (34sts)
Row 5.5: sc4, (sc, make 2sc in the next st) 3 times, sc4, hdc. ch1,turn (the purpose of this mini-row is to alter where the subsequent rows begin)
Row 6: bfsc4, (make 2bfsc in the first st, bfsc2) 3 times, bfsc10, (bfsc, make 2bfsc in the next st) 3 times, bfsc5. ch1, turn (40sts)
Row 7: hdc, sc3, (make 2sc in the first st, sc2) 3 times, sc12, (sc2, make 2sc in the next st) 3 times, sc4, hdc, make 2hdc in the last st. ch1, turn (47sts)
Row 8: bfsc8, (make 2bfsc in the first st, bfsc2) 3 times, bfsc2, slip3, bfsc8, (bfsc2, make 2bfsc in the next st) 3 times, bfsc6. ch2, turn (53sts)
Row 9: make 2hdc in the first st, hdc, sc6, (make 2sc in the first st, sc2) 3 times, sc2, slip13, sc2, (sc2, make 2sc in the next st) 3 times, sc6, hdc3, make 2hdc in the last st. ch1, turn (61sts)
Row 10: bfsc13, (make 2bfsc in the first st, bfsc2) 3 times, slip1. ch1, turn (26sts)
Row 11: skip the slipped st, slip2, (sc3, make 2sc in the next st) 3 times, sc8, hdc2, make 2dc in the last st. ch1, turn (29sts)
Row 12: bfsc11, (make 2bfsc in the first st, bfsc3) 3 times, bfsc2, slip1. ch1, turn (29sts)
Row 13: skip the slipped st, slip2, (sc4, make 2sc in the next st) 3 times, sc9, hdc2, dc into the same st you last crocheted into. ch1, turn (32sts)
Row 14: bfsc15, (make 2bfsc in the first st, bfsc4) 3 times, slip1, ch1, turn (34sts)
Row 15: skip the first slipped st, slip2, (sc4, make 2sc in the next st) 3 times, sc15, make 2sc in the last st. ch1, turn (38sts)
Row 16: bfsc14, slip2. ch1, turn (16sts)
Row 17: skip the first slipped st, slip2, hdc6, slip7. ch1, turn (15sts)
Row 18: bfsc13. ch1, turn (13sts)
Row 19: sc2tog, sc3, hdc2, sc6 . ch1, turn (12sts)
Row 20: bfsc9. ch1, turn (9sts)
Row 21: hdc4, sc2, slip1. ch1, turn (9sts)
Row 22: skip the slipped st, slip1, bfsc, ch1, hdc4. ch1, turn
Row 23: sc2, hdc2. ch1, turn
Row 24: bfsc4
Fasten off
Rejoin yarn to the first st of row 9, as shown below:


Row 10: sc13, (make 2sc in the first st, sc2) 3 times, slip1. ch1, turn (26sts)
Row 11: skip the slipped st, slip2, (bfsc3, make 2bfsc in the next st) 3 times, bfsc11. ch2, turn (29sts)
Row 12: make 2dc in the first st, hdc2, sc8, (make 2sc in the first st, sc3) 3 times, sc2, slip1. ch1, turn (30sts)
Row 13: skip the slipped st, slip2, (bfsc4, make 2bfsc in the next st) 3 times, bfsc12. ch2, turn (32sts)
Row 14: dc, then hdc in the same st. hdc in the next st, sc13, (make 2sc in the first st, sc4) 3 times, slip1, ch1, turn (35sts)
Row 15: skip the slipped st, slip2, (bfsc4, make 2bfsc in the next st) 3 times, bfsc15, make 2bfsc in the last st. ch1, turn (37sts)
Row 16: sc7, hdc6, sc, slip2. ch1, turn (16sts)
Row 18: skip the first slipped st, slip2, ch1, bfsc13. ch1, turn
Row 19: slip7, sc6. ch1, turn (13sts)
Row 20: bfsc2tog, bfsc11 (12sts)
Row 21: sc6, 2hdc, sc4. ch1, turn
Row 22: slip3, ch1, hdc4, bfsc2, slip1. ch1, turn (7sts)
Row 23: skip the first slipped st, slip1, sc, ch1, hdc4. ch1, turn
Row 24: bfsc2, hdc2. ch1, turn
Row 25: sc4
Fasten off
You now need to embroider some of the stripes onto the leg sections using white #8 crochet cotton. You should follow the lines between the rows of crochet when you embroider, as shown below. Sew the first 12 of these stripes, then move onto the next section.


Before you sew any more stripes on you will need to sew the two body sections together and make the collar
Sew the shoulder seams of each of these sections, as well as the outer leg seam. Sew the sleeves to the armholes, then sew the front centre seam. Leave the back centre seam half open so that you can still get the jumpsuit on and off.


For the collar:
Join the yarn to the top back left-hand corner, as shown below.

Row 1: sc38 around the neckline. ch1, turn
Row 2: bfsc2tog 3 times, bfsc7, bfsc2tog 6 times, bfsc7, bfsc2tog 3 times (26sts)
Row 3: (sc5, sc2tog, sc4, sc2tog) twice (22sc)
Row 5: (bfsc4, bfsc2tog, bfsc3, bfsc2tog) twice (18sc)
Row 6: sc in each st
Fasten off
You now need to sew the remaining stripes onto the jumpsuit. Use the images below as a reference. Sew the stripes on the front and back of the body of the outfit first, then sew the parallel vertical stripes onto the sleeves.
 |
| Image courtesy of Victoria and Albert museum, London. |


After you've done this you need to decide whether you want to be able to take the outfit on and off your doll. If you aren't bothered then you can sew up the back seam, otherwise you should sew a hook and eye to the back neckline to fasten it.

With black 4ply yarn and a 2mm hook ch7
Round 1: sc in the 2nd loop from hook, sc in each of the next 4 chain sts, 3sc in the next chain st (the first one you made), sc in the back of each of the previous 4 chain sts you crocheted into, 2sc in the back of the first chain st you crocheted into (14sc)
Round 2: 2sc in the first st, sc4, 2sc in each of the next 3 sts, sc4, 2sc in each of the next 2sts (20sc)
Round 3: sc, 2sc in the next st, sc5, (2sc in the first st, sc in the next st) 3 times, sc4, 2sc in the following st, sc, 2sc in the last st(26sc)
Fasten off neatly
Fasten on to loop behind back loop of 2nd st after 'new' st you made when fastening off neatly
Round 4: sc26, crocheting in the loop behind the back loop of each st
Round 5: sc26
Round 6: sc6, sc2tog, sc3tog, sc2tog, sc13 (22sc)
Round 7: sc5, sc2tog, sc, sc2tog, sc12 (20sc)
Round 8: sc20
Round 9: sc7, sc2tog, sc11 (19sc)
Rounds 10 - 12: (3 rounds) sc in each st
Fasten off
For the soles:
With a 2mm hook and black dk yarn ch6
Round 1: sc in the 2nd loop from hook and the next 3 chain sts. Make 3sc in the last chain st (the first one you made), then sc in the back loop of each of the 3 chain sts you crocheted into previously in turn. Make 2sc in the back of the first chain st you crocheted into. (12sc)
Round 2: make 2sc in the first st,sc3, make 2sc in each of the next 3 sts, sc3, make 2sc in both of the last 2 sts. (18sc)
Fasten off neatly
Rejoin yarn to the back loop of one of these sts
Round 3: sc in the back loop of this st and the next 17sts
Round 4: sc in each st
Fasten off
Sew to the sole of the shoe, stuffing firmly as you do so.


