
This skull is the first in a series of blog posts which link together to result in a 1/5 size anatomically correct skeleton. The second installment is for the hands, and this can be pattern can be found here.
This skull is female (due to the structure of the jawbone and forehead)
Difficulty:

Medium
- white Anchor size 8 crochet cotton (use this unless otherwise specified)
- A 0.8mm crochet hook (use this unless otherwise specified)
- Toy stuffing
- A darning needle
- A 0.6mm crochet hook
- regular white sewing cotton
- A regular sewing needle
Note:

- To make my patterns easier to read, in most cases instead of writing'sc in the next ... sts' I have just written 'sc...' Eg. 'sc12' means 'sc in the next 12 sts'
- 'fasten off neatly' refers to a special way of fastening off which is neater and makes it easier to see where you should be crocheting on the next round (also known as invisible fastening off). This involves pulling up your yarn through your stitch, threading the yarn underneath the second stitch from where you pulled your yarn up, then threading your yarn back through the top of this stitch and down through the back of the work. There is a very helpful site that explains it clearly found here. Just make sure when you do this that you thread your needle through the SECOND stitch after the last stitch you made, otherwise you will end up with an extra stitch which may mean that all of the following rounds are out of line with each other.

For the skull:
ch5
Round 1: Sc in the 2nd loop from hook, then sc in each of the next 2 chain sts. Make 3sc in the last chain st (the first one you made), then sc into the backs of the previous 2 chain sts you crocheted into. Finally, make 2sc into the back of the first chain st you crocheted into (10sc)
Round 2: 2sc in the first st, 2hdc in the next st, sc2, 2sc in each of the following 2 sts, sc2, 2hdc in the next st, 2sc in the next st (16sc)
Round 3: sc in the first 2 sts, 2hdc in the next st, hdc, sc3, 2sc in each of the next 2 sts, sc3, hdc, 2hdc in the following st, sc, 2sc in the last st (21sc)
Round 4: 2sc in the first st, sc, hdc2, sc5, 2sc in the next st, sc, 2sc in the following st, sc5, hdc2, sc2 (24sts)
Round 5: 2sc in each of the first 2sts, sc, hdc2, sc7, 2sc in the next st, sc7, hdc2, sc2 (27sc)
Round 6: Sc5, hdc2, sc7, 2hdc in each of the next 2sts, sc7, hdc2, sc2 (29sts)
Round 7: 2sc in the first st, sc, 2sc in the next st, sc3, hdc, 2hdc in the next st, hdc, sc6, 2hdc in each of the following 2sts, sc6, hdc, 2hdc in the next st, hdc, sc3 (35sts)
Round 8: 2sc in each of the first 2sts, sc15, 2hdc in the following st, hdc3, 2hdc in the following st, sc13 (39sts)
Round 9: sc2, 2sc in the next st, sc, 2sc in the following st, sc16, hdc3, sc15 (41sts)
Round 10: sc2, 2sc in the next st, sc3, 2sc in the following st, sc34 (43sts)


This model was made with dk yarn to show it more clearly


 |
| generic skull shape |
Rounds 11 - 12: (2 rounds) sc in each st
Round 13: Sc24, ch5, skip3, sc2, ch5, skip3, sc11 (47sts)
Round 14: sc22, Sc3tog, sc4, 2hdc in each of the next 2sts, sc4, sc3tog, sc9 (45sts)
Round 15: sc, sc2tog, sc, sc2tog 4 times, sc, sc2tog, sc3, ch6, skip6, sc4, 2sc in each of the next 3sts, sc3, ch6, skip6, sc2, sc2tog, sc (41sts)
Round 16: sc2tog, sc3tog ,sc2tog, sc, sc2tog, sc2, Slip7, sc3, ch3 (these chain sts help to make the nose), skip6, sc3, slip7, sc, sc2tog (32sts)
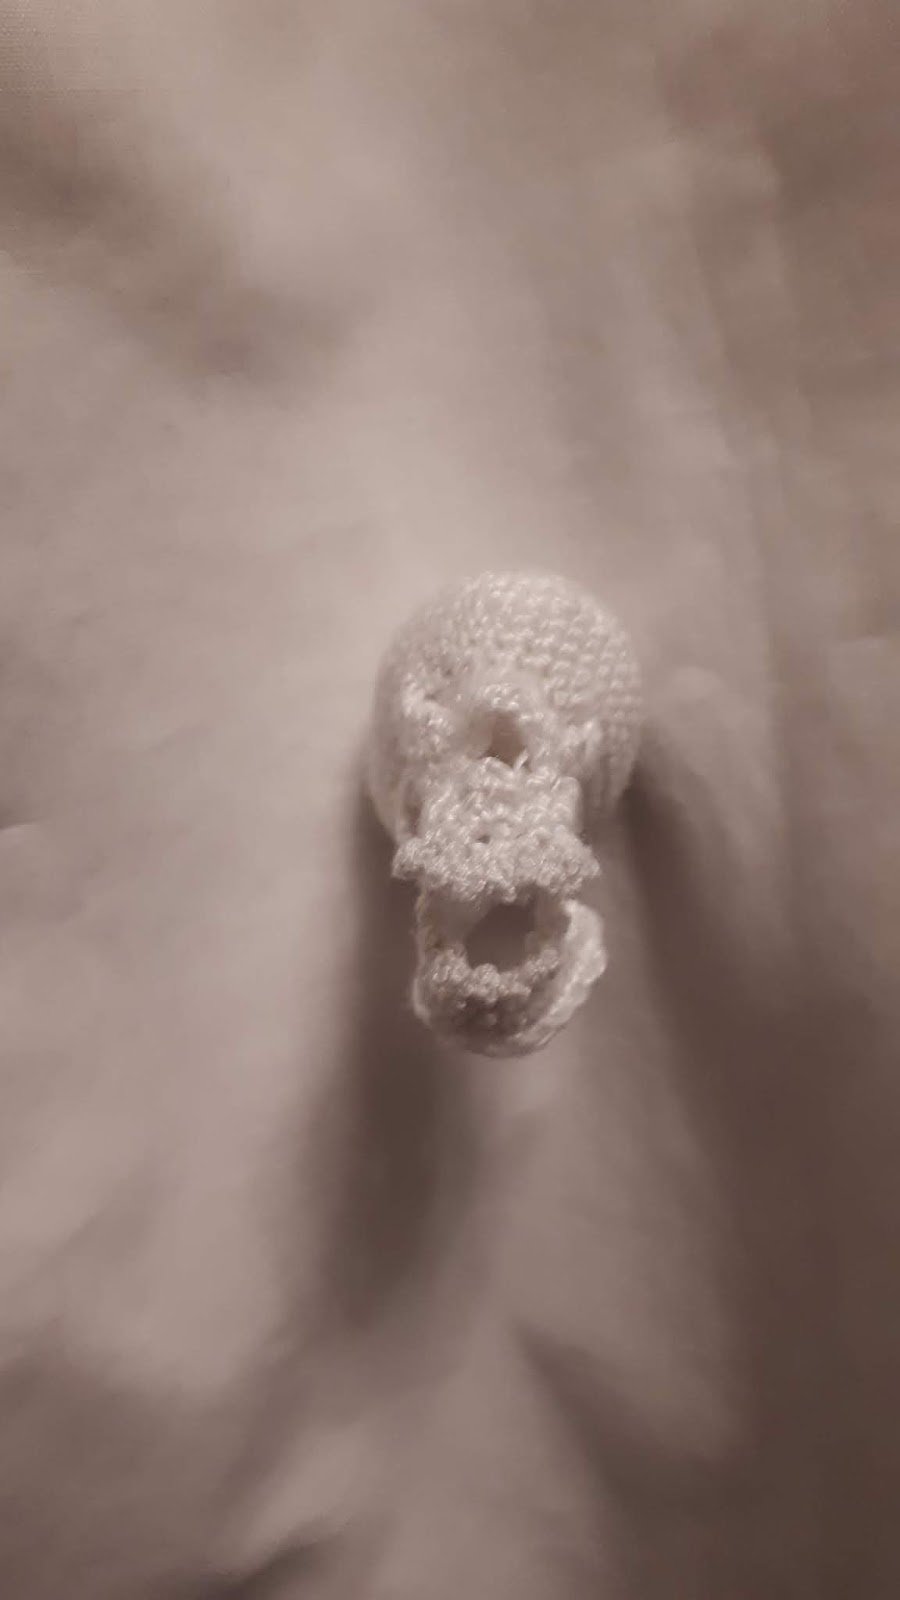
Round 17: sc, sc2tog twice, sc, sc2tog, ch2, sc in the first st of the 6sts you skipped on round 15 (as shown in images 1 and 2 below) , then sc in the next 3 of these skipped sts. ch4, sc in the 3rd st you skipped the 2nd time you skipped 6 on round 15, then sc in the next 3sts (all the ones you skipped on the round before last), ch2. Sc in the 2nd st after the slip7 on the previous section, (23sts)
Round 15: sc, sc2tog, sc, sc2tog 4 times, sc, sc2tog, sc3, ch6, skip6, sc4, 2sc in each of the next 3sts, sc3, ch6, skip6, sc2, sc2tog, sc (41sts)
Round 16: sc2tog, sc3tog ,sc2tog, sc, sc2tog, sc2, Slip7, sc3, ch3 (these chain sts help to make the nose), skip6, sc3, slip7, sc, sc2tog (32sts)
Round 17: sc, sc2tog twice, sc, sc2tog, ch2, sc in the first st of the 6sts you skipped on round 15 (as shown in images 1 and 2 below) , then sc in the next 3 of these skipped sts. ch4, sc in the 3rd st you skipped the 2nd time you skipped 6 on round 15, then sc in the next 3sts (all the ones you skipped on the round before last), ch2. Sc in the 2nd st after the slip7 on the previous section, (23sts)
Round 18: sc5tog, sc3, sc2tog, sc7tog, sc2tog, sc3. Fasten off
Stuff firmly


Images 1 and 2
For the eye sockets (make 2):
Make a magic loop with 4sc
Round 1: sc in each st
Round 2: (sc in the first st, 2sc in the next st) twice (6sc)
Round 3: (sc in each of the first 2sts, then make 2sc in the next st) twice (8sc)
Round 4: (sc in each of the first 3sts, then make 2sc in the next st) twice(10sc)
Round 5: (sc in each of the first 4sts, then make 2sc in the next st) twice (12sc)
Fasten off
Sew these to the eye sockets so that they protrude back into the head before continuing with the rest of the head
For the upper jaw:
For the upper jaw:
Rejoin yarn to round 16 to the first of the chain sts you made for the nose,
Round 17: sc in this st, sc2tog, sc4, ch3, sc in round 16 in the 3rd st before where you fastened on, then sc in the next 2sts (12sts)
Round 17: sc in this st, sc2tog, sc4, ch3, sc in round 16 in the 3rd st before where you fastened on, then sc in the next 2sts (12sts)
Round 18: Hdc6, slip3, hdc3
Fasten off neatly


Fasten off neatly


For the jaw:
Ch15
Row 1: Sc in the 2nd loop from hook, then sc in every following loop to end, turn. (14sc)
Row 2: Slip each st, ch1, turn
Row 3: Sc in each st, ch2, turn
Row 4: Hdc2, turn
Row 5: Slip1, sc
Fasten off
Rejoin yarn to the other end of row 3
Row 4: Ch2, then hdc in this st and the next st. turn
Row 5: Slip1, sc
Fasten off
Sew this lower jaw to the rest of the skull


Teeth (make 24):
With the 0.6mm hook and white sewing cotton make a magic loop with 4sc
Round 1: sc in each st (4sc)
Fasten off
Sew 12 of these teeth to the bottom jaw and the other 12 to the upper jaw (at the bottom of the skull)

I hope you have enjoyed this pattern. If you have any questions about this or any of my other patterns or have any suggestions for future patterns you would like me to make please feel free to contact me, either by leaving a comment below or via my Ravelry or Instagram pages.
You are very welcome to sell finished products but I do ask that you don't re-post this pattern or claim it as your own. Thank you!
I love it!! I hope you make the rest of the skeleton
ReplyDeleteHiya sorry for the very late reply. I'm so glad you like it! I've already made the rest of the skeleton, and am gradually uploading the pattern for it (its taking more time than I would have liked as I didn't record it as I didn't record it as I went along as well as I should have done)
DeleteI'm really grateful that you are willing to write out this pattern but it's incredibly confusing for me... My skull keeps coming out misshapen, past row 7 it gets lumpy. I don't understand where i'm supposed to work sometimes... Row 14 says it's a little less than 1 round, but it's actually a round and a half, covering over 60 stitches, with 55 actions...? and why are there a row 17 and 18 after the eye sockets? on row 18 are we to assume we just work into round 17? what about the ch 6 that is just sitting there? and are we to assume the first set of chains is the eyes? I am sorry but i have so many questions. This is the first even remotely legitimate looking skull I've seen available for free or for purchase as a pattern and I REALLY want to be able to make it...
ReplyDeleteHi Mika, so sorry I took so long to get back to you. I've been crazy busy this last week. I'm glad of your questions because it lets me know where in my patterns I need to go into more detail to try to explain things.
DeleteThe skull should have a little bit of lumpiness in it, since human skulls aren't exactly oblong, and have lots of interesting bumps and ridges in them. If you have a look at the pattern again, I have added an image to show how the skull should look after the first 10 rounds. If your skull looks drastically different to this let me know and I'll try to offer more help.
I have also realized there was a small mistake on round 13 which led to the subsequent rows looking slightly misshapen after this point. It also meant that the start of each round shifted by 4 stitches.
You are right that round 14 wasntt slightly lees than 1 round. This row should have ended after the sc10 (which would mean that the round was 1 stitch short of being one round (I did this because the next st was a sc2tog, which would have gone over into the next round)). I have corrected this now (although with the change in round 13, round 14 now ends in sc9, and so ends up being a whole round rather than slightly less than one.
As for rounds 17 and 18, you are correct that the first set of chain sts, on row 13, are for the eye sockets. If you look at the skull diagram I've added at the top of the pattern, you should be able to see the malar bone at the side of the head. There is a small gap between this bone and the main part of the skull, and so I have used the 6 chain sts on round 15 to recreate this.
The rows after you sew the eye sockets into the skull are designed to make the overhand of the top jaw. During this round 17 you should make a small ring of 12 sts just underneath the nose. For the next round 18 you should then crochet into these 12 sts in turn.
I hope that helps!
If you have any other questions, please let me know,
Lucy
Im having trouble with round 17, with the images, i cant get the pattern right after that, ive tried and started over 3 times with no luck. Does anyone have a video to help me understand
ReplyDeleteHey, Sorry I didn't see this comment, I've been very busy lately. As far as I know there isn't a video, but I'd be happy to make one if that would be helpful. Just let me know if you're still interested and I'll try to make one asap :)
Delete
ReplyDeleteHi there,
Thank you so much for the post you do and also I like your post, Are you looking for Real Blue Shark Jaw, Real Shortfin Mako Jaw, Real Bull Shark Jaw, Real Dusky Shark Jaw, Real Zebra Shark Jaw, Real Chamois Skull, Real Peccary Skull Buy skull bones online, Buy skull bones online forsale, skullodditiesbones with the well price and our services are very fast.
Click here for MORE DETAILS......
CONTACT INFORMATION
Webmail : info@skullodditiesbones.com
Whatsapp Number: +1(539) 489-9213