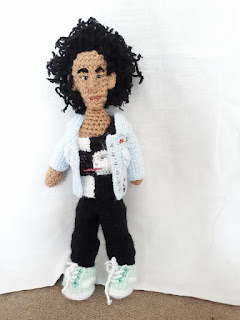
This model was meant to be able the same size as my little animals (around 6"/ 15 cm) but she ended up being around 13" (33cm) tall. Because of this the clothes I made for her won't fit on any of my little animals (unlike the little Ninth Doctor I made). However, I intend to make some more figures of this size in the future (and possibly some animals as well) to allow this to be possible.


You will need:
Please note: If the yarn used for any section is not specified it should be obvious from context or else it is likely to be the light brown dk yarn used (if you still aren't sure please leave a comment below and I will clarify)
If the size of the hook isn't used you should either use the same hook as is used for the rest of that section (e.g. all parts of the shoes are made using a 2mm hook) or you should use a 2.5mm hook if using dk yarn and a 2.5mm hook if using 4ply yarn.
Stuff


Difficulty:

Medium - difficult
You will need:
- dk yarn in light brown (as close a shade as you can get to the colour of Bill Pott's skin (I have noticed there are often very limited shades of brown yarn available and I think this is an issue)) and black (make sure the black is made from acrylic or something similar that won't felt)
- 4ply yarn in black, white, light blue, and light turquoise
- toy stuffing
- a darning needle or similar for sewing up
- a regular point sewing needle
- a thin embroidery needle (this and the last needle are both for fine embroidery of the face, shirt and jacket)
- embroidery thread in the following colours (any colours with a * after them can be replaced with regular sewing cotton (since they are only used one strand at a time): red, orange*, yellow*, green* (I did part of the embroidery in light green and part in medium green but this isn't necessary if you don't already have lots of threads hanging around your house (as I do)), turquoise, light blue*, dark blue* (although you can probably get away with just one shade of blue), purple*, lilac (again you can probably get away with just the lilac), light grey, dark grey, silver black, dark brown, white, bright pink, varying shades of a duller pink (this is for the lips and the colours you use depend on how detailed you want your lips to be - I used a medium pink*, dark pink, dark salmon and very very light pink)
- 2mm crochet hook
- 2.5mm crochet hook
Please note: If the yarn used for any section is not specified it should be obvious from context or else it is likely to be the light brown dk yarn used (if you still aren't sure please leave a comment below and I will clarify)
If the size of the hook isn't used you should either use the same hook as is used for the rest of that section (e.g. all parts of the shoes are made using a 2mm hook) or you should use a 2.5mm hook if using dk yarn and a 2.5mm hook if using 4ply yarn.
For the body:
Make a magic loop with 6sc
Round 1: 2sc in each st (12sc)
Round 2: sc in the first st, 2sc in the next st, rep to end (18sc)
Round 3: sc in the first 2 sts, 2sc in the next st, rep to end (24sc)
Round 4: sc in each st
Rounds 5: sc in the first 6 sts, sc2tog, rep to end (21sc)
Round 6: sc in the first 5 sts, sc2tog, rep to end (18sc)
Round 7: sc in the first 4sts, sc2tog, rep to end (15sc)
Round 8: sc in each st
Round 9: sc in the first 4 sts, 2sc in the next st, rep to end (18sc)
Round 10: sc in each st
Round 11: sc in the first 5 sts, 2sc in the next st, rep to end (21sc)
Round 12: sc in each st
Round 13: sc in the first 6 sts, 2sc in the next st, rep to end (24sc)
Rounds 14 - 15: (2 rounds) sc in each st
Fasten off neatly
For the arms (make 2):
Make a magic loop with 6sc
Round 1: sc in the first st, 2sc in the next st, rep to end (9sc)
Rounds 2 - 3 : (2 rounds) sc in each st
Round 4: sc in the first st, sc2tog, rep to end (6sc)
Rounds 5 - 15: (11 rounds) sc in each st
Fasten off neatly
Stuff
Make a magic loop with 6sc
Round 1: sc in the first st, 2sc in the next st, rep to end (9sc)
Rounds 2 - 3 : (2 rounds) sc in each st
Round 4: sc in the first st, sc2tog, rep to end (6sc)
Rounds 5 - 15: (11 rounds) sc in each st
Fasten off neatly
Stuff
For the shoulders:
Rejoin yarn to the body into the stitch before the 'new' stitch you made (on the body) when you fastened off neatly
Round 16: sc in this st, sc in one of the stitches at the top of one of the arms, sc in the next 4sts of that arm, sc in the body section in the 3rd st from where you fastened on, sc in the next 3sts, sc3tog, sc in the next 4sts, 2sc in one of the stitches of the other arm, sc in the next 4sts, sc in the body in the 3rd st from the last st you crocheted into on the body, sc in the next 8sts of the body. These last 30 sts form a new round (30sc)
Rounds 17 - 18: (2 rounds) sc in each st
Round 19: sc in the first 10sts, sc2tog, sc in the last 18sts (29sc)
Round 20: sc in the first st, sc2tog, sc3tog, sc2tog, sc in the next 7sts, sc2tog, sc3tog, sc2tog, sc in the last 7sts (21sc)
Round 21: sc5tog, sc in the next 5sts, sc5tog, sc in the last 6sts (13sc)
stuff
Round 21: sc2tog, sc in the next 4sts, sc2tog, sc in the last 5sts (11sc)
Rounds 22 - 23: (2 rounds) sc in each st
Row 24: sc in the first 5sts
Fasten off
Stuff the rest of the body (if you haven't already)
For the head:
Make a magic loop with 6sc
Round 1: 2sc in each st (12sc)
Round 2: sc in the first st, 2sc in the next st, rep to end (18sc)
Round 3: sc in the first 2 sts, 2sc in the next st, rep to end (24sc)
Rounds 4 - 12: (9 rounds) sc in each st
Round 13: sc in the first 2 sts, sc2tog, rep to end (18sc)
Stuff
Round 14:sc in the first st, sc2tog, rep to end (12sc)
Round 15:sc2tog to end (6sc)
Fasten off

For the nose:
Make a magic loop with 1sc. Don't join (you can probably tell that joining isn't going to work)
Row 1: ch1, turn. sc in this st
Row 2: ch1, turn, 3sc in this st (3sc)
Fasten off
Sew this to the face, trying to mirror the shape of Bill Potts's nose as you do this.
Sew the head to the body, shaping it around the chin to more resemble Bill's face shape.
For the facial detail:
The first thing you need to do is to shape the rest of the face, particularly around the eyes. Pull the eye-sockets back by making repeated stitches from the front of the head to the back through where you think the eye-sockets should be, and pull the yarn tight to force them back into the head (just make sure you don't bring the yarn out of the back of the head in the same place every tim else you may get dents on the back of the head as well.
After you've done this you should start on the eyebrows. Use black 4ply yarn to embroider these on


For the shirt:
With black 4ply yarn and a 2mm hook ch 31
Row 1: sc in the 2nd st, sc in every following st. ch1, turn (30sc)
Rows 2 - 9: (8 rows) sc in each st. ch1, turn
Fasten off
With white 4ply yarn ch11
Row 1: sc in the 2nd st, sc in every following st. ch1, turn (10sc)
Rows 2 - 9: (8 rows) sc in each st. ch1, turn
Fasten off
join black yarn onto one end of this last white section you made
Row 10: sc in each of the 10 sts along this white section, then sc in the first 20 sts of the black section. Ch1, turn
Row 11: sc in each st
Row 12: sc9, 2sc, sc20
Row 13: sc20, 2sc, sc10
Row 14- 15: sc in each st
Row 16: sc11,2sc, sc20
Row 17: sc in each st
Row 18: sc11, sc2tog, sc20
Fasten off
Join white yarn to row 9 in the stitch next to the last stitch you crocheted in when making the last section (ass shown below)
Rows 10 - 11: (2 rows) sc in each st. ch1, turn (10sc)
Row 12: 2sc in the first st, sc in the next 9sts. ch1, turn (11sc)
Row 13: Sc in the first 10sts, 2sc in the next st. ch1, turn (12sc)
Rows 14 - 15: (2 rows) Sc in each st. ch1, turn
Row 16: 2sc in the first st, sc in the next 11sts. ch1, turn (13sc)
Row 17: sc in each st. ch1, turn
Row 18: Sc2tog, sc in the next 11sts (12sc)
Fasten off
Rejoin black yarn to the 4th st of this last section you made (i.e. the 9th st from the front edge of the jacket) (as shown below)

Row 19: sc in this st and the next 8sts to end
Row 20: Sc in the first 7sts, sc2tog (8sc)
Row 21: Sc in each of these 8sts
Row 22: Sc in the first 7sts, 2sc in the next st (9sc)
Row 23: Sc in the first 2sts, hdc in the following 2sts. Ch2, turn
Row 23: dc in the first st, hdc in the next 2sts, sc in the last 2sts. ch1, turn
Row 24: Sc in each of these 4 sts
Fasten off
Rejoin white yarn to the other side of the long blue section (row 18)
Row 19: Sc in this st and the next 8sts. ch1, turn (9sc)
Row 20: Sc2tog, sc in the next 7sts. ch1, turn (8sc)
Row 21: sc in each st. ch1, turn
Row 22: 2sc in the first st, sc in each of the next 7sts (9sc)
Row 23: Slip the first 5sts, ch2, hdc in the next 2sts, sc in the last 2sts. ch1, turn
Row 24: Sc in the first 2sts, hdc in the next 2sts, dc in the last st. ch1, turn
Row 25: Sc in the first 4sts
Fasten off
Rejoin black yarn to row 18 to the 6th st from where you made the white section

Row 19: sc in this st and the next 13sts. ch1, turn (14sc)
Rows 20 - 21: Sc in each of these 14sts. ch1, turn
Row 22: 2sc in the first st, sc in the next 12sts, 2sc in the last st. ch1, turn (16sc)
Row 23: 2sc in the first st, sc in the next 14sts, 2sc in the last st. (18sc)
Rows 24 - 25: (2 rows) ch1, turn. sc in each of these 18 sts
Rows 26 - 31: (6 rows) ch1, turn. Sc in the first 5sts
Fasten off
Rejoin yarn to the other side of row 25
Rows 26 - 30: (5 rows) Sc in the first 5sts. ch1, turn
Row 31: sc in each of these 5sts.
Fasten off
Now you need to sew up all of the seams (sorry!). First sew together the joins where the black and white sections join together so you get one large block like in the diagram below. Then sew the front seams together and sew the shoulder seams together (i.e. sew together all of the edges joined with arrows on the diagram

 For the embroidery:
Try to replicate the image below with embroidery.

I started doing the chin line. I used a single strand of grey embroidery thread and backstitched it on just above the join between the bottom two colour blocks and the middle two blocks (as shown below)
I then used 3 strands of bright pink embroidery thread to embroider the shape of the month just above the chin line.

After this I used a single strand of grey embroidery thread to add the detail to the middle of the lips, as you can see from the picture of the original above (and you can see how I did this below)

Next I embroidered the nostrils in using a single strand of grey embroidery thread for the one on the white side and grey-purple yarn for the one on the black side
The last bit to do is the eyes.
Embroider the left eye using a single strand of grey-purple embroidery thread and the right one using a single strand of grey embroidery thread. After you've done that embroider the pupil of the right eye using a single strand of grey-purple embroidery thread.
To embroider the eyes try and replicate the eyes on the image of the shirt shown above.


For the jacket:
With light blue 4ply yarn and a 2mm hook ch36
Row 1: sc in the 2nd loop from hook, sc in every following loop. Ch1, turn
Rows 2 - 10: (9 rows) Sc in each st. Ch1, turn
Row 11: Sc in the first 6sts, 2sc in the next st, sc in the follwoing 21sts, 2sc in the next st, sc in the last 6sts. Ch1, turn (37sc)
Rows 12 - 15: (4 rows )Sc in each st. Ch1, turn
Row 16: Sc in the first 7sts, 2sc in the next st, sc in the following 21sts, 2sc in the next st, sc in the last 7sts. Ch1, turn (39sc)
Rows 17 - 21: (5 rows) Sc in the first 6sts only . Ch1, turn
Row 22: 2sc in the first st, sc in the following 4sts. Ch1, turn
Row 23: Sc in the first 5sts, 2sc in the next st. Ch1, turn (7sc)
Row 24: Slip the first 2sts, sc in the next 2sts, hdc in the following 3sts. Ch2, turn
Row 25: Hdc in the first 3sts, sc in the next 2sts, slip the last 2sts. turn
Row 26: Slip the first 2sts, sc in the following 2sts, hdc in the last 3sts. ch1, turn
Row 27: Sc in the first 7sts
Fasten off
Rejoin to 6th st from the other side of row 16

Rows 17 - 21: (5 rows) sc in the first 6sts. ch1, turn
Row 22: Skip1, slip1, ch1, Sc in the next 4sts, 2sc in the following st. Ch1, turn
Row 23: 2sc in the first st, sc in the next 5sts. ch2, turn (7sc)
Row 24: Slip the first 2sts, sc in the next 2sts, hdc in the following 3sts. ch2, turn
Row 25: hdc in the first 3sts, sc in the next 2sts, slip the next 2sts. turn
Row 26: Slip the first 2sts, sc in the next 2sts, hdc in the last 3sts. ch1, turn
Row 27: Sc in the frist 7sts
Fasten off
Rejoin yarn to row 16 to the 4th st from one of these sections

Row 17: Sc in this same st and the next 20sts. ch1, turn (21sc)
Row 18: Sc2tog, sc in the next 7sts, sc3tog, sc in the following 7sts, sc2tog. ch1, turn (17sc)
Row 19: Sc2tog, sc in the next 13sts, sc2tog. ch1, turn (15sc)
Row 20: Sc in each of these 15 sts. ch1, turn
Row 21: Sc in the first 6sts, sc3tog, sc in the last 6sts. ch1, turn (13sc)
Rows 22 - 23: (2 rows) Sc in each of these 13 sts. ch1, turn
Row 24: 2sc in the first st, sc in the next 11sts, 2sc in the last st. ch1, turn (15sc)
Row 25: Sc in each of these 15 sts. ch1, turn
Row 26: 2sc in the first st, sc in the next 13sts, 2sc in the last st. ch1, turn (17sc)
Row 27: Sc in each of these 17 sts. ch1, turn
Row 28: 2sc in the first st, sc in the next 15sts, 2sc in the last st. ch1, turn (19sc)
Row 29: Sc in each of these 19sts. turn
Row 30: Slip the first st, sc in the next 2sts, hdc in the next 2sts, ch1, sc in the following 9sts, ch1, hdc in the next 2sts, sc in the next 2sts, slip the last st
Fasten off
For the sleeves (make 2):
Ch16
Row 1: sc in the first chain st you made, then sc in every following st to make a loop (16sc)
Rows 2 - 12: (11 rounds) Slip in the first st of the last round (i.e. the stitch you would usually crochet into first if you were working in the round) , ch1, turn, sc it the slipped st, sc in the next 17sts
Row 13: Slip the first st, turn, slip the next 3sts. ch1, turn, sc in the same st, sc in the next 12sts.
Row 14: ch1, turn, sc in the first 13sts
Row 15: ch1, turn, sc in the first 5sts, sc3tog, sc in the next 5sts
Row 16: ch1, turn, sc in the first 11sts
Row 17: ch1, turn, sc in the first 4sts, sc3tog, sc in the next 4sts
Row 18: ch1, turn, sc in the first 9sts
Row 19: ch1, turn, sc2tog, sc in the next st, sc3tog, sc in the next st, sc2tog
Row 20: sc in the first 5sts
Row 21: sc5tog
Fasten off
Sew these to the armholes in the jacket
For the front left placket:
with blue 4ply yarn and a 2mm hook join yanr onto the top font left corner of the jacket (left from Bill's perspective)
 Row 1: Sc 22sts down this front left side of the jacket. ch1, turn
Row 2: Sc in each of these 22sts. ch1, turn
Row 3: Sc in each of these 22sts
Fasten off
For the front right placket:
rejoin yarn to the bottom front right edge of the jacket
Row 1: sc 21sts up this right hand side of the jacket. ch1, turn
Row 2: sc in each of these 22sts. ch1, turn
Row 3: sc in each of these 22 sts
Fasten off
Rejoin yarn to the top left-hand side of the jacket to the stitch between the first and second row you crocheted for the left placket.
Row 1: slip 21sts down the front edge of the jacket in the gaps between the first and second rows of the placket.


Rejoin yarn to the bottom right-hand side of the jacket to the stitch between the first and second row you crocheted for the right placket.
Row 1: slip 21sts up the jacket between the first and second rows of this last section (as you did for the other side)
Fasten off
For the collar:
Attach yarn to the top left side of the jacket, a stitch or so in from where you attached the yarn to slip down the front edge of the jacket (as shown below)


Row 1: Sc 29sts around the inside neckline of the jacket
Fasten off
Rejoin to loop behind back loop (or third loop) of the first st of the last row you crocheted (as shown below)


Row 2: Sc in the loop behind the back loop of each of the 29 sts of the last row
Fasten off
Rejoin yarn to first st of last round
Row 3: Sc in the first 9sts, 2sc in the next st, sc in the following 9sts, 2sc in the next st, sc in the last 9sts (31sc)
Fasten off
Rejoin yarn to first st of last round
Row 4: Sc in the first 10sts, 2sc in the next st, sc in the following 9sts, 2sc in the next st, sc in the last 10sts (33sc)
Fasten off

sew around the edge of the collar to attach the collar to the main bit of the jacket (to make sure it doesn't constantly lift up and instead lies flat)
For the pocket flaps (make 2):
With light blue 4ply yarn and a 2mm hook ch5
Row 1: sc in the 2nd loop from your hopok, sc in each of the next 3sts . ch1, turn (4sc)
Row 2: Sc in the first st, sc2tog, sc in the last st. ch1, turn (3sc)
Row 3: Sc3tog
Fasten off
For the pockets (make 2):
With light blue 4ply yarn and a 2mm hook ch5
Row 1: sc in the 2nd loop from your hopok, sc in each of the next 3sts . ch1, turn (4sc)
Row 2: sc in each st. ch1, turn
Row 3: Sc in the first st, sc2tog, sc in the last st. ch1, turn (3sc)
Row 4: Sc3tog
Fasten off
Sew each of the pockets to the upper front section of the jacket, then sew the pocket flaps slightly above but overlapping (as shown below)

For the buttons:
Using 4 - 6 strands of silver embroidery thread sew 6 evenly spaces 'blobs' on the left side of the shirt (from Bill's perspective) Sew over these a few times so that they stick out a little bit.
For the embroidery on the jacket:
Its quite difficult to give a step - by step guide to the embroidery as I sort of made it up as I went along (and forgot to take many pictures, whoops). However I have tried my best to explain how I did it, and if you just try to replicate the images given below it should turn out okay.
If you are uncertain about embroidery you can simplify down the motifs to just simple shapes (or leave them out entirely), and similarly if you feel you can make your motifs more detailed than I have made mine then go for it!
Note: the first two motifs go side by above the left pocket of the jacket and the other two motifs go one above the other at the bottom left side of the jacket.
For the 'WOW' badge:

For this I started off with two strands of red embroidery thread embroidering the spikey but kind of elliptical shaped background

I then used a single strand of goldeny-yellow embroidery thread to add the 'WOW!' over the top of this:


For the skull motif:
This was made in a similar was - building up the individual layers as I went along.
I first used two strands of white embroidery thread to embroider the background of the skull.
Next I used a single strand of black embroidery thread to embroider the eyes, mouth and outline.
Finally I used a little blue, red and light green embroidery thread to embroider the flower motif onto the top of the skull (although this was simplifies to some blue dots and green/ red lines)

For the robot motif:

This was, in my opinion, the trickiest motif to do.
Again I started off with the background of light grey (which I embroidered using 2 strands of light grey embroidery thread). I then used a double strand of dark grey embroidery thread to add the feet and waistband section to the robot.
After this I added the white patch to the chest (using a single strand of embroidery thread), and then used a single strand of blue embroidery thread to embroider in partis of the eyes and the top of the head.
I next used red embroidery thread to add a little detail to the chest (consisting of 3 dots and a line) and embroidered in the mouth.
Finally I outlined everything using a single strand of black embroidery thread (except for the eyes I just added a black dot alongside the blue dot in stead of outlining it completely)
For the rainbow:
Rejoin yarn to the body into the stitch before the 'new' stitch you made (on the body) when you fastened off neatly
Round 16: sc in this st, sc in one of the stitches at the top of one of the arms, sc in the next 4sts of that arm, sc in the body section in the 3rd st from where you fastened on, sc in the next 3sts, sc3tog, sc in the next 4sts, 2sc in one of the stitches of the other arm, sc in the next 4sts, sc in the body in the 3rd st from the last st you crocheted into on the body, sc in the next 8sts of the body. These last 30 sts form a new round (30sc)
Rounds 17 - 18: (2 rounds) sc in each st
Round 19: sc in the first 10sts, sc2tog, sc in the last 18sts (29sc)
Round 20: sc in the first st, sc2tog, sc3tog, sc2tog, sc in the next 7sts, sc2tog, sc3tog, sc2tog, sc in the last 7sts (21sc)
Round 21: sc5tog, sc in the next 5sts, sc5tog, sc in the last 6sts (13sc)
stuff
Round 21: sc2tog, sc in the next 4sts, sc2tog, sc in the last 5sts (11sc)
Rounds 22 - 23: (2 rounds) sc in each st
Row 24: sc in the first 5sts
Fasten off
Stuff the rest of the body (if you haven't already)
For the legs (make 2):
ch5
Round 1: sc in the 2nd st from hook ,sc in the next 2 chain sts, 3sc in the last chan st, sc in the back of the previous two chain sts you crocheted into, 2sc in the back of the first chain st you crocheted into (10sc)
Round 2: 2sc in the first st , sc in the next 2sts, 2sc in each of the next 3 sts, sc in the following 2sts, 2sc in each of the next 2 sts (16sc)
Round 3: (this is slightly less than one round) sc in the first 5sts, sc5tog, sc in the next 6sts (12sc)
Round 4: sc3, sc5tog, sc3 (8sc)
Round 5: sc2tog, sc in the next 6sc (7sc)
Round 6: (this is slightly less than 1 round) sc in the first 6sts
Round 7: sc in the first 2sts, 2sc in the next st, sc in the next 3sts, 2sc in the next st (9sc)
Round 8: sc in each st
Round 9: sc in the first 2sts, 2sc in the next st, sc in the last 6sts (10sc)
Round 10: sc in the first 2sts , 2sc in the next st, sc in the last 7sts (11sc)
Round 11: sc in the first 3sts, 2sc in each of the next 2 sts, sc in the last 6sts (13sc)
Round 12: sc in the first 4sts, sc2tog, sc in the last 7sts (12sc)
Round 13: sc in the first 4sts, sc2tog, sc in the last 6sts (11sc)
Round 14:(this is slightly more than 1 round) sc in the first 4sts, sc3tog, sc in the last 3sts (9sc)
Round 15: sc in the first 4sts, sc2tog, sc in the next 3sts, 3sc in the last st (10sc)
Round 16: (this is slightly more than 1 round) sc in the first 8sts, sc3tog (8sc)
Round 17: sc in the first 3sts, 2sc in the next st, sc in the following 3sts, 2sc in the last st (10sc)
Round 18: sc in the first 3sts, 2sc in the next st, sc in the following 5sts, 2sc in the next st, sc in the last 2sts (12sc)
Round 19: sc in each st
Round 20: sc in the first 9sts, 2sc in the next st, sc in the last 2sts (13sc)
Round 21: sc in each st (13sc)
Round 22: sc in the first 10sts, 2sc in the next st, sc in the last 2sts (14sc)
Round 23: sc in each st
Round 24: sc in the first 6sts
Fasten off
Sew these to the base of the body
For the breasts (make 2):
make a magic loop with 6sc
Round 1: 2sc in each st (12sc)
Round 2: sc in each st
Fasten off
Stuff these slightly and sew them to the chest area of the body
For the breasts (make 2):
make a magic loop with 6sc
Round 1: 2sc in each st (12sc)
Round 2: sc in each st
Fasten off
Stuff these slightly and sew them to the chest area of the body
For the head:
Make a magic loop with 6sc
Round 1: 2sc in each st (12sc)
Round 2: sc in the first st, 2sc in the next st, rep to end (18sc)
Round 3: sc in the first 2 sts, 2sc in the next st, rep to end (24sc)
Rounds 4 - 12: (9 rounds) sc in each st
Round 13: sc in the first 2 sts, sc2tog, rep to end (18sc)
Stuff
Round 14:sc in the first st, sc2tog, rep to end (12sc)
Round 15:sc2tog to end (6sc)
Fasten off
For the hair:
Using black dk yarn with 1.5mm hook ch23
Row 1: sc in the 2nd loop from hook, sc in every following loop to end. ch1, turn (22sc)
Rows 2 - 30: (29 rows) sc in each st. ch1, turn.
Fasten off
Take this rectangle and soak it in warm water, then leave it in a warm place to dry for as long as possible (the longer the better).
Cut a 5cm strand of this yarn and pull it out to its un-curly length (mine was about 16cm long). Make a strip of cardboard of this length (or a little longer) then wind the remaining yarn around it, making sure not to stretch it out of place.
Cut the yarn at both ends of your cardboard so that you end up with lots of 5cm (ish) long curly strands.
Attach these to the head using the standard method of attaching amigurumi hair (I think this is the standard method):
Bring your hook through a loop of the head, fold the yarn in half and pull the looped end through the head with your hook, then thread the un-looped ends of your yarn through the loop you pulled through. Tighten this (but not too much so as to stretch the yarn so that it loses its curliness), and repeat this process all over the head.

For the nose:
Make a magic loop with 1sc. Don't join (you can probably tell that joining isn't going to work)
Row 1: ch1, turn. sc in this st
Row 2: ch1, turn, 3sc in this st (3sc)
Fasten off
Sew this to the face, trying to mirror the shape of Bill Potts's nose as you do this.
 |
| use this picture (or any other picture of Bill you would prefer your model to look like) as a reference when adding detail to the face - try to make it resemble the picture as much as possible. |
Sew the head to the body, shaping it around the chin to more resemble Bill's face shape.
For the facial detail:
The first thing you need to do is to shape the rest of the face, particularly around the eyes. Pull the eye-sockets back by making repeated stitches from the front of the head to the back through where you think the eye-sockets should be, and pull the yarn tight to force them back into the head (just make sure you don't bring the yarn out of the back of the head in the same place every tim else you may get dents on the back of the head as well.
After you've done this you should start on the eyebrows. Use black 4ply yarn to embroider these on
 |
| Try to make the eyebrows similar to those shown in the picture above |
 |
| ignore the eyes for the minute - as I said, I went back to add to the eyebrows after I did the eyes |
 |
| Try to make them a bit wider in the middle than I have done here - I later went back and altered them to make them resemble Bill Potts's eyebrows more (although if you're unsure you can always go back and add to them laster (as I did) |
After you've done the eyebrows you can start on the eyes.
First embroider in the whites of the eyes using either white 4ply yarn or white embroidery thread.

After you've done this add the irises as brown circles inside the whites and black pupils inside the irises. Use the corresponding colour of embroidery thread to do this.
To finish off the eyes embroider a white spec inside the eyes to look like the reflections. You may also want to add eyelids by using a strand of light brown yarn to sew over the top edge of the eyes, along with the suggestion of eyelashes by using a single strand of black to sew in the gap between the eye and the eyelid.
|
| use these eyes as a primary reference for making your eyes |


 |
| This is a slightly better picture of her eyes but I would warn against trying to get the eyes of your model to look exactly like these since in this picture Bill has a rather different facial expression above than in the other pictures, which means that you will have the eyes doing one expression and the mouth doing a different expression, which is likely to end up looking a bit odd. |
Now you are ready to move on to the mouth. This is, in my oppinion, by far the hardest part of the model (at least to get it to look like Bill). I'm still not completely happy with the mouth I did, and how well it comes out is likely to depend on your skill at embroidery, as well as how artistic you are in general. If you are worried about it going wrong you can always do a very simplified version, or just add a simple smile.
If you decide you do want to do the lips as detailed as possible then this is sort of how I did it (I don't have many pictures since I really just added to it as I went along):
Make sure you also look at the face as a whole every so often because if something doesn't look quite right it could also be to do with other parts of the face, or how the mouth interacts with the rest of the face.
 |
| This is what you should try and replicate (obviously if you are using another image for the facial features you should use the mouth from that as a reference) |
I started out embroidering a base of medium pink embroidery thread in the approximate shape I thought the lips should be (Image 1) . I then added dark pink around the edge of this and a line through the centre (to separate the two lips). I then added a little embroidery in salmon embroidery thread underneath the bottom lip, and used a very light pink to add the reflection bit on this bottom lip (Image 2).
(I then realised my lips were a little small and added more pink/ dark pink at the edges (Image 3) - don't be afraid to add things if you aren't happy with them)
 |
| Image 1 |
 |
| Image 2 |
 |
| Image 3 |

For the shirt:
With black 4ply yarn and a 2mm hook ch 31
Row 1: sc in the 2nd st, sc in every following st. ch1, turn (30sc)
Rows 2 - 9: (8 rows) sc in each st. ch1, turn
Fasten off
With white 4ply yarn ch11
Row 1: sc in the 2nd st, sc in every following st. ch1, turn (10sc)
Rows 2 - 9: (8 rows) sc in each st. ch1, turn
Fasten off
join black yarn onto one end of this last white section you made
Row 10: sc in each of the 10 sts along this white section, then sc in the first 20 sts of the black section. Ch1, turn
Row 11: sc in each st
Row 12: sc9, 2sc, sc20
Row 13: sc20, 2sc, sc10
Row 14- 15: sc in each st
Row 16: sc11,2sc, sc20
Row 17: sc in each st
Row 18: sc11, sc2tog, sc20
Fasten off
Join white yarn to row 9 in the stitch next to the last stitch you crocheted in when making the last section (ass shown below)
 |
| the colours are completely wrong but hopefully you can see where you are meant to join the yarn The red yarn represents the white and the blue yarn represents the black |
Row 12: 2sc in the first st, sc in the next 9sts. ch1, turn (11sc)
Row 13: Sc in the first 10sts, 2sc in the next st. ch1, turn (12sc)
Rows 14 - 15: (2 rows) Sc in each st. ch1, turn
Row 16: 2sc in the first st, sc in the next 11sts. ch1, turn (13sc)
Row 17: sc in each st. ch1, turn
Row 18: Sc2tog, sc in the next 11sts (12sc)
Fasten off
Rejoin black yarn to the 4th st of this last section you made (i.e. the 9th st from the front edge of the jacket) (as shown below)

Row 19: sc in this st and the next 8sts to end
Row 20: Sc in the first 7sts, sc2tog (8sc)
Row 21: Sc in each of these 8sts
Row 22: Sc in the first 7sts, 2sc in the next st (9sc)
Row 23: Sc in the first 2sts, hdc in the following 2sts. Ch2, turn
Row 23: dc in the first st, hdc in the next 2sts, sc in the last 2sts. ch1, turn
Row 24: Sc in each of these 4 sts
Fasten off
Rejoin white yarn to the other side of the long blue section (row 18)
Row 19: Sc in this st and the next 8sts. ch1, turn (9sc)
Row 20: Sc2tog, sc in the next 7sts. ch1, turn (8sc)
Row 21: sc in each st. ch1, turn
Row 22: 2sc in the first st, sc in each of the next 7sts (9sc)
Row 23: Slip the first 5sts, ch2, hdc in the next 2sts, sc in the last 2sts. ch1, turn
Row 24: Sc in the first 2sts, hdc in the next 2sts, dc in the last st. ch1, turn
Row 25: Sc in the first 4sts
Fasten off
Rejoin black yarn to row 18 to the 6th st from where you made the white section

Row 19: sc in this st and the next 13sts. ch1, turn (14sc)
Rows 20 - 21: Sc in each of these 14sts. ch1, turn
Row 22: 2sc in the first st, sc in the next 12sts, 2sc in the last st. ch1, turn (16sc)
Row 23: 2sc in the first st, sc in the next 14sts, 2sc in the last st. (18sc)
Rows 24 - 25: (2 rows) ch1, turn. sc in each of these 18 sts
Rows 26 - 31: (6 rows) ch1, turn. Sc in the first 5sts
Fasten off
Rejoin yarn to the other side of row 25
Rows 26 - 30: (5 rows) Sc in the first 5sts. ch1, turn
Row 31: sc in each of these 5sts.
Fasten off
Now you need to sew up all of the seams (sorry!). First sew together the joins where the black and white sections join together so you get one large block like in the diagram below. Then sew the front seams together and sew the shoulder seams together (i.e. sew together all of the edges joined with arrows on the diagram

Try to replicate the image below with embroidery.

I started doing the chin line. I used a single strand of grey embroidery thread and backstitched it on just above the join between the bottom two colour blocks and the middle two blocks (as shown below)
I then used 3 strands of bright pink embroidery thread to embroider the shape of the month just above the chin line.

After this I used a single strand of grey embroidery thread to add the detail to the middle of the lips, as you can see from the picture of the original above (and you can see how I did this below)

Next I embroidered the nostrils in using a single strand of grey embroidery thread for the one on the white side and grey-purple yarn for the one on the black side
The last bit to do is the eyes.
Embroider the left eye using a single strand of grey-purple embroidery thread and the right one using a single strand of grey embroidery thread. After you've done that embroider the pupil of the right eye using a single strand of grey-purple embroidery thread.
To embroider the eyes try and replicate the eyes on the image of the shirt shown above.


For the leggings:
For the trouser legs: (make 2):
ch20
Round 1: sc in the first chain st you made, then sc in each of the following chain sts to make a loop (20sc)
Rounds 2 - 5: (4 rounds) sc in each st
Round 6: sc in the first 9sts, 2sc in the next st, sc in the following 9sts, 2sc in the last st (22sc)
Rounds 7 - 9: (3 rounds) sc in each st
Round 10: sc in the first 5sts, 2sc in the next st, sc in the following 10sts, 2sc in the next st, sc in the last 5sts (24sc)
Rounds 11 - 12: (2 rounds) sc in each st
Round 13: sc in the first sts 4, sc2tog, repeat 4 times to end (20sc)
Rounds 14 - 18: (5 rounds) sc in each st
Round 19: sc in the first 9sts, 2sc in the next st, sc in the following 9sts, 2sc in the last st (22sc)
Round 20: (3 rounds) sc in each st
Round 21: sc in the first 5sts, 2sc in the next st, sc in the following 10sts, 2sc in the last st (24sc)
Rounds 22 - 23: (2 rounds) sc in each st
Fasten off neatly
Join yarn to a st on one of these trouser legs
Round 24: sc in this st and the next 16sts, sc17 around the other leg, slip the first st of this round(34sc)
Round 25: ch1, sc in this same st and the next 33sts (34sc)
Round 26: sc in the first 6sts, sc2tog, sc in the following 16sts, sc2tog, sc in the last 8sts (32sc)
Round 27: sc in the first 7sts, sc2tog, sc in the following 14sts, sc2tog, sc in the last 7sts (30sc)
Round 28: sc in the first 7sts, sc2tog, sc in thge next 13sts, sc2tog, sc in the last 6sts (28sc)
Round 29: sc in the first 6sts, sc2tog, sc in the next 12sts, sc2tog, sc in the last 6sts (26sc)
Round 30 - 32: (3 rounds) sc in each st
Round 33: sc in the first 7sts, sc2tog, sc in the next 11sts, sc2tog, sc in the last 4sts (24sc)
With light blue 4ply yarn and a 2mm hook ch36
Row 1: sc in the 2nd loop from hook, sc in every following loop. Ch1, turn
Rows 2 - 10: (9 rows) Sc in each st. Ch1, turn
Row 11: Sc in the first 6sts, 2sc in the next st, sc in the follwoing 21sts, 2sc in the next st, sc in the last 6sts. Ch1, turn (37sc)
Rows 12 - 15: (4 rows )Sc in each st. Ch1, turn
Row 16: Sc in the first 7sts, 2sc in the next st, sc in the following 21sts, 2sc in the next st, sc in the last 7sts. Ch1, turn (39sc)
Rows 17 - 21: (5 rows) Sc in the first 6sts only . Ch1, turn
Row 22: 2sc in the first st, sc in the following 4sts. Ch1, turn
Row 23: Sc in the first 5sts, 2sc in the next st. Ch1, turn (7sc)
Row 24: Slip the first 2sts, sc in the next 2sts, hdc in the following 3sts. Ch2, turn
Row 25: Hdc in the first 3sts, sc in the next 2sts, slip the last 2sts. turn
Row 26: Slip the first 2sts, sc in the following 2sts, hdc in the last 3sts. ch1, turn
Row 27: Sc in the first 7sts
Fasten off
Rejoin to 6th st from the other side of row 16

Rows 17 - 21: (5 rows) sc in the first 6sts. ch1, turn
Row 22: Skip1, slip1, ch1, Sc in the next 4sts, 2sc in the following st. Ch1, turn
Row 23: 2sc in the first st, sc in the next 5sts. ch2, turn (7sc)
Row 24: Slip the first 2sts, sc in the next 2sts, hdc in the following 3sts. ch2, turn
Row 25: hdc in the first 3sts, sc in the next 2sts, slip the next 2sts. turn
Row 26: Slip the first 2sts, sc in the next 2sts, hdc in the last 3sts. ch1, turn
Row 27: Sc in the frist 7sts
Fasten off
Rejoin yarn to row 16 to the 4th st from one of these sections

Row 17: Sc in this same st and the next 20sts. ch1, turn (21sc)
Row 18: Sc2tog, sc in the next 7sts, sc3tog, sc in the following 7sts, sc2tog. ch1, turn (17sc)
Row 19: Sc2tog, sc in the next 13sts, sc2tog. ch1, turn (15sc)
Row 20: Sc in each of these 15 sts. ch1, turn
Row 21: Sc in the first 6sts, sc3tog, sc in the last 6sts. ch1, turn (13sc)
Rows 22 - 23: (2 rows) Sc in each of these 13 sts. ch1, turn
Row 24: 2sc in the first st, sc in the next 11sts, 2sc in the last st. ch1, turn (15sc)
Row 25: Sc in each of these 15 sts. ch1, turn
Row 26: 2sc in the first st, sc in the next 13sts, 2sc in the last st. ch1, turn (17sc)
Row 27: Sc in each of these 17 sts. ch1, turn
Row 28: 2sc in the first st, sc in the next 15sts, 2sc in the last st. ch1, turn (19sc)
Row 29: Sc in each of these 19sts. turn
Row 30: Slip the first st, sc in the next 2sts, hdc in the next 2sts, ch1, sc in the following 9sts, ch1, hdc in the next 2sts, sc in the next 2sts, slip the last st
Fasten off
For the sleeves (make 2):
Ch16
Row 1: sc in the first chain st you made, then sc in every following st to make a loop (16sc)
Rows 2 - 12: (11 rounds) Slip in the first st of the last round (i.e. the stitch you would usually crochet into first if you were working in the round) , ch1, turn, sc it the slipped st, sc in the next 17sts
Row 13: Slip the first st, turn, slip the next 3sts. ch1, turn, sc in the same st, sc in the next 12sts.
Row 14: ch1, turn, sc in the first 13sts
Row 15: ch1, turn, sc in the first 5sts, sc3tog, sc in the next 5sts
Row 16: ch1, turn, sc in the first 11sts
Row 17: ch1, turn, sc in the first 4sts, sc3tog, sc in the next 4sts
Row 18: ch1, turn, sc in the first 9sts
Row 19: ch1, turn, sc2tog, sc in the next st, sc3tog, sc in the next st, sc2tog
Row 20: sc in the first 5sts
Row 21: sc5tog
Fasten off
Sew these to the armholes in the jacket
For the front left placket:
with blue 4ply yarn and a 2mm hook join yanr onto the top font left corner of the jacket (left from Bill's perspective)
 Row 1: Sc 22sts down this front left side of the jacket. ch1, turn
Row 2: Sc in each of these 22sts. ch1, turn
Row 3: Sc in each of these 22sts
Fasten off
For the front right placket:
rejoin yarn to the bottom front right edge of the jacket
Row 1: sc 21sts up this right hand side of the jacket. ch1, turn
Row 2: sc in each of these 22sts. ch1, turn
Row 3: sc in each of these 22 sts
Fasten off
Rejoin yarn to the top left-hand side of the jacket to the stitch between the first and second row you crocheted for the left placket.
Row 1: slip 21sts down the front edge of the jacket in the gaps between the first and second rows of the placket.


Rejoin yarn to the bottom right-hand side of the jacket to the stitch between the first and second row you crocheted for the right placket.
Row 1: slip 21sts up the jacket between the first and second rows of this last section (as you did for the other side)
Fasten off
For the collar:
Attach yarn to the top left side of the jacket, a stitch or so in from where you attached the yarn to slip down the front edge of the jacket (as shown below)


Row 1: Sc 29sts around the inside neckline of the jacket
Fasten off
Rejoin to loop behind back loop (or third loop) of the first st of the last row you crocheted (as shown below)


Row 2: Sc in the loop behind the back loop of each of the 29 sts of the last row
Fasten off
Rejoin yarn to first st of last round
Row 3: Sc in the first 9sts, 2sc in the next st, sc in the following 9sts, 2sc in the next st, sc in the last 9sts (31sc)
Fasten off
Rejoin yarn to first st of last round
Row 4: Sc in the first 10sts, 2sc in the next st, sc in the following 9sts, 2sc in the next st, sc in the last 10sts (33sc)
Fasten off

sew around the edge of the collar to attach the collar to the main bit of the jacket (to make sure it doesn't constantly lift up and instead lies flat)
For the pocket flaps (make 2):
With light blue 4ply yarn and a 2mm hook ch5
Row 1: sc in the 2nd loop from your hopok, sc in each of the next 3sts . ch1, turn (4sc)
Row 2: Sc in the first st, sc2tog, sc in the last st. ch1, turn (3sc)
Row 3: Sc3tog
Fasten off
For the pockets (make 2):
With light blue 4ply yarn and a 2mm hook ch5
Row 1: sc in the 2nd loop from your hopok, sc in each of the next 3sts . ch1, turn (4sc)
Row 2: sc in each st. ch1, turn
Row 3: Sc in the first st, sc2tog, sc in the last st. ch1, turn (3sc)
Row 4: Sc3tog
Fasten off
Sew each of the pockets to the upper front section of the jacket, then sew the pocket flaps slightly above but overlapping (as shown below)

For the buttons:
Using 4 - 6 strands of silver embroidery thread sew 6 evenly spaces 'blobs' on the left side of the shirt (from Bill's perspective) Sew over these a few times so that they stick out a little bit.
For the embroidery on the jacket:
Its quite difficult to give a step - by step guide to the embroidery as I sort of made it up as I went along (and forgot to take many pictures, whoops). However I have tried my best to explain how I did it, and if you just try to replicate the images given below it should turn out okay.
If you are uncertain about embroidery you can simplify down the motifs to just simple shapes (or leave them out entirely), and similarly if you feel you can make your motifs more detailed than I have made mine then go for it!
Note: the first two motifs go side by above the left pocket of the jacket and the other two motifs go one above the other at the bottom left side of the jacket.
 |
| Sorry this isn't a great picture but it was the best one I could find to show the positioning of the badges. |
For the 'WOW' badge:

For this I started off with two strands of red embroidery thread embroidering the spikey but kind of elliptical shaped background

I then used a single strand of goldeny-yellow embroidery thread to add the 'WOW!' over the top of this:


For the skull motif:
This was made in a similar was - building up the individual layers as I went along.
I first used two strands of white embroidery thread to embroider the background of the skull.
Next I used a single strand of black embroidery thread to embroider the eyes, mouth and outline.
Finally I used a little blue, red and light green embroidery thread to embroider the flower motif onto the top of the skull (although this was simplifies to some blue dots and green/ red lines)

For the robot motif:

This was, in my opinion, the trickiest motif to do.
Again I started off with the background of light grey (which I embroidered using 2 strands of light grey embroidery thread). I then used a double strand of dark grey embroidery thread to add the feet and waistband section to the robot.
After this I added the white patch to the chest (using a single strand of embroidery thread), and then used a single strand of blue embroidery thread to embroider in partis of the eyes and the top of the head.
I next used red embroidery thread to add a little detail to the chest (consisting of 3 dots and a line) and embroidered in the mouth.
Finally I outlined everything using a single strand of black embroidery thread (except for the eyes I just added a black dot alongside the blue dot in stead of outlining it completely)
 |
 |
For the rainbow:
In my opinion this is the easiest (and least stressful) thing to embroider on probably this whole model.
Starting with a small purple semicircle, embroider increasingly sized almost-semicircles around the outside in all the colours of the rainbow (purple then a larger ones in blue,green, yellow, orange, and red)


For the shoes:
With a 2mm hook and white 4ply yarn ch5
Round 1: sc in the 2nd st from hook ,sc in the next 2 chain sts, 3sc in the last chan st, sc in the back of the previous two chain sts you crocheted into, 2sc in the back of the first chain st you crocheted into (10sc)
Round 2: 2sc in the first st , sc in the next 2sts, 2sc in each of the next 3 sts, sc in the following 2sts, 2sc in each of the next 2 sts (16sc)
Round 3: sc in the first st, 2sc in the next st, sc in the 2 following sts, (sc in the first st, 2sc in the next st) 3 times, sc in the next 2sts, (sc in the first st, 2sc in the next st) twice (22sc)
Round 4: sc in the first 2 sts, 2sc in the next st, sc in the 2 following sts, (sc in the first 2 sts, 2sc in the next st) 3 times, sc in the next 2sts, (sc in the first 2 sts, 2sc in the next st) twice (28sc)
Fasten off neatly
Rejoin yarn to the back loop of one of these stitches (it doesn't really matter which one but it's best if it isn't the 'new' st you made when fastening off)
Round 5: Sc the back loop of in each st
Round 6: Sc in both loops of each st
Fasten off neatly

Mark out the central front st of the shoe and attach either a stitch marker or a bit of yarn to act as a stitch marker (you may have to judge this by eye but hopefully it shouldn't be too difficult (if there are two stitches at the centre front and you can't work out which one is more central it probably doesn't matter which one you pick))

Join turquoise 4ply yarn to the 4th st after this marker.
Round 7: Sc in this st and the next 20sts. Ch1, turn (21sc)
Row 8: Sc in each of these 21 sts. Ch1, turn
Row 9: Sc2tog, sc7, sc2tog, sc8, sc2tog. ch1, turn (18sc)
Row 10: Sc2tog, sc14, sc2tog. ch1, turn (16sc)
Row 11: Sc in each of these 16sts. ch1, turn
Row 12: Sc2tog, sc12, sc2tog. ch1, turn (14sc)
Row 13: Sc in each of these 14sts. ch1, turn
Fasten off
Rejoin yarn to the white section of the boot in the loop behind the back loop (or 'third loop') of the second to last st you crocheted into when making the first row in turquoise (as shown below)

Row 7: Sc in this loop behind the back loop (of the same st), then in both loops (but not the loop behind the back loop) of the next st (the same st as you made the last sc into on the first row of turquoise) (as shown below)


sc in both loops of the next 7 sts, remove the stitch marker, sc in both loops of the next st (the same st you attached the turquoise yarn to when making the sides and back), sc in the loop behind the back loop of the next st (as you did for the other side) (as shown below). Ch1, turn

Row 8: Sc in each of these 11sts. Ch1, turn
Row 9: Sc2tog, sc in the next 7sts, sc2tog. Ch1, turn (9sc)
Row 10: Sc in each of these 9sts. ch1, turn
Row 11: Sc2tog, sc in the next 5sts, sc2tog (7sc)
Rows 12 - 13: (2 rows) ch1, turn. sc in each of these 7 sts
Fasten off
Rejoin yarn to the front top right (from Bill's perspective) corner of the shoe (as shown below),#

Row 1: sc8 down the front edge of the shoe. Ch1, turn
Row 2: Sc in the first 2sts, 3sc in the next st, sc in the last 5sts (10sc)
Fasten off
Rejoin yarn to the bottom front left corner of the other side (as shown below)


Row 1: Sc8 up this front edge of the shoe. ch1, turn
Row 2: Sc in the first 5sts, 3sc in the next st, sc in the last 2sts (10sc)
Fasten off
Slip 7sts up/down both sides of the boots in the holes between where you did the first row of crochet up the side of the shoe and where you did the crochet along the sides and back of the boot.
(see images below) (If you're confused about this please comment below and I will try to clarify)


For the stripes (make 2 for each shoe):
with white 4ply yarn fsc6
Fasten off
Sew these sections to the sides of the shoes

For the eyelets (make 3 in each side of each shoe):
With turquoise embroidery thread make repeated stitches around the outside of the holes where you are planning to thread your laces. (in every other row between the front edge of your shoes and where you made a row of slip stitches) I found it easier to get a good circle by pushing the blunt end of a small crochet hook through the hole whilst I did this to keep the hole in position whilst I sewed it in place.

For the shoelaces (make 2):
Cut three lengths of white 4ply yarn approx. 37cm (15 1/2 inches) long.
tie a small knot at one end then neatly plait the rest of the strands of yarn togerther until you get to the other end.
Tie this end in another knot and neaten the ends.
You can leave the shoes like this but I decided to add a little more detail to them using surface crochet
Firstly I crocheted two likes of surface chain stitching up the back of the shoes, just inside where the stripes on the side of the shoe ended, as shown below

I then did a similar thing around where the white and turquoise sections meet around the bottom of the shoe, but I did it on the inside, so that only the back of the stitching (that looks like backstitching) could be seen. I did this first in turquoise yarn and then again using white 4ply yarn, crocheting into the same holes but making sire the stitching lies slightly above the turquoise stitching
Place these shoes onto Bill's feet and thread the laces through, starting from the bottom and working your way up. To thread them through you may just be able to push them through the eyelet holes or you may need to pull them through using a crochet hook.


For the shoes:
With a 2mm hook and white 4ply yarn ch5
Round 1: sc in the 2nd st from hook ,sc in the next 2 chain sts, 3sc in the last chan st, sc in the back of the previous two chain sts you crocheted into, 2sc in the back of the first chain st you crocheted into (10sc)
Round 2: 2sc in the first st , sc in the next 2sts, 2sc in each of the next 3 sts, sc in the following 2sts, 2sc in each of the next 2 sts (16sc)
Round 3: sc in the first st, 2sc in the next st, sc in the 2 following sts, (sc in the first st, 2sc in the next st) 3 times, sc in the next 2sts, (sc in the first st, 2sc in the next st) twice (22sc)
Round 4: sc in the first 2 sts, 2sc in the next st, sc in the 2 following sts, (sc in the first 2 sts, 2sc in the next st) 3 times, sc in the next 2sts, (sc in the first 2 sts, 2sc in the next st) twice (28sc)
Fasten off neatly
Rejoin yarn to the back loop of one of these stitches (it doesn't really matter which one but it's best if it isn't the 'new' st you made when fastening off)
Round 5: Sc the back loop of in each st
Round 6: Sc in both loops of each st
Fasten off neatly

Mark out the central front st of the shoe and attach either a stitch marker or a bit of yarn to act as a stitch marker (you may have to judge this by eye but hopefully it shouldn't be too difficult (if there are two stitches at the centre front and you can't work out which one is more central it probably doesn't matter which one you pick))

Join turquoise 4ply yarn to the 4th st after this marker.
Round 7: Sc in this st and the next 20sts. Ch1, turn (21sc)
Row 8: Sc in each of these 21 sts. Ch1, turn
Row 9: Sc2tog, sc7, sc2tog, sc8, sc2tog. ch1, turn (18sc)
Row 10: Sc2tog, sc14, sc2tog. ch1, turn (16sc)
Row 11: Sc in each of these 16sts. ch1, turn
Row 12: Sc2tog, sc12, sc2tog. ch1, turn (14sc)
Row 13: Sc in each of these 14sts. ch1, turn
Fasten off
Rejoin yarn to the white section of the boot in the loop behind the back loop (or 'third loop') of the second to last st you crocheted into when making the first row in turquoise (as shown below)

Row 7: Sc in this loop behind the back loop (of the same st), then in both loops (but not the loop behind the back loop) of the next st (the same st as you made the last sc into on the first row of turquoise) (as shown below)


sc in both loops of the next 7 sts, remove the stitch marker, sc in both loops of the next st (the same st you attached the turquoise yarn to when making the sides and back), sc in the loop behind the back loop of the next st (as you did for the other side) (as shown below). Ch1, turn

Row 8: Sc in each of these 11sts. Ch1, turn
Row 9: Sc2tog, sc in the next 7sts, sc2tog. Ch1, turn (9sc)
Row 10: Sc in each of these 9sts. ch1, turn
Row 11: Sc2tog, sc in the next 5sts, sc2tog (7sc)
Rows 12 - 13: (2 rows) ch1, turn. sc in each of these 7 sts
Fasten off
Rejoin yarn to the front top right (from Bill's perspective) corner of the shoe (as shown below),#

Row 1: sc8 down the front edge of the shoe. Ch1, turn
Row 2: Sc in the first 2sts, 3sc in the next st, sc in the last 5sts (10sc)
Fasten off
Rejoin yarn to the bottom front left corner of the other side (as shown below)


Row 1: Sc8 up this front edge of the shoe. ch1, turn
Row 2: Sc in the first 5sts, 3sc in the next st, sc in the last 2sts (10sc)
Fasten off
Slip 7sts up/down both sides of the boots in the holes between where you did the first row of crochet up the side of the shoe and where you did the crochet along the sides and back of the boot.
(see images below) (If you're confused about this please comment below and I will try to clarify)


For the stripes (make 2 for each shoe):
with white 4ply yarn fsc6
Fasten off
Sew these sections to the sides of the shoes

For the eyelets (make 3 in each side of each shoe):
With turquoise embroidery thread make repeated stitches around the outside of the holes where you are planning to thread your laces. (in every other row between the front edge of your shoes and where you made a row of slip stitches) I found it easier to get a good circle by pushing the blunt end of a small crochet hook through the hole whilst I did this to keep the hole in position whilst I sewed it in place.

For the shoelaces (make 2):
Cut three lengths of white 4ply yarn approx. 37cm (15 1/2 inches) long.
tie a small knot at one end then neatly plait the rest of the strands of yarn togerther until you get to the other end.
Tie this end in another knot and neaten the ends.
You can leave the shoes like this but I decided to add a little more detail to them using surface crochet
Firstly I crocheted two likes of surface chain stitching up the back of the shoes, just inside where the stripes on the side of the shoe ended, as shown below

I then did a similar thing around where the white and turquoise sections meet around the bottom of the shoe, but I did it on the inside, so that only the back of the stitching (that looks like backstitching) could be seen. I did this first in turquoise yarn and then again using white 4ply yarn, crocheting into the same holes but making sire the stitching lies slightly above the turquoise stitching
 |
| An image showing the inside of the shoe after the first row of stitching is made |
 |
| An image showing the inside of the shoe after the second row of stitching has been made |
 |
| An image showing the right side (outside) of the shoe after both rows of stitching have been made |


And that's it! I hope you have enjoyed using this pattern and that your model turned out well! If you have any queries or suggestions for future patterns please feel free to contact me either by leaving a comment below, messaging me on my ravelry page, or contacting me via my instagram page.
I also have a new facebook page (which I hope to keep a little more up-to-date than my last one) which you can find here, so please feel free to post any finished products on there - I would love to see them.
Unfortunately, Bill Potts, as a character from Doctor Who, is copyrighted by the BBC, so I ask you not to sell finished products (I mean I con't stop you if you do want to but the BBC have been known to sue people over copyright issues like this so I'd advise against it).
However, I do have lots of other crochet patterns where the finished product can be sold (any of my non-character patterns)
I also ask that you don't re-post this pattern or claim it as your own.
Thank you!


