This model of Anne Lister from Gentleman Jack was made as part of a series of LGBTQ+ people I made to celebrate pride month back in June. I have also created a model of Ann Walker, which I will be posting shortly.
Both of these models are part of my little animals collection, so the clothes will fit onto most of the animals in that collection.


Difficulty:

Medium
You will need:
- A 2.5mm crochet hook
- A 2mm crochet hook
- A 0.7mm crochet hook (0.8mm would also work)
- Dk yarn in beige (or a similar skin colour)
- 4ply yarn in black
- #8 crochet cotton in white
- #10 crochet cotton in black
- embroidery thread in black, white, dark brown, dark blue, tan, and dark grey
- A small piece of cardboard 8.5cm wide
- A small section of clear (or white) plastice (you want it relatively thick but possible to cut and sew through)
- A small piece of black felt
- regular sewing cotton in brown, black, and white
- A pet brush
- PVA glue (optional)
- A regular sewing needle
- A darning needle
- Toy stuffing
- A pair of scissors
Note:
- 'fasten off neatly' refers to a special way of fastening off which is neater and makes it easier to see where you should be crocheting on the next round (also known as invisible fastening off). This involves pulling up your yarn through your stitch, threading the yarn underneath the second stitch from where you pulled your yarn up, then threading your yarn back through the top of this stitch and down through the back of the work. There is a very helpful site that explains it clearly found here. Just make sure when you do this that you thread your needle through the SECOND stitch after the last stitch you made, otherwise you will end up with an extra stitch which may mean that all of the following rounds are out of line with each other.
- This pattern includes the back-to-front single crochet stitch (bfsc). A video to show you how to do this can be found here. It's pretty simple but if you can't work it out you can just use a regular single crochet stitch, but this will give it a slightly different look.
- The 'loop behind the back loop' refers to the '3rd loop' in the diagram below


For the body:
With beige make a magic loop with 6sc
Round 1: 2sc in each st (12sc)
Round 2: sc in the first st, 2sc in the next st, rep to end (18sc)
Round 3: sc in the first 2 sts, 2sc in the next st, rep to end(24sc)
Rounds 4 - 9: (6 rounds) sc in each st (24sc)
Round 10: sc in the first 2 sts, sc2tog, rep to end (18sc)Round 11: sc in the first st, sc2tog, rep to end (12sc)
Round 12: (sc in the first 2sts, sc2tog) 3 times (9sc)
Rounds 13 - 15: (3 rounds) sc in each st
Round 16: slip1, ch1, turn, slip the first st, bfsc3, slip1
Round 17: ch1, turn, slip2, sc, slip1
Fasten off
Stuff firmly
For the arms (make 2):
With beige make a magic loop with 6sc
Round 1: sc in the first st, 2sc in the next st, rep to end (9sc)
Rounds 2 - 3: (2 rounds) sc in each st (9sc)
Round 4: sc in the first st, sc2tog, rep to end (6sc)
Round 5: sc in each st
Fasten off black yarn and fasten on grey yarn.
Rounds 6 - 9: (4 rounds) sc in each st (6sc)
Fasten off
Lightly stuff these arms and sew them to the sides of the bodyWith beige make a magic loop with 6sc
Round 1: sc in the first st, 2sc in the next st, rep to end (9sc)
Rounds 2 - 3: (2 rounds) sc in each st (9sc)
Round 4: sc in the first st, sc2tog, rep to end (6sc)
Round 5: sc in each st
Fasten off black yarn and fasten on grey yarn.
Rounds 6 - 9: (4 rounds) sc in each st (6sc)
Fasten off
For the legs (make 2):
With beige make a magic loop with 6sc
Round 1: 2sc in each st (12sc)
Round 2: sc in the first 3 sts, 2cs in the next st, rep to end (15sc)
Rounds 3- 4: (2 rounds) sc in each st (15sc)
Round 5: sc2tog 3 times, sc in the last 9 sts (12sc)
Round 6: sc in the first 2 sts, sc2tog, rep to end (9sc)
Fasten off. Fasten on in grey yarn
Rounds 7 - 11: (5 rounds) sc in each st (9sc)
Rounds 3- 4: (2 rounds) sc in each st (15sc)
Round 5: sc2tog 3 times, sc in the last 9 sts (12sc)
Round 6: sc in the first 2 sts, sc2tog, rep to end (9sc)
Fasten off. Fasten on in grey yarn
Rounds 7 - 11: (5 rounds) sc in each st (9sc)
Fasten off
Stuff the legs and sew them to the underside of the body
For the head:
With beige ch3
Round 1: sc in the 2nd chain st from hook and the next chain st. Make 3sc int eh first chain st you made, sc in the back loop of the previous chain st you crocheted into, then make 2sc in the back of the first chain st you crocheted into (6sc)
Round 2: make 2sc in the first st, sc, make 2sc in the next st, sc3 (8sc)
Round 3: sc, make 2sc in the next st, sc, make 2sc in the following st, sc, slip3 (10sts)
Round 4: sc, make 2sc in the next st, hdc3, make 2sc in the following st, sc4 (12sts)
Round 5: sc2, make 2sc in the next st, hdc4, make 2sc in the following st, sc4
Round 6: sc3, make 2sc in the next st, hdc4, make 2sc in the following st, sc5 (16sc)
Round 7: sc4, make 2sc in the next st, hdc5, make 2sc in the following st, sc5 (18sc)
Round 8: sc4, make 2sc in the next st, sc, make 2sc in the following st, sc3, make 2sc in the next st, sc, make 2sc in the following st, sc4(22sc)
Rounds 9 - 12: (4 rounds) sc in each st
Round 13: (slightly less than 1 round) sc2, (sc, sc2tog) 3 times, sc3, (sc, sc2tog) twice, sc (17sc)
Round 14: sc2tog, sc, sc2tog, sc10, sc2tog (14sc)
Round 15: sc2tog 7 times (7sc)
Stuff firmly
Round 16: sc2tog twice
Fasten off
For the nose:
With a 2mm hook and beige yarn make a magic loop with 1sc. ch1, turn
Row 1: make 2sc in this st. ch1, turn (2sc)
Row 2: make 2sc in both of these sts (4sc)
Fasten off
Sew this to the face

Create eye sockets by making repeated stitches through the head either side of the nose.


For the eyes:
Use white embroidery thread to embroider the whites of the eyes into the eye sockets. Add the irises using dark brown embroidery thread, and then add the pupils over the top using black embroidery thread. Add a highlight using white thread. You may also want to use beige embroidery thread to add an upper eyelid to the eye. Note that this doesn't have to be perfect and can be altered later on to better suit the rest of the facial features (eg. I made the eyes slightly larger and accentuated the highlight right at the end because they didn't look quite right).


For the ears(make 2):
With a 2mm hook make a magic loop with 4sc
Fasten off
Sew to the sides of the head

For the hair:
Wrap dark brown yarn many times around a section of cardboard approx. 8.5cm wide. Cut the yarn at one end to give a number of 17cm long strands.
Attach 4 or 5 strands to both sides of the head either side of the ear. You should attache them by folding each strand in half and pulling the looped end through a stitch in the head before threading the free ends through this loop you've created (there is a more detailed explanation of this on my David Bowie pattern if you're unsure what I mean).
After you've done this use the pet brush to brush these strands of hair to make them smoother and more fluffy, as can be seen below.


For the shirt:
With a 0.7mm hook and #8 crochet cotton ch49
Row 1: sc in the 2nd chain st from hook, then sc in every following chain st. ch1, turn (48sc)
Rows 2 - 3: (2 rows) sc in each st. ch1, turn
Row 4: sc 45, ch2, skip2, sc. ch1, turn
Row 5: sc, make 2sc in the hole below the chains sts, sc in the next 45sts. ch1, turn
Rows 6 - 8: (3 rows) sc in each st. ch1, turn
Row 9: sc, ch2, skip2, sc45. ch1, turn
Row 10: sc45, make 2sc in the hole below the chain sts, sc in the final st. ch1, turn
Rows 11 - 13: (3 rows) sc in each st. ch1, turn
Row 14: sc45, ch2, skip2, sc. ch1, turn
Row 15: sc, make 2sc in the hole below the chain sts, sc in the next 45sts. ch1, turn
Row 16: sc in each st. ch1, turn
Row 17: sc9, ch1, turn (9sc)
Row 18: sc9, ch1, turn
Row 19: sc, ch2, skip2, sc3, hdc3. ch2, turn
Row 20: make 2hdc in the first st, hdc2, turn (4sts)
Row 21: slip1, ch2, hdc3
Fasten off
Rejoin yarn to the 9th st from the other end of row 16

Row 17: sc in this st and the next 8 sts. ch1, turn (8sc)
Row 18: sc9. ch2, turn
Row 19: hdc3, sc6, turn
Row 20: slip6, ch2, hdc2, make 2hdc in the next st. ch2, turn
Row 21: hdc3
Fasten off
Rejoin yarn to row 16 to the 7th st from the first section you made.

Row 17: sc2tog between this st and the next st, sc13, sc2tog. ch1, turn (15sc)
Row 18: sc2tog, sc4, sc3tog, sc4, sc2tog. ch1, turn (11sc)
Row 19: make 2sc in the first st, sc9, make 2sc in the last st. ch2, turn (13sc)
Row 20: make 2hdc in the first st, hdc2, ch1, sc7, ch1, hdc2, make 2hdc in the last st. ch2,turn (17sts (including chain sts))
Row 21: hdc3, ch2, slip11, ch2, hdc3
Fasten off
Sew the shoulder seams together
For the collar:
Rejoin yarn to row 19 to the stitch before the buttonhole.

Row 1: make 2sc in the hole below the chain sts, then sc a further
30sts around the edge of the neckline. ch1, turn (32sc)
Row 2: sc, (sc3, sc2tog) 6 times, sc. ch1, turn (26sc)
Row 3: sc in each st. ch1, turn
Row 4: sc12, sc2tog, sc12. ch1, turn (25sc)
Row 5: sc in each st. ch1, turn
Row 6: sc2, make 3sc in each of the next 21sts, sc2
Fasten off
Use dark blue embroidery thread to sew a line of stitching to the very top of the collar, as can be seen in the image below.


For the buttons:
Cut out 4 disks from the thick plastic sheet, each approximately 6mm in diameter.
Use a sharp needle to sew these to the front of the shirt opposite the buttonholes. Do this by piercing 2 holes in the plastic and sewing through these holes. Fasten up the shirt (you may find it useful to use a pair of tweezers to pull the buttons through the buttonholes)
For the sleeves (make 2):
With a 2mm hook and white 4ply yarn ch23
Row 1: sc in the 2nd loop from hook and the next 21 chain sts. ch1, turn (22sc)
Row 2: bfsc 20, ch1, skip1, bfsc in the last st. ch1,turn
Row 3: make 2sc in the first st, make 2sc in the hole under the chain st, skip1, sc18, make 2sc in the last st. ch1, turn (24sts)
Round 4: sc in the first st you made on the previous round, (sc6, make 2sc in the next st, sc) twice, sc6, then make 2sc in the last st (27sc)
Round 4: slip1, ch1, turn, sc in each st
Rounds 5 - 10: (6 rounds) slip the first st of the previous round, ch1, turn, sc in each st (make sure you count the number of stitches you have after each round as its very easy to gain or lose stitches doing this)
Row 10.5: (this helps re-align the rows) slip6, ch1, turn.
Row 11: sc in the first 3 slip sts, hdc12, sc3, slip1, ch1, turn. (19sts)
Row 12: skip the slip st and slip the next st, sc3, hdc10, sc3, slip1. ch1, turn (18sts)
Row 13: skip the slip st, slip2, sc3, hdc6, sc3, slip1. ch1, turn (15sts)
Row 14: skip the slipped st, slip2, sc2, hdc4, sc2, slip1 (11sts)
Round 15: sc 25sts around the outside edge of the sleeve (as shown below)

Round: 16 slip the first st of the last round, ch1, turn. sc, (sc2, sc2tog) 6 times (19sc)
slip the first st of the last row
Fasten off
Sew these to the armholes
For the buttons on the cuffs cut out 2 disks of plastic 5mm in diameter. Sew them to the cuffs opposite the cuff buttonholes, and fasten them up.

For the skirt:
With a 2mm hook and black 4ply yarn ch32
Round 1: sc in the first chain st you made, then sc in every following chain st to make a loop (32sc)
Rounds 2 - 3: (2 rounds) sc in each st
Round 4: (sc7, make 2sc in the next st) 4 times (36sc)
Rounds 5 - 7: (3 rounds) sc in each st
Round 8: (sc8, make 2sc in the next st) 4 times (40sc)
Rounds 9 - 11: (3 rounds) sc in each st
Round 12: (sc9, make 2sc in the next st) 4 times (44sc)
Rounds 13 - 15: (3 rounds) sc in each st
Round 16: (sc10, make 2sc in the next st) 4 times (48sc)
Rounds 17 - 19: (3 rounds) sc in each st
Round 20: (sc11, make 2sc in the next st) 4 times (52sc)
Round 21: sc in each st
Fasten off
For the bow:
With 3 strands of tan embroidery thread and a 0.7mm crochet hook ch5
Row 1: sc in the 2nd st from hook and the next 3 chain sts. ch1, turn (4sc)
Rows 2 - 4: (4 rows) sc in each st. ch1 , turn
Row 5: sc2tog twice. ch1, turn (2sc)
Rows 6 - 7: (2 rows) sc in each st. ch1, turn
Row 8: make 2sc in both sts. ch1, turn (4sc)
Row 9: make 2sc in the first st, sc2, make 2sc in the last st. ch1, turn (6sc)
Rows 10 - 13: (4 rows) sc in each st. ch1, turn
Row 14: sc2tog, sc2, sc2tog. ch1, turn (4sc)
Row 15: sc2tog twice. ch1, turn (2sc)
Rows 16 - 17: (2 rows): sc in each st. ch1, turn
Row 18: make 2sc in each st. ch1, turn (4sc)
Row 19: make 2sc in the first st, sc2, make 2sc in the last st. ch1, turn (6sc)
Rows 20 - 23: (4 rows) sc in each st. ch1, turn
Row 24: sc2tog, sc2, sc2tog. ch1, turn (4sc)
Row 25: sc2tog twice. ch1, turn (2sc)
Rows 26 - 27: (2 rows): sc in each st. ch1, turn
Row 28: make 2sc in each st. ch1, turn (4sc)
Rows 29 - 33: (5 rows) sc in each st
Fasten off
For the fastening:
ch3
Row 1: sc int he 2nd loop from hook and the next chain st. ch1, turn (2sc)
Rows 2 - 29: (28 rows) sc in each st. ch1, turn
Row 30: sc in each st
Fasten off
Sew one end of this around the middle of the bow, and let the other end hang loose to allow you to fasten it around the neck. Sew on part of a small snap fastener to the back of the bow, and the other to the free end of the fastening, so that you can secure the tie to the neck


For the jacket:
With black #10 crochet cotton ch46
Row 1: make 2sc in the 2nd loop from hook, then sc in each of the next 44sts. ch1, turn (45sc)
Row 2: sc9, make 2sc in the next st, sc25, make 2sc in the following st, sc9. ch1, turn (47sc)
Row 3: sc3, make 2sc in the next st, sc39, make 2sc in the following st, sc3. ch1, turn (49sc)
Row 4: sc4, make 2sc in the next st, sc39, make 2sc in the following st, sc4. ch1, turn (51sc)
Row 5: sc4, make 2sc in the next st, sc41, make 2sc in the following st, sc4. ch1, turn (53sc)
Row 6: sc4, make 2sc in the next st, sc43, make 2sc in the following st, sc4. ch1, turn (55sc)
Row 7: sc4, make 2sc in the next st, sc45, make 2sc in the following st, sc4. ch1, turn (57sc)
Row 8: sc in each st. ch1, turn
Row 9: sc4, sc2tog, sc5. ch1, turn (10sc)
Row 10: sc4, sc2tog, sc2, sc2tog. ch1, turn (8sc)
Row 11: sc2tog, sc, sc2tog, sc3. ch1, turn (6sc)
Row 12: sc4, sc2tog. ch1, turn (5sc)
Row 13: sc2tog, sc3. ch1, turn (4sc)
Row 14: make 2sc in the first st, sc, sc2tog. ch1, turn (4sc)
Row 15: sc2tog, sc, make 2sc in the last st. ch1, turn (4sc)
Row 16: slip2, hdc2
Fasten off
Rejoin yarn to row 8 to the 11th st from the other end of this section you've just made.

Row 9: sc in this st and the next 4sts, sc2tog, sc4. ch1, turn (10sc)
Row 10: sc2tog, sc2, sc2tog, sc4. ch1, turn (8sc)
Row 11: sc3, sc2tog, sc, sc2tog. ch1, turn (6sc)
Row 12: sc2tog, sc4. ch1, turn (5sc)
Row 13: sc3, sc2tog. ch1, turn (4sc)
Row 14: sc2tog, sc, make 2sc in the next st. ch1, turn (4sc)
Row 15: make 2sc in the first st, sc, sc2tog. ch1, turn (4sc)
Row 16: hdc2,slip2. ch1, turn
Fasten off
Rejoin yarn to row 8 to the 10th st from the previous section you made.

Row 9: sc in this st, sc in the next 14sts. ch1, turn (15sc)
Row 10: sc6, sc2tog, sc7. ch1, turn (14sc)
Row 11: sc in each st. ch1, turn
Row 12: make 2sc in the first st, sc12, make 2sc in the last st. ch1, turn (16sc)
Row 13: hdc4, sc8, hdc4. ch1, turn
Row 14: hdc4, ch1, slip8, ch1, hdc4. turn (18sts (inluding central chain sts))
Row 15: slip2, sc2, ch1, slip10 (including the chain sts), ch1, sc2, slip2
Fasten off
Sew the shoulder seams together.
For the upper sleeves:
rejoin yarn to row 8 to the bottom left-hand corner of one of the armholes

Row 1: sc15 around the edge of the armhole until you reach row 8 once again at the bottom left-hand corner. ch1, turn
Row 2: slip2, sc3, hdc5, sc3, slip2. ch1, turn
Row 3: slip3, sc2, hdc5, sc2. slip3. ch1, turn
Row 4: slip4, sc2, hdc3, sc2, slip4
Fasten off
Repeat around the other armhole
For the lower sleeves (make 2):
With black #10 crochet cotton and a 0.7mm crochet hook ch21
Round 1: sc in the 2nd chain st from hook, then sc in each of the remaining 20 chain sts (21sc)
Round 2 - 11: (10 rounds) sc in each st
Row 12: sc14. ch1, turn
Row 13: bfsc14. ch1, turn
Row 14: sc14. ch1, turn
Row 15: bfsc14. ch1, turn
Row 16: sc14. ch1, turn
Row 17: bfsc2tog, bfsc4, bfsc2tog, bfsc4, bfsc2tog. ch1, turn (11sc)
Row 18: sc2tog, sc3, sc2tog, sc2, sc2tog. ch1, turn (8sc)
Row 19: bfsc3tog, bfsc2tog, bfsc3tog (3sc)
Fasten off
Sew to the original armhole, underneath the upper sleeves

For the collar:
rejoin yarn to the right-hand side of the front of the jacket in between the 8th and 9th rows

Row 1: sc in this st, then sc 31 more sts around the neckline, finishing with the final st between the 8th and 9th rows of the left-hand front edge of the jacket. (32sc)
Fasten off
Rejoin yarn to the back loop of the first st of the last round
Row 2: sc in the back loop of this st and each of the next 31sts. ch1, turn
Row 3: skip the first st, slip2, sc26, slip1. ch1, turn
Row 4: skip the first st, slip3, ch1, hdc20, ch1, slip3
Fasten off
For the decoration:
For the ch7 section (make 4):
With black embroidery thread and a 0.7mm hook ch7, sc in the 2nd st from hook
Fasten off
For the ch8 section (make 4):
With black embroidery thread and a 0.7mm hook ch8, sc in the 2nd st from hook
Fasten off
For the ch5 section (make 2):
With black embroidery thread and a 0.7mm hook ch5, sc in the 2nd st from hook
Fasten off
These need to be sewn to the front of the jacket, so that the end without the sc on is touching the central front edge, as can be seen below. On each side the order of these sections, from bottom to top (finishing just below the shoulder seam) is: ch7, ch8, ch8, ch7, ch5.


For the cuffs (make 2):
With a 0.7mm hook and black embroidery thread ch21
Fasten off
Sew these around the sleeves of the jacket about 1.2cm from the edge.
For the buttons:
Cut out 7 circles approximately 5mm in diameter out of black felt.

Sew 3 of these to the front right-hand side of the jacket, to the ends of each of the 3 lower chains of embroidery thread chains you sewed on. The remaining 4 should be sewn o the cuffs, with two being sewn between the ch21 section and the edge of the sleeve for each arm.
After you've done this you may wish to add a dab of PVA glue to each button to stop it tearing away, but this is optional.


Finally use the black #10 crochet cotton to create button loops on the opposite side of the jacket to the front buttons, to allow you to do the jacket up.


For the hat:
With a 2mm hook and black 4ply yarn ch3
Round 1: sc in the 2nd chain st from hook and the next chain st. Make 3sc int eh first chain st you made, sc in the back loop of the previous chain st you crocheted into, then make 2sc in the back of the first chain st you crocheted into (6sc)
Round 2: make 2sc in each st (12sc)
Round 3: (sc in the first st, make 2sc int eh next st) 6 times (18sc)
Round 4: (sc2, make 2sc in the next st) 6 times (24sc)
Round 5: (sc3, make 2sc in the next st) 6 times (30sc)
Round 6: (sc4, make 2sc in the next st) 6 times (36sc)
Fasten off neatly
Rejoin to the loop behind the back loop of the 2nd st from the 'new' st you made when fastening off neatly
Round 7: in the loop behind the back loop of each st: sc6, sc2tog, (sc7, sc2tog) 3 times (32sc)
Round 8: sc4, sc2tog, sc14, sc2tog, sc10 (30sc)
Round 9 - 15: (7 rounds) sc in each st
Fasten off neatly
Rejoin yarn to the front loop of the st after the new st you made when fastening off neatly.
Round 16: in the front loop only of each st: (sc4, make 2sc in the next st) 6 times (36sc)
Round 17: sc3, hdc2, make 2hdc in the next st, hdc2, sc3, make 2sc in the following st, sc5, make 2sc in the next st, sc, hdc4, make 2hdc in the following st, sc5, make 2sc in the next st, sc5, make 2sc in the last st (42sts)
Round 18: sc4, hdc2, make 2hdc in the next st, hdc2, sc4, make 2sc in the next st, sc6, make 2sc in the following st, sc, hdc6, sc in the same st as the last hdc you made, sc5, make 2sc in the next st, sc6, make 2sc in the last st (48sts)
Fasten off
Sew a length of wire around the rim of the hat, as shown below. Make sure you sew it so that the wire is completely covered.


For the ribbon:With a 0.7mm hook and #10 crochet cotton ch33
Round 1: sc in the first chain st you made, then sc in every following chain st to make a loop (33sc)
Rounds 2 - 4: (3 rounds) sc in each st
Fasten off neatly

With a 0.7mm hook and #10 crochet cotton ch5
Row 1: sc in the 2nd chain st from hook and the next 3 chain sts. ch1, turn (4sc)
Rows 2 - 9: (8 rows) sc in each st. ch1, turn
Row 10: sc in each st
Fasten off
Secure this smaller length around the outside of the large ribbon by sewing the cast on and cast off edges together with the large ribbon in between. Sew the larger ribbon to the hat, with the small ribbon situated on the right-hand side (as looking at it from the front)


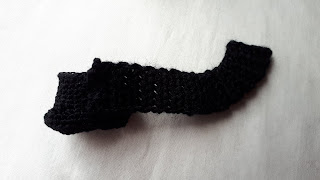
For the shoes (make 2):
For the sole:
With #10 crochet cotton and a 0.7mm hook ch6
Round 1: make 2sc in each of the first 3 chain sts, make 3sc in the next st, sc, make 3sc in the last st (13sc)
Round 2: (sc, make 2sc in the next st) 3 times, sc, make 3sc in the next st, sc3, make 3sc in the following st, sc (20sc)
Round 3: (sc2, make 2sc in the next st) 3 times, sc2, make 3sc in the following st, sc5, make 3sc in the next st, sc2 (27sc)
Round 4: (sc3, make 2sc in the next st) 3 times, sc3 (30sc)
Fasten off neatly
Rejoin yarn to the back loop of the 2nd st after the 'new' st you made when fastening off neatly
Round 5: Sc in this st and the next 29sts
Fasten off neatly
For the heel sole:
With #10 crochet cotton and a 0.7mm hook ch4
Round 1: sc in the 2nd chain st from hook, sc in the next chain st, make 3sc in the first chain st you made, sc in the back loop of the preious chain st you crocheted into, make 2sc in the back loop of the first chain st you crocheted into (8sc)
Round 3: make 2sc in the first st, sc, make 2sc in the next st, sc, make 3sc in the following st, sc2, make 3sc in the last st (14sc)
Round 4: sc, make 2sc in the next st, sc2, make 2sc in the following st, sc2, make 3sc in the next st, sc4, make 3sc in the following st (20sc)
Fasten off neatly
Rejoin yarn to the back loop of the 2nd st after the 'new' st you made when fastening off neatly.
Round 5: sc in the back loop of this st and the next 19sts
Fasten off neatly
For the body of the shoe: Rejoin yarn to the heel sole to 3rd st before the 'new' st you made then fastening off neatly.
Round 6: Sc in this st and the next 12sts. Sc in the 6th st from the 'new' st you made when fastening off neatly on the sole (as shown below), then sc in the next 23sts of the sole. (37sc)

Round 7: Sc in the first st you made on the previous round, sc in the next 17sts, sc2tog twice, sc3tog, sc2tog twice, sc8 (31sc)
Round 8: sc18, sc2tog, sc, sc2tog, sc8 (29sc)
Rounds 9 - 13: (5 rounds) sc in each st
Fasten off
For the right boot flap:
With black 4ply yarn and a 2mm hoom ch7
Row 1: sc in in the 2nd loop from hook, then sc in each fo the following 5 chain sts. ch1, turn (6sc)
Row 2: bfsc in each st. ch1, turn
Row 3: sc in each st. ch1, turn
Row 4: bfsc in each st. ch1, turn
Row 5: sc in each st. ch1, turn
Row 6: bfsc in each st. ch1, turn
Row 7: sc in each st. ch1, turn
Row 8: bfsc in each st. ch1, turn
Row 9: sc in each st. ch1, turn
Row 10: bfsc in each st. ch1, turn
Row 11: sc in each st. ch1, turn
Row 12: bfsc in each st. ch1, turn
Row 13: slip2, sc2, hdc2. ch1, turn
Row 14: bfsc in each st. ch1, turn
Repeat the previous 2 rows 4 times more
Fasten off
For the left boot flap:
With black 4ply yarn and a 2mm hook ch7
Row 1: sc in in the 2nd loop from hook, then sc in each of the following 5 chain sts. ch1, turn (6sc)
Row 2: bfsc in each st. ch1, turn
Row 3: sc in each st. ch1, turn
Row 4: bfsc in each st. ch1, turn
Row 5: sc in each st. ch1, turn
Row 6: bfsc in each st. ch1, turn
Row 7: sc in each st. ch1, turn
Row 8: bfsc in each st. ch1, turn
Row 9: sc in each st. ch1, turn
Row 10: bfsc in each st. ch1, turn
Row 11: sc in each st. ch1, turn
Row 12: bfsc in each st. ch1, turn
Row 13: hdc2, sc2, slip2. ch1, turn
Row 14: bfsc in each st. ch1, turn
Repeat the previous 2 rounds 4 times more
Fasten off
Sew the cast on edge of each of these flaps to the outside edge of each of the corresponding boot. Wrap it round the foot, then use grey embroidery thread (or similar) to lace up the cast-off edge to fasten, as shown below.


That's all for this pattern - I hope you have enjoyed it. If you have, you may be interested on following me on Instrgam so you can keep updated on all the projects I'm working on, be alerted whenever I publish a new pattern, and even have some say in the pattern I make. I'm also currently working on creating a new crochet blog that's more academically focused, and you can find out all about that on my Instagram page.
If you have any questions about this or any of my patterns please feel free to contact me, either by leaving a comment below, or via my Ravelry or Instagram pages.
You are very welcome to sell finished products but I do ask that you don't re-post this pattern or claim it as your own. Thank you!!!


Stuff the legs and sew them to the underside of the body
For the head:
With beige ch3
Round 1: sc in the 2nd chain st from hook and the next chain st. Make 3sc int eh first chain st you made, sc in the back loop of the previous chain st you crocheted into, then make 2sc in the back of the first chain st you crocheted into (6sc)
Round 2: make 2sc in the first st, sc, make 2sc in the next st, sc3 (8sc)
Round 3: sc, make 2sc in the next st, sc, make 2sc in the following st, sc, slip3 (10sts)
Round 4: sc, make 2sc in the next st, hdc3, make 2sc in the following st, sc4 (12sts)
Round 5: sc2, make 2sc in the next st, hdc4, make 2sc in the following st, sc4
Round 6: sc3, make 2sc in the next st, hdc4, make 2sc in the following st, sc5 (16sc)
Round 7: sc4, make 2sc in the next st, hdc5, make 2sc in the following st, sc5 (18sc)
Round 8: sc4, make 2sc in the next st, sc, make 2sc in the following st, sc3, make 2sc in the next st, sc, make 2sc in the following st, sc4(22sc)
Rounds 9 - 12: (4 rounds) sc in each st
Round 13: (slightly less than 1 round) sc2, (sc, sc2tog) 3 times, sc3, (sc, sc2tog) twice, sc (17sc)
Round 14: sc2tog, sc, sc2tog, sc10, sc2tog (14sc)
Round 15: sc2tog 7 times (7sc)
Stuff firmly
Round 16: sc2tog twice
Fasten off
For the nose:
With a 2mm hook and beige yarn make a magic loop with 1sc. ch1, turn
Row 1: make 2sc in this st. ch1, turn (2sc)
Row 2: make 2sc in both of these sts (4sc)
Fasten off
Sew this to the face


For the eyes:
Use white embroidery thread to embroider the whites of the eyes into the eye sockets. Add the irises using dark brown embroidery thread, and then add the pupils over the top using black embroidery thread. Add a highlight using white thread. You may also want to use beige embroidery thread to add an upper eyelid to the eye. Note that this doesn't have to be perfect and can be altered later on to better suit the rest of the facial features (eg. I made the eyes slightly larger and accentuated the highlight right at the end because they didn't look quite right).


For the ears(make 2):
With a 2mm hook make a magic loop with 4sc
Fasten off
Sew to the sides of the head

For the hair:
Wrap dark brown yarn many times around a section of cardboard approx. 8.5cm wide. Cut the yarn at one end to give a number of 17cm long strands.
Attach 4 or 5 strands to both sides of the head either side of the ear. You should attache them by folding each strand in half and pulling the looped end through a stitch in the head before threading the free ends through this loop you've created (there is a more detailed explanation of this on my David Bowie pattern if you're unsure what I mean).
After you've done this use the pet brush to brush these strands of hair to make them smoother and more fluffy, as can be seen below.

You now need to curl up these strands of hair into ringlets on the head. Secure them in place using small stitches with a regular sewing needle and dark brown thread.

After this you need to attach around 10 strands to the top centre of the head. These will create the hairline, so try to make sure they are arranged in 2 definite rows (although these rows should be very close together). Brush these strands until they are smooth. You then need to flatten them down until they meet the previous row of ringlets and secure them in place with a few stitches. The ends should then be fashioned into a second layer of ringlets just above the first one.


You then need to sew the head to the neck of the body.


After you've done this you will need to add hair to the back of the head. Attach it in a sort of semicircle shape, the bottom of which lies just above the point where the head meets the neck, with the sides just behind the ears. Once again you should brush this until it is smooth and fluffly.


Brush this hair upwards and secure it in place using a few stitches just below where the ringlets are


Once you've done this curl all loose hair around into a bun shape and seccure with repeated small stitches using dark brown sewing cotton.
For the eyebrows and mouth:
Using a single strand of dark brown embroidery thread sew the eyebrows in place, using repeated small stitches to try to imitate the individual hairs. After you've done this sew the mouth in place using a single strand of black embroidery thread.


For the shirt:
With a 0.7mm hook and #8 crochet cotton ch49
Row 1: sc in the 2nd chain st from hook, then sc in every following chain st. ch1, turn (48sc)
Rows 2 - 3: (2 rows) sc in each st. ch1, turn
Row 4: sc 45, ch2, skip2, sc. ch1, turn
Row 5: sc, make 2sc in the hole below the chains sts, sc in the next 45sts. ch1, turn
Rows 6 - 8: (3 rows) sc in each st. ch1, turn
Row 9: sc, ch2, skip2, sc45. ch1, turn
Row 10: sc45, make 2sc in the hole below the chain sts, sc in the final st. ch1, turn
Rows 11 - 13: (3 rows) sc in each st. ch1, turn
Row 14: sc45, ch2, skip2, sc. ch1, turn
Row 15: sc, make 2sc in the hole below the chain sts, sc in the next 45sts. ch1, turn
Row 16: sc in each st. ch1, turn
Row 17: sc9, ch1, turn (9sc)
Row 18: sc9, ch1, turn
Row 19: sc, ch2, skip2, sc3, hdc3. ch2, turn
Row 20: make 2hdc in the first st, hdc2, turn (4sts)
Row 21: slip1, ch2, hdc3
Fasten off
Rejoin yarn to the 9th st from the other end of row 16

Row 17: sc in this st and the next 8 sts. ch1, turn (8sc)
Row 18: sc9. ch2, turn
Row 19: hdc3, sc6, turn
Row 20: slip6, ch2, hdc2, make 2hdc in the next st. ch2, turn
Row 21: hdc3
Fasten off
Rejoin yarn to row 16 to the 7th st from the first section you made.

Row 17: sc2tog between this st and the next st, sc13, sc2tog. ch1, turn (15sc)
Row 18: sc2tog, sc4, sc3tog, sc4, sc2tog. ch1, turn (11sc)
Row 19: make 2sc in the first st, sc9, make 2sc in the last st. ch2, turn (13sc)
Row 20: make 2hdc in the first st, hdc2, ch1, sc7, ch1, hdc2, make 2hdc in the last st. ch2,turn (17sts (including chain sts))
Row 21: hdc3, ch2, slip11, ch2, hdc3
Fasten off
Sew the shoulder seams together
For the collar:
Rejoin yarn to row 19 to the stitch before the buttonhole.

Row 1: make 2sc in the hole below the chain sts, then sc a further
30sts around the edge of the neckline. ch1, turn (32sc)
Row 2: sc, (sc3, sc2tog) 6 times, sc. ch1, turn (26sc)
Row 3: sc in each st. ch1, turn
Row 4: sc12, sc2tog, sc12. ch1, turn (25sc)
Row 5: sc in each st. ch1, turn
Row 6: sc2, make 3sc in each of the next 21sts, sc2
Fasten off
Use dark blue embroidery thread to sew a line of stitching to the very top of the collar, as can be seen in the image below.


For the buttons:
Cut out 4 disks from the thick plastic sheet, each approximately 6mm in diameter.
Use a sharp needle to sew these to the front of the shirt opposite the buttonholes. Do this by piercing 2 holes in the plastic and sewing through these holes. Fasten up the shirt (you may find it useful to use a pair of tweezers to pull the buttons through the buttonholes)
For the sleeves (make 2):
With a 2mm hook and white 4ply yarn ch23
Row 1: sc in the 2nd loop from hook and the next 21 chain sts. ch1, turn (22sc)
Row 2: bfsc 20, ch1, skip1, bfsc in the last st. ch1,turn
Row 3: make 2sc in the first st, make 2sc in the hole under the chain st, skip1, sc18, make 2sc in the last st. ch1, turn (24sts)
Round 4: sc in the first st you made on the previous round, (sc6, make 2sc in the next st, sc) twice, sc6, then make 2sc in the last st (27sc)
Round 4: slip1, ch1, turn, sc in each st
Rounds 5 - 10: (6 rounds) slip the first st of the previous round, ch1, turn, sc in each st (make sure you count the number of stitches you have after each round as its very easy to gain or lose stitches doing this)
Row 10.5: (this helps re-align the rows) slip6, ch1, turn.
Row 11: sc in the first 3 slip sts, hdc12, sc3, slip1, ch1, turn. (19sts)
Row 12: skip the slip st and slip the next st, sc3, hdc10, sc3, slip1. ch1, turn (18sts)
Row 13: skip the slip st, slip2, sc3, hdc6, sc3, slip1. ch1, turn (15sts)
Row 14: skip the slipped st, slip2, sc2, hdc4, sc2, slip1 (11sts)
Round 15: sc 25sts around the outside edge of the sleeve (as shown below)

Round: 16 slip the first st of the last round, ch1, turn. sc, (sc2, sc2tog) 6 times (19sc)
slip the first st of the last row
Fasten off
Sew these to the armholes
For the buttons on the cuffs cut out 2 disks of plastic 5mm in diameter. Sew them to the cuffs opposite the cuff buttonholes, and fasten them up.

For the skirt:
With a 2mm hook and black 4ply yarn ch32
Round 1: sc in the first chain st you made, then sc in every following chain st to make a loop (32sc)
Rounds 2 - 3: (2 rounds) sc in each st
Round 4: (sc7, make 2sc in the next st) 4 times (36sc)
Rounds 5 - 7: (3 rounds) sc in each st
Round 8: (sc8, make 2sc in the next st) 4 times (40sc)
Rounds 9 - 11: (3 rounds) sc in each st
Round 12: (sc9, make 2sc in the next st) 4 times (44sc)
Rounds 13 - 15: (3 rounds) sc in each st
Round 16: (sc10, make 2sc in the next st) 4 times (48sc)
Rounds 17 - 19: (3 rounds) sc in each st
Round 20: (sc11, make 2sc in the next st) 4 times (52sc)
Round 21: sc in each st
Fasten off
For the bow:
With 3 strands of tan embroidery thread and a 0.7mm crochet hook ch5
Row 1: sc in the 2nd st from hook and the next 3 chain sts. ch1, turn (4sc)
Rows 2 - 4: (4 rows) sc in each st. ch1 , turn
Row 5: sc2tog twice. ch1, turn (2sc)
Rows 6 - 7: (2 rows) sc in each st. ch1, turn
Row 8: make 2sc in both sts. ch1, turn (4sc)
Row 9: make 2sc in the first st, sc2, make 2sc in the last st. ch1, turn (6sc)
Rows 10 - 13: (4 rows) sc in each st. ch1, turn
Row 14: sc2tog, sc2, sc2tog. ch1, turn (4sc)
Row 15: sc2tog twice. ch1, turn (2sc)
Rows 16 - 17: (2 rows): sc in each st. ch1, turn
Row 18: make 2sc in each st. ch1, turn (4sc)
Row 19: make 2sc in the first st, sc2, make 2sc in the last st. ch1, turn (6sc)
Rows 20 - 23: (4 rows) sc in each st. ch1, turn
Row 24: sc2tog, sc2, sc2tog. ch1, turn (4sc)
Row 25: sc2tog twice. ch1, turn (2sc)
Rows 26 - 27: (2 rows): sc in each st. ch1, turn
Row 28: make 2sc in each st. ch1, turn (4sc)
Rows 29 - 33: (5 rows) sc in each st
Fasten off
For the fastening:
ch3
Row 1: sc int he 2nd loop from hook and the next chain st. ch1, turn (2sc)
Rows 2 - 29: (28 rows) sc in each st. ch1, turn
Row 30: sc in each st
Fasten off
Sew one end of this around the middle of the bow, and let the other end hang loose to allow you to fasten it around the neck. Sew on part of a small snap fastener to the back of the bow, and the other to the free end of the fastening, so that you can secure the tie to the neck


For the jacket:
With black #10 crochet cotton ch46
Row 1: make 2sc in the 2nd loop from hook, then sc in each of the next 44sts. ch1, turn (45sc)
Row 2: sc9, make 2sc in the next st, sc25, make 2sc in the following st, sc9. ch1, turn (47sc)
Row 3: sc3, make 2sc in the next st, sc39, make 2sc in the following st, sc3. ch1, turn (49sc)
Row 4: sc4, make 2sc in the next st, sc39, make 2sc in the following st, sc4. ch1, turn (51sc)
Row 5: sc4, make 2sc in the next st, sc41, make 2sc in the following st, sc4. ch1, turn (53sc)
Row 6: sc4, make 2sc in the next st, sc43, make 2sc in the following st, sc4. ch1, turn (55sc)
Row 7: sc4, make 2sc in the next st, sc45, make 2sc in the following st, sc4. ch1, turn (57sc)
Row 8: sc in each st. ch1, turn
Row 9: sc4, sc2tog, sc5. ch1, turn (10sc)
Row 10: sc4, sc2tog, sc2, sc2tog. ch1, turn (8sc)
Row 11: sc2tog, sc, sc2tog, sc3. ch1, turn (6sc)
Row 12: sc4, sc2tog. ch1, turn (5sc)
Row 13: sc2tog, sc3. ch1, turn (4sc)
Row 14: make 2sc in the first st, sc, sc2tog. ch1, turn (4sc)
Row 15: sc2tog, sc, make 2sc in the last st. ch1, turn (4sc)
Row 16: slip2, hdc2
Fasten off
Rejoin yarn to row 8 to the 11th st from the other end of this section you've just made.

Row 9: sc in this st and the next 4sts, sc2tog, sc4. ch1, turn (10sc)
Row 10: sc2tog, sc2, sc2tog, sc4. ch1, turn (8sc)
Row 11: sc3, sc2tog, sc, sc2tog. ch1, turn (6sc)
Row 12: sc2tog, sc4. ch1, turn (5sc)
Row 13: sc3, sc2tog. ch1, turn (4sc)
Row 14: sc2tog, sc, make 2sc in the next st. ch1, turn (4sc)
Row 15: make 2sc in the first st, sc, sc2tog. ch1, turn (4sc)
Row 16: hdc2,slip2. ch1, turn
Fasten off
Rejoin yarn to row 8 to the 10th st from the previous section you made.

Row 9: sc in this st, sc in the next 14sts. ch1, turn (15sc)
Row 10: sc6, sc2tog, sc7. ch1, turn (14sc)
Row 11: sc in each st. ch1, turn
Row 12: make 2sc in the first st, sc12, make 2sc in the last st. ch1, turn (16sc)
Row 13: hdc4, sc8, hdc4. ch1, turn
Row 14: hdc4, ch1, slip8, ch1, hdc4. turn (18sts (inluding central chain sts))
Row 15: slip2, sc2, ch1, slip10 (including the chain sts), ch1, sc2, slip2
Fasten off
Sew the shoulder seams together.
For the upper sleeves:
rejoin yarn to row 8 to the bottom left-hand corner of one of the armholes

Row 1: sc15 around the edge of the armhole until you reach row 8 once again at the bottom left-hand corner. ch1, turn
Row 2: slip2, sc3, hdc5, sc3, slip2. ch1, turn
Row 3: slip3, sc2, hdc5, sc2. slip3. ch1, turn
Row 4: slip4, sc2, hdc3, sc2, slip4
Fasten off
Repeat around the other armhole
For the lower sleeves (make 2):
With black #10 crochet cotton and a 0.7mm crochet hook ch21
Round 1: sc in the 2nd chain st from hook, then sc in each of the remaining 20 chain sts (21sc)
Round 2 - 11: (10 rounds) sc in each st
Row 12: sc14. ch1, turn
Row 13: bfsc14. ch1, turn
Row 14: sc14. ch1, turn
Row 15: bfsc14. ch1, turn
Row 16: sc14. ch1, turn
Row 17: bfsc2tog, bfsc4, bfsc2tog, bfsc4, bfsc2tog. ch1, turn (11sc)
Row 18: sc2tog, sc3, sc2tog, sc2, sc2tog. ch1, turn (8sc)
Row 19: bfsc3tog, bfsc2tog, bfsc3tog (3sc)
Fasten off
Sew to the original armhole, underneath the upper sleeves

For the collar:
rejoin yarn to the right-hand side of the front of the jacket in between the 8th and 9th rows

Row 1: sc in this st, then sc 31 more sts around the neckline, finishing with the final st between the 8th and 9th rows of the left-hand front edge of the jacket. (32sc)
Fasten off
Rejoin yarn to the back loop of the first st of the last round
Row 2: sc in the back loop of this st and each of the next 31sts. ch1, turn
Row 3: skip the first st, slip2, sc26, slip1. ch1, turn
Row 4: skip the first st, slip3, ch1, hdc20, ch1, slip3
Fasten off
For the decoration:
For the ch7 section (make 4):
With black embroidery thread and a 0.7mm hook ch7, sc in the 2nd st from hook
Fasten off
For the ch8 section (make 4):
With black embroidery thread and a 0.7mm hook ch8, sc in the 2nd st from hook
Fasten off
For the ch5 section (make 2):
With black embroidery thread and a 0.7mm hook ch5, sc in the 2nd st from hook
Fasten off
These need to be sewn to the front of the jacket, so that the end without the sc on is touching the central front edge, as can be seen below. On each side the order of these sections, from bottom to top (finishing just below the shoulder seam) is: ch7, ch8, ch8, ch7, ch5.


For the cuffs (make 2):
With a 0.7mm hook and black embroidery thread ch21
Fasten off
Sew these around the sleeves of the jacket about 1.2cm from the edge.
For the buttons:
Cut out 7 circles approximately 5mm in diameter out of black felt.

Sew 3 of these to the front right-hand side of the jacket, to the ends of each of the 3 lower chains of embroidery thread chains you sewed on. The remaining 4 should be sewn o the cuffs, with two being sewn between the ch21 section and the edge of the sleeve for each arm.
After you've done this you may wish to add a dab of PVA glue to each button to stop it tearing away, but this is optional.


Finally use the black #10 crochet cotton to create button loops on the opposite side of the jacket to the front buttons, to allow you to do the jacket up.


For the hat:
With a 2mm hook and black 4ply yarn ch3
Round 1: sc in the 2nd chain st from hook and the next chain st. Make 3sc int eh first chain st you made, sc in the back loop of the previous chain st you crocheted into, then make 2sc in the back of the first chain st you crocheted into (6sc)
Round 2: make 2sc in each st (12sc)
Round 3: (sc in the first st, make 2sc int eh next st) 6 times (18sc)
Round 4: (sc2, make 2sc in the next st) 6 times (24sc)
Round 5: (sc3, make 2sc in the next st) 6 times (30sc)
Round 6: (sc4, make 2sc in the next st) 6 times (36sc)
Fasten off neatly
Rejoin to the loop behind the back loop of the 2nd st from the 'new' st you made when fastening off neatly
Round 7: in the loop behind the back loop of each st: sc6, sc2tog, (sc7, sc2tog) 3 times (32sc)
Round 8: sc4, sc2tog, sc14, sc2tog, sc10 (30sc)
Round 9 - 15: (7 rounds) sc in each st
Fasten off neatly
Rejoin yarn to the front loop of the st after the new st you made when fastening off neatly.
Round 16: in the front loop only of each st: (sc4, make 2sc in the next st) 6 times (36sc)
Round 17: sc3, hdc2, make 2hdc in the next st, hdc2, sc3, make 2sc in the following st, sc5, make 2sc in the next st, sc, hdc4, make 2hdc in the following st, sc5, make 2sc in the next st, sc5, make 2sc in the last st (42sts)
Round 18: sc4, hdc2, make 2hdc in the next st, hdc2, sc4, make 2sc in the next st, sc6, make 2sc in the following st, sc, hdc6, sc in the same st as the last hdc you made, sc5, make 2sc in the next st, sc6, make 2sc in the last st (48sts)
Fasten off
Sew a length of wire around the rim of the hat, as shown below. Make sure you sew it so that the wire is completely covered.


For the ribbon:With a 0.7mm hook and #10 crochet cotton ch33
Round 1: sc in the first chain st you made, then sc in every following chain st to make a loop (33sc)
Rounds 2 - 4: (3 rounds) sc in each st
Fasten off neatly

With a 0.7mm hook and #10 crochet cotton ch5
Row 1: sc in the 2nd chain st from hook and the next 3 chain sts. ch1, turn (4sc)
Rows 2 - 9: (8 rows) sc in each st. ch1, turn
Row 10: sc in each st
Fasten off
Secure this smaller length around the outside of the large ribbon by sewing the cast on and cast off edges together with the large ribbon in between. Sew the larger ribbon to the hat, with the small ribbon situated on the right-hand side (as looking at it from the front)


Use a few sts to secure the hat to the head

For the shoes (make 2):
For the sole:
With #10 crochet cotton and a 0.7mm hook ch6
Round 1: make 2sc in each of the first 3 chain sts, make 3sc in the next st, sc, make 3sc in the last st (13sc)
Round 2: (sc, make 2sc in the next st) 3 times, sc, make 3sc in the next st, sc3, make 3sc in the following st, sc (20sc)
Round 3: (sc2, make 2sc in the next st) 3 times, sc2, make 3sc in the following st, sc5, make 3sc in the next st, sc2 (27sc)
Round 4: (sc3, make 2sc in the next st) 3 times, sc3 (30sc)
Fasten off neatly
Rejoin yarn to the back loop of the 2nd st after the 'new' st you made when fastening off neatly
Round 5: Sc in this st and the next 29sts
Fasten off neatly
For the heel sole:
With #10 crochet cotton and a 0.7mm hook ch4
Round 1: sc in the 2nd chain st from hook, sc in the next chain st, make 3sc in the first chain st you made, sc in the back loop of the preious chain st you crocheted into, make 2sc in the back loop of the first chain st you crocheted into (8sc)
Round 3: make 2sc in the first st, sc, make 2sc in the next st, sc, make 3sc in the following st, sc2, make 3sc in the last st (14sc)
Round 4: sc, make 2sc in the next st, sc2, make 2sc in the following st, sc2, make 3sc in the next st, sc4, make 3sc in the following st (20sc)
Fasten off neatly
Rejoin yarn to the back loop of the 2nd st after the 'new' st you made when fastening off neatly.
Round 5: sc in the back loop of this st and the next 19sts
Fasten off neatly
For the body of the shoe: Rejoin yarn to the heel sole to 3rd st before the 'new' st you made then fastening off neatly.
Round 6: Sc in this st and the next 12sts. Sc in the 6th st from the 'new' st you made when fastening off neatly on the sole (as shown below), then sc in the next 23sts of the sole. (37sc)

Round 7: Sc in the first st you made on the previous round, sc in the next 17sts, sc2tog twice, sc3tog, sc2tog twice, sc8 (31sc)
Round 8: sc18, sc2tog, sc, sc2tog, sc8 (29sc)
Rounds 9 - 13: (5 rounds) sc in each st
Fasten off
For the right boot flap:
With black 4ply yarn and a 2mm hoom ch7
Row 1: sc in in the 2nd loop from hook, then sc in each fo the following 5 chain sts. ch1, turn (6sc)
Row 2: bfsc in each st. ch1, turn
Row 3: sc in each st. ch1, turn
Row 4: bfsc in each st. ch1, turn
Row 5: sc in each st. ch1, turn
Row 6: bfsc in each st. ch1, turn
Row 7: sc in each st. ch1, turn
Row 8: bfsc in each st. ch1, turn
Row 9: sc in each st. ch1, turn
Row 10: bfsc in each st. ch1, turn
Row 11: sc in each st. ch1, turn
Row 12: bfsc in each st. ch1, turn
Row 13: slip2, sc2, hdc2. ch1, turn
Row 14: bfsc in each st. ch1, turn
Repeat the previous 2 rows 4 times more
Fasten off
For the left boot flap:
With black 4ply yarn and a 2mm hook ch7
Row 1: sc in in the 2nd loop from hook, then sc in each of the following 5 chain sts. ch1, turn (6sc)
Row 2: bfsc in each st. ch1, turn
Row 3: sc in each st. ch1, turn
Row 4: bfsc in each st. ch1, turn
Row 5: sc in each st. ch1, turn
Row 6: bfsc in each st. ch1, turn
Row 7: sc in each st. ch1, turn
Row 8: bfsc in each st. ch1, turn
Row 9: sc in each st. ch1, turn
Row 10: bfsc in each st. ch1, turn
Row 11: sc in each st. ch1, turn
Row 12: bfsc in each st. ch1, turn
Row 13: hdc2, sc2, slip2. ch1, turn
Row 14: bfsc in each st. ch1, turn
Repeat the previous 2 rounds 4 times more
Fasten off
Sew the cast on edge of each of these flaps to the outside edge of each of the corresponding boot. Wrap it round the foot, then use grey embroidery thread (or similar) to lace up the cast-off edge to fasten, as shown below.


That's all for this pattern - I hope you have enjoyed it. If you have, you may be interested on following me on Instrgam so you can keep updated on all the projects I'm working on, be alerted whenever I publish a new pattern, and even have some say in the pattern I make. I'm also currently working on creating a new crochet blog that's more academically focused, and you can find out all about that on my Instagram page.
If you have any questions about this or any of my patterns please feel free to contact me, either by leaving a comment below, or via my Ravelry or Instagram pages.
You are very welcome to sell finished products but I do ask that you don't re-post this pattern or claim it as your own. Thank you!!!

