

 |

For the start of Autumn (the astronomical Autumn), I have created this Autumn fairy. I have included a photo tutorial to show you how to make the wings.
Difficulty:

Medium
You will need:
- Dk yarn in peach (or another suitable skin colour) and orange
- 4ply yarn in dark red, light red, red, orange, yellow, green
- Embroidery thread in black, white, dark brown, pink and orange(useful but not necessary)
- Yellow sewing thread
- A pet brush
- Several knitting needles or a metal gauze (I prefer using knitting needles)
- A cutting mat or a similar hard surface resistant to scratching
- PVA glue
- Cling film
- Scissors
- A darning needle (or similar)
- A regular sewing needle
- Orange sewing cotton
- Thin wire (approx 0.5 mm in diameter)
- Masking tape
- A tape measure
Note:
- instead of writing 'sc in the next ... sts' in many cases I have just written 'sc... Eg. 'sc12' means 'sc in the next 12 sts'
- 'fasten off neatly' refers to a special way of fastening off which is neater and makes it easier to see where you should be crocheting on the next round (also known as invisible fastening off). This involves pulling up your yarn through your stitch, threading the yarn underneath the second stitch from where you pulled your yarn up, then threading your yarn back through the top of this stitch and down through the back of the work. There is a very helpful site that explains it clearly found here. Just make sure when you do this that you thread your needle through the SECOND stitch after the last stitch you made, otherwise you will end up with an extra stitch which may mean that all of the following rounds are out of line with each other.
For the body:
For every part of the body, unless specifies, use a 2.5mm hook and peach dk yarn
For the legs (make 2):
ch5
Round 1: sc in the 2nd st from hook, sc in the next 2 chain sts, 3sc in the last chan st, sc in the back of the previous two chain sts you crocheted into, 2sc in the back of the first chain st you crocheted into (10sc)
Round 2: 2sc in the first st, sc in the next 2sts, 2sc in each of the next 3 sts, sc in the following 2sts, 2sc in each of the next 2 sts (16sc)
Round 3: (this is slightly less than one round) sc in the first 5sts, sc5tog, sc in the next 6sts (12sc)
Round 4: sc3, sc5tog, sc3 (8sc)
Round 5: sc2tog, sc in the next 6sc (7sc)
Round 6: (this is slightly less than 1 round) sc in the first 6sts
Round 7: sc in the first 2sts, 2sc in the next st, sc in the next 3sts, 2sc in the next st (9sc)
Round 8: sc in each st
Round 9: sc in the first 2sts, 2sc in the next st, sc in the last 6sts (10sc)
Round 10: sc in the first 2sts, 2sc in the next st, sc in the last 7sts (11sc)
Round 11: sc in the first 3sts, 2sc in each of the next 2 sts, sc in the last 6sts (13sc)
Round 12: sc in the first 4sts, sc2tog, sc in the last 7sts (12sc)
Round 13: sc in the first 4sts, sc2tog, sc in the last 6sts (11sc)
Round 14:(this is slightly more than 1 round) sc in the first 4sts, sc3tog, sc in the last 3sts (9sc)
Round 15: sc in the first 4sts, sc2tog, sc in the next 3sts, 3sc in the last st (10sc)
Round 16: (this is slightly more than 1 round) sc in the first 8sts, sc3tog (8sc)
Round 17: sc in the first 3sts, 2sc in the next st, sc in the following 3sts, 2sc in the last st (10sc)
Round 18: sc in the first 3sts, 2sc in the next st, sc in the following 5sts, 2sc in the next st, sc in the last 2sts (12sc)
Round 19: sc in each st
Round 20: sc in the first 9sts, 2sc in the next st, sc in the last 2sts (13sc)
Round 21: sc in each st (13sc)
Round 22: sc in the first 10sts, 2sc in the next st, sc in the last 2sts (14sc)
Round 23: sc in each st
Round 24: sc11, 2sc in the next st, sc4 (15sc)
Round 25: (this is less than one round)sc, 2sc in the next st, sc4.
Round 25: (this is less than one round)sc, 2sc in the next st, sc4.
Fasten off neatly
Stuff the legs
Stuff the legs
For the arms (make 2):
Make a magic loop with 6sc
Round 1: sc in the first st, 2sc in the next st, rep to end (9sc)
Round 2: sc in each st
Round 3: sc in the first st, sc2tog, rep to end (6sc)
Rounds 4 - 6: (3 rounds) sc in each st
Round 7: 2sc in the first st, sc5 (7sc)
Place a stitch marker in between the two stitches you made in the first st
Rounds 8 - 9: (2 rounds) sc in each st
Round 10: sc3, 2sc in each of the next 2sts, sc2(9sc)
Round 11: sc4, sc2tog, sc2tog, 2sc (8sc)
Place a stitch marker in between the two stitches you made in the same stitch.
Round 12 - 16: (5 rounds) sc in each st
Round 17: sc4, 2sc in the next st, sc3 (9sc)
Fasten off neatly
Don't stuff yet
Press the arm and hand flat so that the stitch markers are on the edges

For the thumb:
insert your hook through the post of one of the stitches in between rounds 2 and 3 (as shown below)(NOTE: the magic loop you made isn't counted when numbering the rows in the pattern above, so looking at your hand from the end your hook should be inserted between the 3rd and 4th circle). Pull your yarn through, ch1, then make 2sc into where you first inserted your hook. Ch1, then sc2tog through the 2 sts you just made.
Fasten off


Make sure that when you make the thumb on the second hand it is on the opposite side of the hand to the first one you made, with respect to the elbow (the 2sc x2 and sc2tog x2 you did on rows 10 and 11)
For the fingers:
insert your hook through the post of the stitch between the magic loop and round 1 directly above where you made the thumb (as shown below)
pull the yarn through, ch1, then sc into where you inserted your hook. ch1, sc in this st you just made, ch1, sc in this next st you made.
Fasten off

Insert your hook into the spoke between the magic loop and the first row on the other edge of the hand (as shown below)
Pull yarn through, ch1, sc in where you inserted your hook, ch1, sc in this st you just made. Fasten off

You now need to make 2 more fingers in the same way as you made the first one, in between the two fingers you have already made. It doesn't particularly matter where you insert your hook for each st, as long as they end up both being in between the two existing stitches. This will mean you end up with a hand looking similar to the one below (Once you've sewn in the loose ends).
 |
After you have made the arms mark with either a scrap of yarn or a stitch marker the stitch on each arm directly above the thumb.


Stuff the arms gently, making sure not to over-stuff them
For the body:
Round 1: Join yarn to the 5th st after the new st on one of the legs, sc8, sc in the 10th st after the new st on the other leg, sc13, skip2 on the other leg, sc5 (28sc)
Round 2: Sc17, 2sc x2, sc5, 2sc x2, sc2 (32sc)
Round 3: Sc19, 2sc, sc8, 2sc, sc3 (34sc)
Round 4 - 5: (2 rounds) sc in each st
Round 6: Sc20, sc2tog, sc8, sc2tog, sc2 (32sc)
Round 7: Sc19, sc2tog x2, sc5, sc2tog x2 (28sc)
Round 8: Sc22, sc3tog, sc3 (26sc)
Round 9: Sc, sc2tog x2, sc9, sc2tog x2, sc8 (22sc)
Round 10: Sc3tog, sc8, sc3tog, sc8 (18sc)
Rounds 11 - 12: (2 rounds) sc in each st
Round 13: Sc, 2sc, sc8, 2sc, sc7 (20sc)
Round 14: Sc, 2sc, sc9, 2sc, sc8 (22sc)
Round 15: Sc in each st
Round 16: Sc2, 2sc, sc10, 2sc, sc8 (24sc)
Rounds 17 - 18: (2 rounds) Sc in each st
Round 19: Sc3, 2sc, sc11, 2sc, sc8 (26sc)
Rounds 20 - 22: (3 rounds) Sc in each st
Fasten off neatly
Stuff the body firmly, and continue stuffing as you make the shoulder section.
For the shoulders:
Attach yarn to the stitch after the new stitch you made when you fastened off neatly (the one that tightens when you pull the end)
Round 23: sc in this st, sc4, sc in the 4th st before the marker stitch on the left arm (the one where the thumb is at the front when the elbow is on the outside when attaching it at this point), sc6 around this side, sc in the body in the 3rd st after where you last crocheted, sc11, sc in the 2nd st before the marker on the other arm, sc in the next 6sts around the arm, sc in the body in the 3rd st after where you last crocheted, sc5 (36sts)
Rounds 24 - 26: (3 rows) sc in each st
Round 27: sc6, sc2tog 3 times, sc11, sc2tog 3 times, sc8 (30sc)
Round 28: sc3, sc2tog 3 times, sc9, sc2tog 3 times, sc7 (24sc)
Round 29: (This is a little less than 1 round) sc2tog 3 times, sc7, sc2tog 3 times, sc5 (18sc)
Round 30: sc2tog twice, sc5, sc2tog twice, sc4 (14sc)
Round 31: sc2tog twice, sc3, sc2tog twice, sc3 (10sc)
Rounds 32 - 33: (2 Rounds) sc in each st
Row 34: ch1, turn. sc4
Fasten off
For the head:
Make a magic loop with 6sc
Round 1: 2sc in each st (12sc)
Round 2: sc in the first st, 2sc in the next st, rep to end (18sc)
Round 3: sc in the first 2sts, 2sc in the next st, rep to end (24sc)
Rounds 4 - 8: (5 rounds) sc in each st
Round 9: 3sc in each of the first 2sts, sc3, 3sc in each of the next 2sts, sc18 (28sc)
Round 10: sc3tog twice, sc3, sc3tog twice, sc18 (24sc)
Round 11: sc5, 2sc in the next st, sc, 2sc in the next st, sc16 (26sc)
Round 12: sc5, sc2tog, sc, sc2tog, sc16 (24sc)
Round 13: sc7, sc3tog, sc5, sc2tog, sc10, sc2tog (20sc)
Round 14: sc9, sc2tog, sc9, sc2tog (18sc)
Round 15: sc8, sc2tog, sc8, sc2tog (16sc)
Round 16: sc7, sc2tog, sc7, sc2tog (14sc)
Round 17: sc5, sc4tog, sc4, sc4tog (8sc)
Round 18: sc2, sc4tog, slip1. (5sc)
Fasten off
Sew the head to the body
For the face:
Use your yarn to shape the nose and eye sockets of the head.

Pull in stitches around the nose to make it stand out from the face. After you have done this use repeated stitches through the head to pull the eye sockets back.


For the eyes:
Sew the whites of the eyes onto the face first using 2 strands of white embroidery thread. Next, sew the irises on top using 2 strands of dark brown embroidery thread, followed by the pupils using 2 strands of black embroidery thread.


For the eyebrows:
Embroidery the eyebrows onto the face using two strands of orange embroidery thread. If you don't have any you can use orange 4ply yarn instead.
For the mouth:
Sew the mouth to the face using pink embroidery thread
For the hair:
Note: try to attach the hair before you attach the head to the body as this makes it a LOT easier
Cut out a rectangle of cardboard approximately 22 cm long and wind you dark brown yarn around it.
Cut all of the strands at one end so that you have half as many 44cm long strands.
Use these strands to make yarn wefts for your dolls hair in the same way as is done in this video
(I used a knitting needle instead of a gauze to hold the yarn in place as I brushed it)


(these photos were of another project but the process is the same)

After you have a bunch of these wefts you need to start attaching them to the head. You can glue the strands to the head if you want, but I prefer to sew them on.
It is important to make sure that all of the strands have dried properly before you do this, otherwise they may fall apart whilst you are attaching them to the head.
Take a needle and dark brown sewing cotton and use backstitch to sew over where the strip of glue is, attaching the wefts to the head. Sew them on so that they look like they're facing the wrong way, then fold the hair back so that it covers the place where the glue is. Start from the front and sides of the head and slowly work backwards until you have covered the head.


Make a magic loop with 6sc
Round 1: 2sc in each st (12sc)
Round 2: sc in the first st, 2sc in the next st, rep to end (18sc)
Round 3: sc in the first 2sts, 2sc in the next st, rep to end (24sc)
Rounds 4 - 8: (5 rounds) sc in each st
Round 9: 3sc in each of the first 2sts, sc3, 3sc in each of the next 2sts, sc18 (28sc)
Round 10: sc3tog twice, sc3, sc3tog twice, sc18 (24sc)
Round 11: sc5, 2sc in the next st, sc, 2sc in the next st, sc16 (26sc)
Round 12: sc5, sc2tog, sc, sc2tog, sc16 (24sc)
Round 13: sc7, sc3tog, sc5, sc2tog, sc10, sc2tog (20sc)
Round 14: sc9, sc2tog, sc9, sc2tog (18sc)
Round 15: sc8, sc2tog, sc8, sc2tog (16sc)
Round 16: sc7, sc2tog, sc7, sc2tog (14sc)
Round 17: sc5, sc4tog, sc4, sc4tog (8sc)
Round 18: sc2, sc4tog, slip1. (5sc)
Fasten off
Sew the head to the body
For the face:
Use your yarn to shape the nose and eye sockets of the head.

Pull in stitches around the nose to make it stand out from the face. After you have done this use repeated stitches through the head to pull the eye sockets back.


For the eyes:
Sew the whites of the eyes onto the face first using 2 strands of white embroidery thread. Next, sew the irises on top using 2 strands of dark brown embroidery thread, followed by the pupils using 2 strands of black embroidery thread.


For the eyebrows:
Embroidery the eyebrows onto the face using two strands of orange embroidery thread. If you don't have any you can use orange 4ply yarn instead.
 |
| (please ignore the fact that the hair is attached in this photo: I may have accidentally forgotten to add the eyebrows until the end of the project (Whoops) |
Sew the mouth to the face using pink embroidery thread
|
| Okay maybe I didn't take these pictures in the order that I should have done but this shows the placing of the mouth |
For the hair:
Note: try to attach the hair before you attach the head to the body as this makes it a LOT easier
Cut out a rectangle of cardboard approximately 22 cm long and wind you dark brown yarn around it.
Cut all of the strands at one end so that you have half as many 44cm long strands.
Use these strands to make yarn wefts for your dolls hair in the same way as is done in this video
(I used a knitting needle instead of a gauze to hold the yarn in place as I brushed it)


(these photos were of another project but the process is the same)

After you have a bunch of these wefts you need to start attaching them to the head. You can glue the strands to the head if you want, but I prefer to sew them on.
It is important to make sure that all of the strands have dried properly before you do this, otherwise they may fall apart whilst you are attaching them to the head.
Take a needle and dark brown sewing cotton and use backstitch to sew over where the strip of glue is, attaching the wefts to the head. Sew them on so that they look like they're facing the wrong way, then fold the hair back so that it covers the place where the glue is. Start from the front and sides of the head and slowly work backwards until you have covered the head.


For the dress:
For the bra cups (make 2):
With yellow 4ply yarn and a 2.5mm hook
Leave a long end (around 20cm)Make a magic loop with 2sc. Don't join. Ch1, turn
Row 1: 2sc in each st. ch1, turn (4sc)
Row 2: 2sc in the first st, sc2, 2sc in the last st. ch1, turn (6sc)
Row 3: 2sc in the first st, sc3, 2sc in the last st. ch1, turn (8sc)
Row 4: 2sc in the first st, sc4, 2sc in the last st. ch1, turn (10sc)
Row 5: 2sc in the first st, sc5, 2sc in the last st. ch1, turn (12sc)
Row 6: 2sc in the first st, sc6, 2sc in the last st. ch1, turn (14sc)
Row 7: 2sc in the first st, sc7, 2sc in the last st. ch1, turn (16sc)
Row 8: sc in each st
Fasten off
For the waistband:
With red 4ply yarn and a 2mm hook ch11
Row 9: sc 9 across the bottom of one of these sections, sc7 thought the bottom of both sections at the same time, then sc9 across the rest of this second section you added


Round 10: sc in the first chain st you made, sc in every following chain st, sc25 (36sc)
These last 36sts form a new round
Rounds 11 - 12: (2 rounds) Sc36
Round 13: Sc11
Fasten off neatly
With red 4ply yarn and a 2mm hook ch11
Row 9: sc 9 across the bottom of one of these sections, sc7 thought the bottom of both sections at the same time, then sc9 across the rest of this second section you added

These last 36sts form a new round
Rounds 11 - 12: (2 rounds) Sc36
Round 13: Sc11
Fasten off neatly
For the skirt section:
With dark red 4ply yarn and a 3mm hook rejoin yarn to the waistband
Round 14: sc36
Round 15: sc3, 2sc in the next st, rep to end (45sc)
Round 16: sc4, 2sc, rep to end (54sc)
Round 17: sc5, 2sc, rep to end (63sc)
Round 18: sc6, 2sc, rep to end (72sc)
Round 19: sc7, 2sc, rep to end (81sc)
Round 20: sc8, 2sc, rep to end (90sc)
Round 21: sc9, 2sc, rep to end (99sc)
Round 22: sc10, 2sc, rep to end (108sc)
Round 23: sc11, 2sc, rep to end (117sc)
Rows 24 - 25: (2 rows) sc in each st
Round 26: sc12, 2sc, rep to end (126sc)
Rows 27 - 31: (5 rows) sc in each st
Round 32: sc13, 2sc, rep to end (135sc)
Rows 33 - 43: (11 rows) sc in each st
Fasten off

Tie the ends of the bra cups you left together behind the neck to hold the dress in place.
For the pants:
With green 4ply yarn and a 2mm hook ch21
Row 1: (2 rows) sc in the 2nd chain st from hook, then sc in every following chain st to end. ch1, turn (20sc)
Row 2: sc in each st
Row 3: Sc2tog, sc16, sc2tog (18sc)
Row 4: Sc2tog, sc14, sc2tog (16sc)
Row 5: Sc2tog, sc12, sc2tog (14sc)
Row 6: Sc2tog, sc10, sc2tog (12sc)
Row 7: Sc2tog, sc8, sc2tog (10sc)
Row 8: Sc2tog, sc6, sc2tog (8sc)
Row 9: Sc2tog, sc4, sc2tog (6sc)
Row 10: Sc2tog, sc2, sc2tog (4sc)
Rows 11 - 18: (8 rows) sc in each st
Row 19: 2sc in the first st, sc2, sc in the last st (6sc)
Row 20: 2sc in the first st, sc4, sc in the last st (8sc)
Row 21: 2sc in the first st, sc6, sc in the last st (10sc)
Row 22: 2sc in the first st, sc8, sc in the last st (12sc)
Row 23: 2sc in the first st, sc10, sc in the last st (14sc)
Row 24: 2sc in the first st, sc12, sc in the last st (16sc)
Row 25: 2sc in the first st, sc14, sc in the last st (18sc)
Row 26: 2sc in the first st, sc16, sc in the last st (20sc)
Row 27: sc in each st
Fasten off
For the wings:
For the frame:
The image below shows you the lengths of all of the pieces of wire in the frame. You may be able to just use this to create the frame, but I have included a written/photo tutorial below as well.
The lengths of the diagram represent the lengths of the wire shown in those corresponding colours (although the initial lengths will have to be slightly longer (by approx. 2cm) since all of the sharp ends will need to be folded over and taped) (Note: Places where there is more than one colour next to each other represent different lengths along one wire)
1. Cut a length of wire 20.5cm long, and fold it into a sort of arc shape (as shown below). The exact shape of this doesn't particularly matter, as it will take the correct shape as you add more pieces of wire and crochet. Fold the ends over by 1cm, then tape over the ends to keep them in place and make sure they aren't sharp. Leave a little loop of wire free at the top end of the wire (You will need to loop another piece of wire through this later)


2. Cut another section of wire approx. 7cm long. Wind one end of this around the piece of wire you started with, so that it is attached 6.5cm from the bottom end of the wire. Tape this in place. Fold the other end of the 7cm piece over so that the wire measures 5cm from where it leaves the longer wire. Tape over the end of this as you did before.


3. Cut a length of wire approx. 12cm long. Attach one end to the long section in the same place as you attached the 5/7cm piece (As shown below). Thread the other end of the wire through the loop of the end of the long section, then fold the end over so that the total length of the wire from the end to where it joins the main section is 10cm long. Tape both ends of the wire.


4. Cut an 8cm piece of wire and attach one end of the same place as you attached the first end of the previous two pieces of wire, making sure this one lies below both of the previous pieces (as shown below (the piece you are adding is the very bendy one in the picture below)). Fold the other end over so that the wire measures 6cm from where it leaves the long wire to the end. Tape over both ends.


5. Cut a piece of wire 7cm in length. Attach one end of this wire to the third piece of wire you attached, to a position 2.5cm from where this third piece of wire joins to the first. Tape it to keep it in this position, then fold over the other end of the wire so that the length of the piece from the end where it joins to the second piece of wire measures 5cm. Tape over the end.


6. Cut a length of wire 6cm long. Attach one of these ends to the third piece of wire, to a position 4cm from where it is attached to the first piece of wire (1.5cm from where the 5th piece you added is attached to the 3rd). Tape this in place. Attach the other end to the initial piece of wire you started with, to a position 3.5cm from the top end of this piece, making sure that the length of the wire you are adding is around 4cm from there it leaves the third piece to where it joins the first. Tape it in place.


7. Cut a piece of wire 4cm long. Attach one end of this to the initial piece of wire, 3cm below where the 2nd, 3rd and 4th pieces are attached. Attach the other end of the wire to the 4th piece of wire you attached, to a position 2cm from the end. Try to make it so that the wire you are attaching measures 2cm from where it leaves the first piece to where it joins the 4th. Tape both ends into place.


8. Cut a piece of wire 5.5cm in length. Attach it to the 5th piece of wire you added, to a position 2cm from where the 5th piece joins the second. Tape this in place. Fold over the end of this piece you added so that it measures 3.5cm from the end to where it joins the 5th piece. Tape this in place.


The next section shows you how to crochet the sections that make up the wings. The easiest way to to do this is to sew the pieces to the wings as you make them. The fasten off edge is always on the outer edge of the wings.
Use a 2mm hook and orange-y 4ply yarn for all crochet.
Make a magic loop with 2sc. ch1, turn
Row 1: 2sc in each st. ch1, turn (4sc)
Row 2: Sc3, 2sc in the next st. ch1, turn (5sc)
Row 3: sc in each st. ch1, turn
Row 4: 2sc in the first st, sc4. ch1, turn (6sc)
Row 5: 2sc in the first st, sc4, 2sc in the last st. ch1, turn (8sc)
Row 6: 2sc in the first st, sc7. ch1, turn (9sc)
Fasten off
Where you just fastened off is the lower corner
This piece should be attached to the lowest section of the wing (as shown below)
Attach all pieces by using yellow 4ply yarn to make repeated stitches around the outside of the wing around the wire. These should aim to cover the wire entirely over every section you make, whilst simultaneously attaching the crocheted sections to the wing.


For the frame:
The image below shows you the lengths of all of the pieces of wire in the frame. You may be able to just use this to create the frame, but I have included a written/photo tutorial below as well.
The lengths of the diagram represent the lengths of the wire shown in those corresponding colours (although the initial lengths will have to be slightly longer (by approx. 2cm) since all of the sharp ends will need to be folded over and taped) (Note: Places where there is more than one colour next to each other represent different lengths along one wire)
 |


2. Cut another section of wire approx. 7cm long. Wind one end of this around the piece of wire you started with, so that it is attached 6.5cm from the bottom end of the wire. Tape this in place. Fold the other end of the 7cm piece over so that the wire measures 5cm from where it leaves the longer wire. Tape over the end of this as you did before.


3. Cut a length of wire approx. 12cm long. Attach one end to the long section in the same place as you attached the 5/7cm piece (As shown below). Thread the other end of the wire through the loop of the end of the long section, then fold the end over so that the total length of the wire from the end to where it joins the main section is 10cm long. Tape both ends of the wire.


4. Cut an 8cm piece of wire and attach one end of the same place as you attached the first end of the previous two pieces of wire, making sure this one lies below both of the previous pieces (as shown below (the piece you are adding is the very bendy one in the picture below)). Fold the other end over so that the wire measures 6cm from where it leaves the long wire to the end. Tape over both ends.


5. Cut a piece of wire 7cm in length. Attach one end of this wire to the third piece of wire you attached, to a position 2.5cm from where this third piece of wire joins to the first. Tape it to keep it in this position, then fold over the other end of the wire so that the length of the piece from the end where it joins to the second piece of wire measures 5cm. Tape over the end.


6. Cut a length of wire 6cm long. Attach one of these ends to the third piece of wire, to a position 4cm from where it is attached to the first piece of wire (1.5cm from where the 5th piece you added is attached to the 3rd). Tape this in place. Attach the other end to the initial piece of wire you started with, to a position 3.5cm from the top end of this piece, making sure that the length of the wire you are adding is around 4cm from there it leaves the third piece to where it joins the first. Tape it in place.


7. Cut a piece of wire 4cm long. Attach one end of this to the initial piece of wire, 3cm below where the 2nd, 3rd and 4th pieces are attached. Attach the other end of the wire to the 4th piece of wire you attached, to a position 2cm from the end. Try to make it so that the wire you are attaching measures 2cm from where it leaves the first piece to where it joins the 4th. Tape both ends into place.


8. Cut a piece of wire 5.5cm in length. Attach it to the 5th piece of wire you added, to a position 2cm from where the 5th piece joins the second. Tape this in place. Fold over the end of this piece you added so that it measures 3.5cm from the end to where it joins the 5th piece. Tape this in place.


Use a 2mm hook and orange-y 4ply yarn for all crochet.
Make a magic loop with 2sc. ch1, turn
Row 1: 2sc in each st. ch1, turn (4sc)
Row 2: Sc3, 2sc in the next st. ch1, turn (5sc)
Row 3: sc in each st. ch1, turn
Row 4: 2sc in the first st, sc4. ch1, turn (6sc)
Row 5: 2sc in the first st, sc4, 2sc in the last st. ch1, turn (8sc)
Row 6: 2sc in the first st, sc7. ch1, turn (9sc)
Fasten off
Where you just fastened off is the lower corner
This piece should be attached to the lowest section of the wing (as shown below)
Attach all pieces by using yellow 4ply yarn to make repeated stitches around the outside of the wing around the wire. These should aim to cover the wire entirely over every section you make, whilst simultaneously attaching the crocheted sections to the wing.

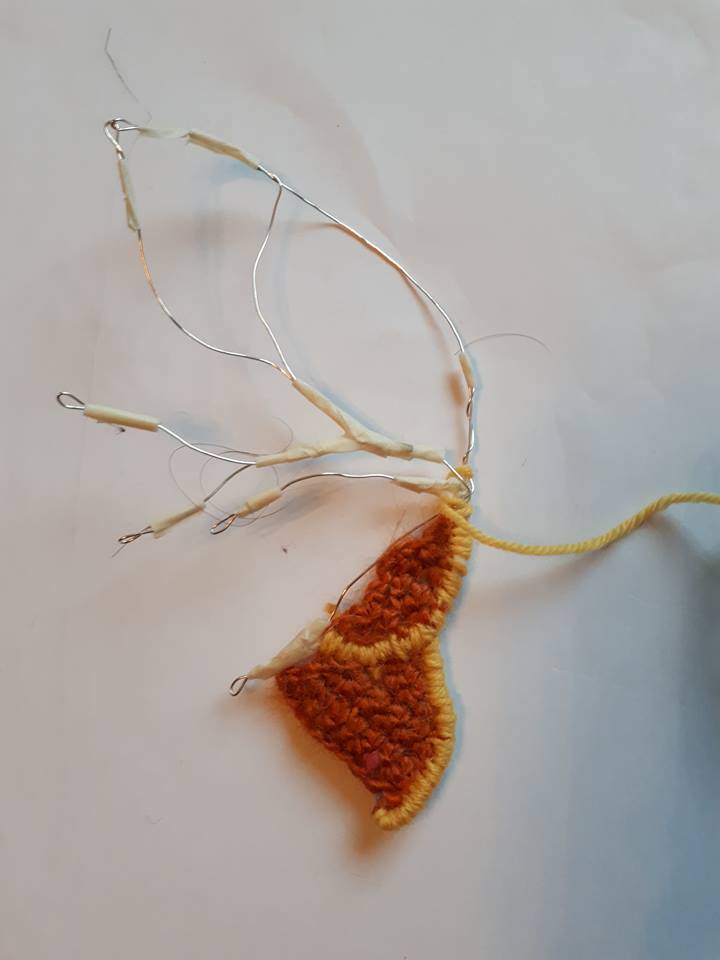
Start at the fasten on corner and work your way sewing down the length of the initial wire to the end, then do the same thing over the same section of wire in the other direction. Going over it twice will ensure that the wire is completely covered and looks as neat as possible.


Make a magic loop with 1sc. ch1, turn
Row 1: 2sc in this st. ch1, turn (2sc)
Row 2: Sc, 2sc in the last st. ch1, turn (3sc)
Row 3: Sc in each st. ch1, turn
Row 4: Sc2tog, sc. ch1, turn (2sc)
Row 5: Sc in both sts. ch1, turn
Row 6: Sc2tog. ch1, turn
Row 7: Sc
Fasten off
You fastened off at the top edge of the section.
Begin sewing this piece by sewing over the 7th piece of wire you attached, meanwhile attaching the edges touching this wire of both the first and second crocheted section. Sew up this section and back down again, as shown below


After you have done this, attach the next edge of the second crocheted section by sewing up the initial piece of wire between where the 7th piece of wire was attached, and where the 2nd, 3rd and 4th pieces of wire were attached. Then sew back over this section the other way, and fasten off your yarn.

Make a magic loop with 1sc. ch1, turn
Row 1: 2sc in this st. ch1, turn (2sc)
Row 2: Sc, 2sc in the last st. ch1, turn (3sc)
Row 3: Sc in each st. ch1, turn
Row 4: Sc2, 2sc in the last st. ch1, turn (4sc)
Row 5: 2sc in the first st, sc2, 2sc in the last st. ch1, turn (6sc)
Row 6: Sc5, 2sc in the last st. ch1, turn (7sc)
Row 7: Sc2tog, sc5. ch1, turn (6sc)
Row 8: Sc4, sc2tog. ch1, turn (5sc)
Row 9: Sc in each st. ch1, turn
Row 10: Sc in each st
Fasten off
The corner you fastened off at is the lower corner
Attach your yellow 4ply yarn to the corner where the initial section meets the 2nd, 3rd and 4th sections. Sew down the length of the 4th section of wire added, simultaneously sewing in place this third crocheted section and the neighbouring edges of the 1st/2nd crocheted pieces. When you get to the end sew back the other way.


Make a magic loop with 1sc. ch1, turn
Rows 1 - 3: (3 rows) Sc in this st. ch1, turn
Row 4: 2sc in this st. ch1, turn (2sc)
Row 5: sc in both sts. ch1, turn
Row 6: Sc, 2sc in the next st. ch1, turn (3sc)
Row 7: Sc, slip1, sc
Fasten off
Attach this piece by sewing over the length of the 2nd piece of wire you attached, sewing in place both this section and the third crocheted section. When you reach the end, sew back of the section in the opposite direction.


(Now working anticlockwise around the upper wing section starting from the largest section)
Make a magic loop with 1sc. ch1, turn
Row 1: 3sc in this st. ch1, turn (3sc)
Row 2: Sc2, 2sc in the last st. ch1, turn (4sc)
Row 3: Sc3, 2sc in the last st. ch1, turn (5sc)
Row 4: Sc4, 2sc in the last st. ch1, turn (6sc)
Row 5: Sc5, 2sc in the last st. ch1, turn (7sc)
Rows 6 - 11 : (6 rows) Sc in each st. ch1, turn
Row 12: Sc5, sc2tog. ch1, turn (6sc)
Row 13: Sc in each st. ch1, turn
Row 14: Sc2tog, sc4. ch1, turn (5sc)
Row 15: Sc3, sc2tog. ch1, turn (4sc)
Row 16: Sc2tog twice. ch1, turn (2sc)
Row 17: Sc2tog (1sc)
Fasten off
The fastening off is on the outer section of the wing furthest from where you will attach them to the body.
Start attaching this piece by sewing over the third piece of wire you attached, but only between where it meets the initial piece of wire and where the 5th piece of wire is attached. Don't yet sew back over this in the opposite direction.


Once this is done, sew over the remaining section of the 5th wire piece, whilst also attaching another edge of the 7th crocheted section. Once you reach the end, sew back over this section in the other direction. Fasten off the yarn.


Row 1: 3sc in this st. ch1, turn (3sc)
Row 2: Sc2, 2sc in the last st. ch1, turn (4sc)
Row 3: Sc3, 2sc in the last st. ch1, turn (5sc)
Row 4: Sc4, 2sc in the last st. ch1, turn (6sc)
Row 5: Sc5, 2sc in the last st. ch1, turn (7sc)
Rows 6 - 11 : (6 rows) Sc in each st. ch1, turn
Row 12: Sc5, sc2tog. ch1, turn (6sc)
Row 13: Sc in each st. ch1, turn
Row 14: Sc2tog, sc4. ch1, turn (5sc)
Row 15: Sc3, sc2tog. ch1, turn (4sc)
Row 16: Sc2tog twice. ch1, turn (2sc)
Row 17: Sc2tog (1sc)
Fasten off
The fastening off is on the outer section of the wing furthest from where you will attach them to the body.
Start attaching this piece by sewing over the third piece of wire you attached, but only between where it meets the initial piece of wire and where the 5th piece of wire is attached. Don't yet sew back over this in the opposite direction.

Make a magic loop with 2sc. ch1, turn
Row 1: 2sc in each st. ch1, turn (4sc)
Row 2: sc each st. ch1, turn
Row 3: Sc3, 2sc in the last st. ch1, turn (5sc)
Rows 4 - 7: (4 rows) Sc in each st. ch1, turn
Row 8: 2sc in the first st, sc4. ch1, turn (6sc)
Row 9: Sc2tog, sc3, 2sc in the last st. ch1, turn (6sc)
Row 10: 3sc in the first st, sc5. ch1, turn (8sc)
row 11: Sc7, 3sc in the last st (11sc)
Fasten off
The fasten off corner is on the top edge
Sew this last section to the wing in the position shown below. Sew only from where you yarn end is to where the 8th wire section meets the 5th. Sew back over this section and the previous section you sewed. Fasten off the yarn


Make a magic loop with 1sc. ch1, turn
Row 1: 2sc in this st. ch1, turn (2sc)
Row 2: 2sc in each st. ch1, turn (4sc)
Row 3: Sc3, 2sc in the last st. ch1, turn (5sc)
Row 4: Sc in each st. ch1, turn
Row 5: Slip4, 2sc in the last st (6sc)
Fasten off
The fasten off corner is on the top edge
Fasten the yarn back on at the join where the 8th wire section meets the 5th. Sew this piece in place by sewing over the 8th piece of wire you attached (simultaneously sewing one of the edges of the 6th crocheted piece you made in place as well). When you reach the end over this length of wire again in the opposite direction.

Once this is done, sew over the remaining section of the 5th wire piece, whilst also attaching another edge of the 7th crocheted section. Once you reach the end, sew back over this section in the other direction. Fasten off the yarn.


Make a magic loop with 1sc. ch1, turn
Row 1: 2sc in this st. ch1, turn (2sc)
Row 2: 2sc, sc. ch1, turn (3sc)
Row 3: 3sc in the first st, sc2. ch1, turn (5sc)
Row 4: Sc4, 2sc in the last st. ch1, turn (6sc)
Row 5: Sc in each st. ch1, turn
Row 6: Sc5, 2sc in the last st. ch1, turn (7sc)
Rows 7 - 8: sc in each st. ch1, turn
Row 9: Sc2tog, sc3, sc2tog. ch1, turn (5sc)
Row 10: Sc in each st. ch1, turn
Row 11: Sc2tog, sc3. ch1, turn (4sc)
Row 12: Sc2, sc2tog (3sc)
Fasten off
Attach the yarn to the join where the 6th wire section meets the 3rd. Attach this last piece you made to the wing by sewing along the length of the 3rd wire section between where your yarn is attached and the end of the 6th crocheted section (as shown below) (also sewing this 6th section in place as you do this). When you reach the end, sew back over this section in the opposite direction.


Sew up the length of the 6th wire section, sewing in place the neighbouring sides of the 5th and 8th crocheted sections as you do this. Don't yet sew back over this section.

Next, sew the rest of the 8th crocheted section in place by sewing over all of the uncovered wire around the edge of it (as shown below). When you reach the end (so that the 8th section is sewn in place around all of its sides), sew back over these last two sections to make sure that they are fully covered. Fasten off your yarn

Next, sew the rest of the 8th crocheted section in place by sewing over all of the uncovered wire around the edge of it (as shown below). When you reach the end (so that the 8th section is sewn in place around all of its sides), sew back over these last two sections to make sure that they are fully covered. Fasten off your yarn


 |
| I've turned the wing around for this picture so that it shows the back (although there isn't any difference between the front and back, hence why the two wings are made the same) |

Sew the wings to the back of the fairy using yellow sewing thread


For the shoes (make 2):
With a 2mm hook and red 4ply yarn ch5
Round 1: Sc in the 2nd loop from hook, sc in each of the next 2 chain sts, 3sc in the last chain st (the first one you made), sc in the back loop of each of the previous 2sts you crocheted into in turn, 2sc in the back loop of the first loop you crocheted into (10sc)
Round 2: 2sc in the first st, sc4, 2sc in each of the next 3sts, sc2, 2sc in each of the next 2sts (16sc)
Round 3: sc in the first st, 2sc in the next st, sc2, (sc, 2sc in the following st) 3 times, sc2, (sc, 2sc in the next st) 2 times (22sc)
Round 4: Sc in each st
Round 5: Sc9, sc2tog, (sc, sc2tog) twice, sc4 (19sc)
Round 6: Sc8, sc2tog 3 times, sc5 (16sc)
Round 7: Sc7.
Fasten off neatly
For the straps (make 2 for each shoe):
With a 2mm hook and red 4ply yarn ch5
Round 1: Sc in the 2nd loop from hook, sc in each of the next 2 chain sts, 3sc in the last chain st (the first one you made), sc in the back loop of each of the previous 2sts you crocheted into in turn, 2sc in the back loop of the first loop you crocheted into (10sc)
Round 2: 2sc in the first st, sc4, 2sc in each of the next 3sts, sc2, 2sc in each of the next 2sts (16sc)
Round 3: sc in the first st, 2sc in the next st, sc2, (sc, 2sc in the following st) 3 times, sc2, (sc, 2sc in the next st) 2 times (22sc)
Round 4: Sc in each st
Round 5: Sc9, sc2tog, (sc, sc2tog) twice, sc4 (19sc)
Round 6: Sc8, sc2tog 3 times, sc5 (16sc)
Round 7: Sc7.
Fasten off neatly
 |
| This shows the back of the legs |
Ch3
Row 1: sc in the 2nd loop from hook, sc in the next loop. ch1, turn
Rows 2 - 20: (19 rows) sc in each st. ch1, turn
Row 22: sc in each st
Fasten off
Sew these straps to the sides of the shoes. Put the shoes on the feet, wind the straps around the legs until they meet at the back, then sew the ends together.
Brush the hair until you are satisfied with it. You may want to thin it out. To do this, cut off some of the strands inside the body of the hair until it is thin enough. After you cut the strands brush them a little until they look more natural (so that they don't have perfectly cut ends)
Braid the hair. I used two french plaits down either side of the head (If you've never done French plaits before I recommend trying it out - I had never done them before this project but I found them surprisingly easy to do on this doll)
I hope you have enjoyed this pattern. If you have any questions about this or any of my other patterns or have any suggestions of future patterns you would like to see, please feel free to get in contact with me, either by leaving a comment below or visiting my Instagram or Ravelry pages.
You are very welcome to sell any finished products but I do ask that you don't re-post this pattern or claim it as your own. Thank you!


Row 1: sc in the 2nd loop from hook, sc in the next loop. ch1, turn
Rows 2 - 20: (19 rows) sc in each st. ch1, turn
Row 22: sc in each st
Fasten off
Sew these straps to the sides of the shoes. Put the shoes on the feet, wind the straps around the legs until they meet at the back, then sew the ends together.
 |
| This shows the back of the legs |
Brush the hair until you are satisfied with it. You may want to thin it out. To do this, cut off some of the strands inside the body of the hair until it is thin enough. After you cut the strands brush them a little until they look more natural (so that they don't have perfectly cut ends)
Braid the hair. I used two french plaits down either side of the head (If you've never done French plaits before I recommend trying it out - I had never done them before this project but I found them surprisingly easy to do on this doll)
I hope you have enjoyed this pattern. If you have any questions about this or any of my other patterns or have any suggestions of future patterns you would like to see, please feel free to get in contact with me, either by leaving a comment below or visiting my Instagram or Ravelry pages.
You are very welcome to sell any finished products but I do ask that you don't re-post this pattern or claim it as your own. Thank you!

