This rocket measures 55cm tall. The structure is made from cardboard, and is coated with crochet. I have also created some basic furniture to go inside it. I have previously published patterns for an astronaut and robot dog to inhabit this rocket.


Difficulty:

Medium - difficult
You will need:
- A 2mm crochet hook
- a 2.5mm crochet hook
- dk yarn in red (3x100g balls), light blue, grey, silver, white, light green, yellow, darker blue, and light turquoise (use dk yarn if no weight is specified)
- 4ply yarn in yellow, red, green, purple, white, and black
- white #10 crochet cotton
- Regular sewing cotton in white, red, and yellow
- An astronaut (pattern can be found here)
- A robot dog (pattern can be found here)
- A large amount of corrugate cardboard (the largest piece you will need to cut out is just less than 30 x 40cm)
- A pack of of cocktail sticks
- A pack of of bamboo skewers
- A thin sheet of clear plastic (I used one of those polypocket display envelopes you use to store documents)
- 3 large snap fasteners
- A glue gun
- A darning needle
- A regular sewing needle
- A pair of compasses
- A craft knife
- A pair of scissors
Part 1: The exterior
I have split this pattern into 3 parts: The outer shell (which includes the floors), then furniture for the upper control room, and the furniture for the bedroom. The astronaut and dog each have their own separate patterns. However, I will just between the section a little, since certain parts are much easier to make before you sew the floors in.
Part A: Cutting out the cardboard
Make sure you keep these sections in a safe place before construction. You should try to ensure that they don't get creased, as this will weaken them.
For the outer shell:
Cut a rectangle of cardboard 39 x 30cm. This should be oriented so that the 30cm long edges lie across the grain of the cardboard (you should be able to easily bend the cardboard along the longer edge, but not along the shorter one)
You then need to add the holes for the windows. The upper window should be locate in the centre of the rectangle (19.5cm from each edge), 7.5cm from the top edge. The lower windows should be situated 7.5cm from the bottom edge, and each should be 7cm away from the closest (side) edge.The windows should be circular (made using a pair of compasses), and should have a 3cm radius. Cut them out using a craft knife
Once you have done this you will need to make a series of folds along the length of the cardboard, parallel to the shorter edge, to allow it to forma cylinder shape when combined with the front door. I recommend using a ruler to ensure these are straight and as crisp as possible.

For the front door:
Cut a section of cardboard 11 x 30cm. Again the 30cm long edges should lie along the grain of the cardboard.


You then need to cut a window in this section whose centre is 15cm from the top and 5.5cm from the edge of the cardboard. Again it should have a 3cm radius. Cut it out using a craft knife. Once you've done this you should create vertical grooves in the cardboard to allow it to be bent more easily.
For the floors (make 3):
Note: the cardboard used for the project (specifically for the outer shell) should be 4mm thick. If it is a different thickness you will need to alter the radius accordingly (take away a mm for each extra mm of cardboard thickness)
Cut out this square using a craft knife.


Draw 9 triangles on a piece of carboard. Their base should measure 5cm wide, and have a height of 12cm. Cut these out.


For the hatches (make 3):
Cut out a square of cardboard 2.8cm wide.
Note: When you go to strengthen the rest of the cardboard sections these do not need strengthening since they are so small and unlikely to be under any great force.
For the legs of the rocket:
Cut out 6 rectangles of cardboard 6x16cm, then construct the shape shown by the black lines below and cut them out.

You then need to cut out 3 rectangles in each of the following sizes:
3x2.8cm
10x2.8cm
8.5x2.8cm (cut out 6 of these)
For the front fastening:
Cut out 2 rectangles of cardboard 2 x 30cm. The longer side should lie along the grain of the cardboard.
Part B: Strengthening the cardboard and adding window panes
All sections of cardboard (apart from those of the legs of the rocket) need to be strengthened by gluing cocktail sticks along the grain of the cardboard (as shown in the images below). The more sticks you glue in place the better.


You should then add the window panes to all the wall sections. Cut a square section of plastic with sides 8-9cm long. Tape them over the holes in the walls, as shown below. Try to make it so that they curve alongside the curve of the cardboard. This can be tricky and doesn't have to be perfect, but you should essentially tape them in place so that they don't lie flat.

Part C: The crochet
For the outside of the rocket:
With red dk yarn ch80
Row 1: sc in the 2nd st from hook and the next 78sts. ch1, turn (79sc)
Rows 2 - 11: (10 rows) sc in each st. ch1, turn (79sc)
Row 12: sc10, sc2tog. ch1, turn (11sc)
Row 13: sc in each of these 11sts. ch1, turn
Row 14: sc9, sc2tog. ch1, turn (10sc)
Rows 15 - 20: (6 rows) sc in each st ch1, turn
Row 21: make 2sc in the first st, sc9. ch1, turn (11sc)
Rows 22 - 23: (2 rows) sc in each st. ch1, turn
Row 24: sc in each st
Fasten off
Rejoin yarn to row 11 to the 12th st from the end

Row 12: sc2tog between this st and the next, then sc in the next 10sts to end. ch1, turn (11sc)
Row 13: sc in each of these 11sts. ch1, turn
Row 14: sc2tog, sc9. ch1, turn (10sc)
Rows 15 - 20: (6 rows) sc in each st. ch1, turn
Row 21: sc9, make 2sc in the next st. ch1, turn (11sc)
Rows 22 - 23: (2 rows) sc in each st. ch1, turn
Row 24: sc in each st
Fasten off
Rejoin yarn to row 11 to the 6th st from the first section you made
 .
.Row 12: Sc2tog between this st and the next, sc41, sc2tog. ch1, turn (43sc)
Row 13: sc in each of these 43sts. ch1, turn
Row 14: sc2tog, sc39, sc2tog. ch1, turn (41sc)
Rows 15 - 18: (4 rounds) sc in each st. ch1, turn
Row 19: make 2sc in the first st, sc39, make 2sc in the last st. ch1, turn (43sc)
Row 20: sc in each st. ch1, turn
Row 21: make 2sc in the first st, sc41, make 2sc in the last st. ch1, turn (45sc)
Row 22: make 2sc in the first st, sc43, make 2sc in the last st. ch1, turn (47sc)
Row 23: sc in each st
Fasten off
Rejoin to row 23 to the first st of one of the end section (as shown below)

Row 24: sc in this st and the next 10sts, ch5, make 2sc in the first st of the next section (as shown below), then sc in the next 45sts, make 2sc in the last st of this section, ch5, sc in the first st of the next section, then sc in the following 10sts. ch1, turn (81sc)

Rows 24 - 46: (22 rows) sc in each st. ch1, turn
Row 47: Sc36, sc2tog. ch1, turn (37sc)
Row 48: Sc2tog, sc35. ch1, turn (36sc)
Row 49: Sc36. ch1, turn
Row 50: Sc2tog, sc34. ch1, turn (35sc)
Rows 51 - 55: (5 rows) Sc ineach of these 35sts. ch1, turn
Row 56: make 2sc in the first st, sc34. ch1, turn (36sc)
Row 57: Sc35, make 2sc in the last st. ch1, turn (37sc)
Row 58: Sc37. ch1, turn
Row 59: Sc36, make 2sc in the last st. ch1, turn (38sc)
Row 60: make 2sc in the first st, sc37 (39sc)
Fasten off
Rejoin yarn to row 46 to the 5th st from last section
Row 47: Sc2tog, sc36. ch1, turn (37sc)
Row 48: Sc35, sc2tog. ch1, turn (36sc)
Row 49: Sc36. ch1, turn
Row 50: Sc34, sc2tog. ch1, turn (35sc)
Rows 51 - 55: (5 rows) sc in each st. ch1, turn
Row 56: Sc34, make 2sc in the next st. ch1, turn
Row 57: make 2sc in the firsts st, sc35. ch1, turn (37sc)
Row 58: Sc37. ch1, turn
Row 59: make 2sc in the first st, sc36. ch1, turn (38sc)
Row 60: Sc37, make 2sc in the last st (39sc)
Fasten off
Rejoin yarn to the first st of row 60 on the first of these sections you made.
Row 61: Sc in this st and the next 38sts, ch2, sc in the last st of row 60 of the next section, then sc in each of the following 38sts. ch1, turn (80sc)
Rows 62 - 70: (9 rows) sc in each st. ch1, turn
Row 71: sc in each st
Fasten off
For the outside front:
with red dk ch23
Row 1: sc in the 2nd loop from hook and the next 21sts. ch1, turn (22sc)
Rows 2 - 52: (51 rows) sc in each st. ch1, turn
Row 53: sc8, sc2tog. ch1, turn (9sc)
Row 54: sc2tog, sc7. ch1, turn (8sc)
Row 55: sc6, sc2tog. ch1, turn (7sc)
Row 56: sc2tog, sc5. ch1, turn (6sc)
Rows 57 - 61: (5 rows) sc in each of these 6sts. ch1, turn
Row 62: make 2sc in the first st, sc5. ch1, turn (7sc)
Row 63: sc in each st. ch1, turn
Row 64: make 2sc in the first st, sc6. ch1, turn (8sc)
Row 65: sc7, make 2sc in the next st(9sc)
Fasten off
Rejoin yarn to row 52 to the 3rd st from this section.
Fasten off
For the outside front:
with red dk ch23
Row 1: sc in the 2nd loop from hook and the next 21sts. ch1, turn (22sc)
Rows 2 - 52: (51 rows) sc in each st. ch1, turn
Row 53: sc8, sc2tog. ch1, turn (9sc)
Row 54: sc2tog, sc7. ch1, turn (8sc)
Row 55: sc6, sc2tog. ch1, turn (7sc)
Row 56: sc2tog, sc5. ch1, turn (6sc)
Rows 57 - 61: (5 rows) sc in each of these 6sts. ch1, turn
Row 62: make 2sc in the first st, sc5. ch1, turn (7sc)
Row 63: sc in each st. ch1, turn
Row 64: make 2sc in the first st, sc6. ch1, turn (8sc)
Row 65: sc7, make 2sc in the next st(9sc)
Fasten off
Rejoin yarn to row 52 to the 3rd st from this section.

Row 53: sc2tog between this st and the next, sc8. ch1, turn (9sc)
Row 54: sc7, sc2tog. ch1, turn (8sc)
Row 55: sc2tog, sc6. ch1, turn (7sc)
Row 56: sc5, sc2tog. ch1, turn (6sc)
Row 57: (5 rows) sc in each of these 6sts. ch1, turn
Row 58: sc5, make 2sc in the next st. ch1, turn (7sc)
Row 59: sc in each st. ch1, turn
Row 60: sc6, make 2sc in the next st. ch1, turn
Row 61: make 2sc in the first st, sc7. ch1, turn
Row 62: sc8, make 2sc in the next st, ch3, make 2sc in the first st of the next section (as shown below), sc8. ch1, turn (23sc)

Rows 63 - 71: (9 rows) sc in each st. ch1, turn
Row 72: sc in each st
Fasten off
For the upper inside section:
With blue dk yarn ch81
Row 1: sc in the 2nd chain st from hook, then sc in each of the following chain sts. ch1, turn (80sc)
Rows 2 - 11: (10 rows) sc in each st. ch1, turn
Row 12: Sc36, sc2tog. ch1, turn (37sc)
Row 13: Sc2tog, sc35. ch1, turn (36sc)
Row 14: Sc36. ch1, turn
Row 15: Sc2tog, sc34. ch1, turn (35sc)
Rows 16 - 20: (5 rows) Sc in each of these 35sts. ch1, turn
Row 21: make 2sc in the first st, sc34. ch1, turn (36sc)
Row 22: Sc35, make 2sc in the last st. ch1, turn
Row 23: Sc in each st. ch1, turn
Row 24: Sc36, make 2sc in the next st. ch1, turn
Row 25: make 2sc in the first st, sc37
Fasten off
Rejoin yarn to row 11 to 5th st from last section
Row 12: Sc2tog, sc36. ch1, turn (37sc)
Row 13: Sc35, sc2tog. ch1, turn (36sc)
Row 14: Sc36. ch1, turn
Row 15: Sc34, sc2tog. ch1, turn (35sc)
Rows 16 - 20: (5 rows) sc in each st. ch1, turn
Row 21: Sc34, make 2sc in the last st. ch1, turn (36sc)
Row 22: make 2sc in the first st, sc35. ch1, turn (37sc)
Row 23: Sc in each of these 37sts. ch1, turn
Row 24: make 2sc in the first st, sc36. ch1, turn (38sc)
Row 25: Sc37, make 2sc in the last st (39sc)
Fasten off
Rejoin yarn to the first st of row 60 on the first of these sections you made.
Row 61: Sc in this st and the next 38sts, ch2, sc in the last st of row 60 of the next section, then sc in each of the following 38sts. ch1, turn (80sc)
Rows 62 - 70: (9 rows) sc in each st. ch1, turn
For the inside upper front:
With blue dk yarn ch23
Row 14: Sc36. ch1, turn
Row 15: Sc34, sc2tog. ch1, turn (35sc)
Rows 16 - 20: (5 rows) sc in each st. ch1, turn
Row 21: Sc34, make 2sc in the last st. ch1, turn (36sc)
Row 22: make 2sc in the first st, sc35. ch1, turn (37sc)
Row 23: Sc in each of these 37sts. ch1, turn
Row 24: make 2sc in the first st, sc36. ch1, turn (38sc)
Row 25: Sc37, make 2sc in the last st (39sc)
Fasten off
Rejoin yarn to the first st of row 60 on the first of these sections you made.
Row 61: Sc in this st and the next 38sts, ch2, sc in the last st of row 60 of the next section, then sc in each of the following 38sts. ch1, turn (80sc)
Rows 62 - 70: (9 rows) sc in each st. ch1, turn
Row 71: sc in each st
Fasten off
Fasten off
For the lower inside section:
With white ch80
With white ch80
Row 1: sc in the 2nd chain st from hook, then sc in each of the next 78 chain sts to end. ch1, turn (79sc)
Rows 2 - 11: (10 rows) sc in each st. ch1, turn (79sc)
Row 12: sc10, sc2tog. ch1, turn (11sc)
Row 13: sc11. ch1, turn
Row 14: sc9, sc2tog. ch1, turn (10sc)
Rows 15 - 20: (6 rows) sc n each st. ch1, turn
Row 21: make 2sc in the first st, sc9. ch1, turn (11sc)
Row 22: sc in each st. ch1, turn
Row 23: sc in each st. ch1, turn
Row 24: sc10, make 2sc in the last st (12sc)
Fasten off
Rejoin yarn to row 11 to the 12th st from the end (as you did for the outside section)
Row 12: sc2tog between this st and the next, then sc in the next 10sts to end. ch1, turn (11sc)
Row 13: sc in each st. ch1, turn
Row 14: sc2tog, sc9. ch1, turn (10sc)
Rows 15 - 20: (6 rows) sc in each st. ch1, turn
Row 21: sc9, make 2sc in the last st. ch1, turn (11sc)
Row 22: sc in each st. ch1, turn
Row 23: sc in each st1. ch1, turn
Row 24: make 2sc in the first st, sc10
Fasten off
Rejoin yarn to row 11 the 6th st from the first of these section you made.
Row 12: sc2tog between this st and the next, sc41, sc2tog. ch1, turn (43sc)
Row 13: sc in each of these 43sts. ch1, turn
Row 14: sc2tog, sc39, sc2tog. ch1, turn (41sc)
Rows 15 - 19: (5 rows) sc41. ch1, turn
Row 20: make 2sc in the first st, sc39, make 2sc in the last st. ch1, turn (43sc)
Row 21: sc in each st. ch1, turn
Row 22: make 2sc in the first st, sc41, make 2sc in the last st. ch1, turn (45sc)
Row 23: make 2sc in the first st, sc43, make 2sc in the last st. ch1, turn (47sc)
Row 24: sc in each st
Fasten off
Rejoin to the first st of one of the end sections (as you did for the outside section)
Row 25: sc in this st and the next 11sts, ch4, make 2sc in the first st of the next section, then sc in the next 45sts. Make 2sc in the last st of this section, ch4, sc in the first st of the next section, then sc in the following 11sts. (81sc)
Rows 26 - 36: (11 rows) sc in each of these sts. ch1, turn
Row 37: sc in each st
Fasten off
Fasten off
For the inside upper front:
With blue dk yarn ch23
Row 1: sc in the 2nd chain st from hook, then sc in every following chain st. ch1, turn (22sc)
Rows 2 - 11: (10 rows) sc in each st. ch1 turn
Row 12: sc8, sc2tog. ch1, turn (9sc)
Row 13: sc2tog, sc7. ch1, turn (8sc)
Row 14: sc6, sc2tog. ch1, turn (7sc)
Row 15: sc2tog, sc5. ch1, turn (6sc)
Rows 16 - 20: (5 rows) sc in each st. ch1, turn
Row 21: make 2sc in the first st, sc5. ch1, turn (7sc)
Row 22: sc in each st. ch1, turn
Row 23: make 2sc in the first st, sc6. ch1, turn (8sc)
Row 24: sc7, make 2sc in the last st (9sc)
Fasten off
Rejoin yarn to row 11 to the 3rd st from this section you just made (like you did for the outside front)
Row 12: sc2tog between this st and the next, sc8. ch1, turn
Row 13: sc7, sc2tog. ch1, turn (8sc)
Row 14: sc2tog, sc6. ch1, turn(7sc)
Row 15: sc5, sc2tog. ch1, turn(6sc)
Rows 16 - 20: (5 rows) sc in each st. ch1, turn
Row 21: sc5, make 2sc in the last st. ch1, turn (7sc)
Row 22: sc in each st. ch1, turn
Row 23: sc6, make 2sc in the last st. ch1, turn (8sc)
Row 24: make 2sc in the first st, sc7. ch1, turn (9sc)
Row 25: sc8, make 2sc in the next st, ch3, make 2sc in the first st of the next section, sc8. ch1, turn (23sc)
Rows 26 - 34: (9 rows) sc in each st. ch1, turn
Row 35: sc in each st
Fasten off
For the inside lower front:
with white ch23
For the inside lower front:
with white ch23
Row 1: sc in the 2nd chain st from hook, then sc in every following chain st. ch1, turn (22sc)
Rows 2 - 40: (39 rows) sc in each st. ch1, turn
Rows 2 - 40: (39 rows) sc in each st. ch1, turn
Row 41: sc in each st
Fasten off
Fasten off
For the windows (make 4 in yellow, 2 in grey-blue and 2 in light green):
ch36
Round 1: sc in the first chain st you made, then sc in each of the following 35 chain sts to make a loop
Round 2: (sc5, make 2sc in the next st) 6 times (42sc)
Round 3: sc3, (make 2sc in the next st, sc6) 5 times, make 2sc in the following st, sc3 (48sc)
Fasten off neatly
Round 1: sc in the first chain st you made, then sc in each of the following 35 chain sts to make a loop
Round 2: (sc5, make 2sc in the next st) 6 times (42sc)
Round 3: sc3, (make 2sc in the next st, sc6) 5 times, make 2sc in the following st, sc3 (48sc)
Fasten off neatly
For the roof (make 9 in red and 9 in silver):
ch11
Row 1: sc in the 2nd chain st from hook, then sc in each of the next 9sts. ch1, turn (10sc)
Rows 2 - 4: (3 rows) sc in each st. ch1, turn
Row 5: sc4, sc2tog, sc4. ch1, turn (9sc)
Rows 6 - 9: (4 rounds) sc in each st. ch1, turn
Row 10: sc4, sc2tog, sc3. ch1, turn(8sc)
Rows 11 - 13: (3 rounds) sc in each st. ch1, turn
Row 14: sc3, sc2tog, sc3. ch1, turn (7sc)
Rows 15 - 16: (2 rounds) sc in each st. ch1, turn
Row 17: sc3, sc2tog, sc2. ch1, turn (6sc)
Rows 18 - 19: (2 rounds) sc in each st
Row 20: sc2, sc2tog, sc2. ch1, turn (5sc)
Row 21: sc in each st. ch1, turn
Row 22: sc2, sc2tog, sc. ch1, turn (4sc)
Row 23: sc in each st. ch1, turn
Row 24: sc, sc2tog, sc. ch1, turn (3sc)
Row 25: sc in each st. ch1, turn
Row 26: sc, sc2tog. ch1, turn (2sc)
Row 27: sc2tog. ch1, turn (1sc)
Fasten off
For the top point:
make a magic loop with 4sc
Round 1: sc in each st
Round 2: (sc, make 2sc in the next st) twice (6sc)
Round 3: sc in each st
Round 4: (sc2, make 2sc in the next st) twice (8sc)
Round 5: sc in each st
Round 6: (sc3, make 2sc in the next st) twice (10sc)
Round 7: sc in each st
Round 8: (sc4, make 2sc in the next st) twice (12sc)
Round 9: sc in each st
Round 10: (sc5, make 2sc in the next st) twice (14sc)
Round 11: sc in each st
Round 12: (sc6, make 2sc in the next st) twice (16sc)
Round 13: sc2tog 8 stimes (8sc)
Stuff firmly
Round 14: sc2tog 4 times (4sc)
Fasten off
For the floors/ceilings (make 2 in white, 1 in red, 1 in grey, 1 in light blue, and 1 in darker blue):
ch32
Round 1: sc in the first chain st you made, sc in the next 6 chain sts, then make 3sc in the following chain st, (sc7, make 3sc in the next chain st) 3 times (40sc)
Round 2: sc8, (make 3sc in the next st, sc9) 3 times, make 3sc in the following st, sc (48sc)
Round 3: sc9, (make 3sc in the next st, sc11) 3 times, make 3sc in the following st, sc2 (56sc)
Round 5: sc10, (make 3sc in the next st, sc13) 3 times, make 3sc in the following st, sc3 (64sc)
Round 4: sc11, (make 3sc in the next st, sc15) 3 times, make 3sc in the following st, sc4 (72sc)
Round 6: (sc11, make 2sc in the next st) 6 times (78sc)
Round 7: sc6, (make 2sc in the next st, sc12) 5 times, make 2sc in the following st, sc6 (84sc)
Round 8: sc4, (make 2sc in the next st, sc13) 5 times, make 2sc in the following st, sc9 (90sc)
Round 9: sc10, (make 2sc in the next st, sc14) 5 times, make 2sc in the following st, sc4 (96sc)
Round 10: (sc15, make 2sc in the next st) 6 times (102sc)
Round 11: hdc10, sc3, slip10, sc3, hdc10, sc3, slip11, sc3, hdc10, sc3, slip10, sc3, hdc10, sc3, slip10
Fasten off
ch8
Row 1: sc in the 2nd chain st from hook, then sc in each of the following chain sts
Rows 2 - 7: (6 rows) sc in each st
Fasten off
For the sides of the feet (make 6):
With red yarn ch7
Row 1: sc in the 2nd chain st from hook, then sc in every following chain st to end. ch1, turn
Row 1: make 2sc in the first st, then sc5. ch1, turn (7sc)
Row 2: sc in each st. ch1, turn
Row 3: make 2sc in the first st, sc6. ch1, turn (8sc)
Row 4: sc in each st. ch1, turn
Row 5: make 2sc in the first st, sc7. ch1, turn (9sc)
Row 6: sc in each st. ch1, turn
Row 7: make 2sc in the first st, sc8. ch1, turn (10sc)
Row 8: sc in each st. ch1, turn
Row 9: make 2sc in the first st, sc9. ch1, turn (11sc)
Row 10: sc in each st. ch1, turn
Row 11: make 2sc in the first st, sc10. ch1, turn (12sc)
Row 12: sc in each st. ch1, turn
Row 13: make 2sc in the first st, sc11. ch1, turn (13sc)
Rows 14 - 15: (2 rows) sc in each st. ch1, turn
Row 16: sc12, then make 2sc in the last st. ch1, turn (14sc)
Rows 17 - 23: (7 rows) sc in each st. ch1, turn
Row 24: sc12, sc2tog. ch1, turn (13sc)
Row 25: sc2tog, sc11. ch1, turn (12sc)
Row 26: sc10, sc2tog. ch1, turn (11sc)
Row 27: sc2tog, sc9. ch1, turn (10sc)
Row 28: sc8, sc2tog. ch1, turn (9sc)
Row 29: sc2tog, sc7. ch1, turn (8sc)
Row 30: sc6, sc2tog. ch1, turn (7sc)
Row 31: sc2tog, sc5. ch1, turn (6sc)
Row 32: sc4, sc2tog. ch1, turn (5sc)
Row 33: sc2tog, sc3. ch1, turn (4sc)
Row 34: sc2, sc2tog. ch1, turn (3sc)
Row 35: sc2tog, sc. ch1, turn (2sc)
Row 36: sc2tog. ch1, turn (1sc)
Row 37: sc in this st
Fasten off
For the gusset of the feet (make 3):
With red yarn ch10
With red yarn ch10
Row 1: sc in the 2nd loop from hook, then sc in each of the following 8 chain sts to end. ch1, turn
Rows 2 - 22: (21 rows) sc in each st. ch1, turn (sc9)
Row 22: sc in the back loop of each st. ch1, turn
Rows 23 - 29: (7 rows) sc in each st. ch1, turn
Row 30: sc in the back loop of each st. ch1, turn
Rows 31 - 52: (22 rows) scin each st. ch1, turn
Row 53: sc in the front loop only of each st. ch1, turn
Rows 54 - 69: (16 rows) sci n each st. ch1, turn
Row 70: sc in each st
Fasten off
For the fastening (make 2):
With red yarn ch11
Row 1: sc in the 2nd chain st and the next 9sts. ch1, turn
Rows 2 - 71 : (70 rows) sc in each st. ch1, turn
Row 72: sc in each st
Fasten off
Part D: Making up
When I put together my rocket I added all the floors at the same time, but I realised when I was sewing the cupboard and control desk in place that this made this very difficult. Therefore I recommend you progress in the following order:
1. Assemble the floors
Each of the cardboard floor sections should be sandwiched between two crocheted sections. The colour combinations for the crochet are as follows:
White on one side, red on the other (bottom floor)
White on one side, red on the other (bottom floor)
White on one side, blue on the other (middle floor)
Blue on one side, grey on the other (top floor)
Sew around the outside of these sections (securing the crochet together), then sew around the square in the centre (as shown below)


You then need to sandwich the three cardboard hatch sections between the crocheted hatch sections, with the same colour combinations as for the floors. Once you've done this you should sew one edge of the hatch to one side of the square hole in the centre of each floor. Ensure that the correct hatch piece is sewn in place, and that the colours match (i.e.its the right way up). The idea is that the hatch should blend into the floor when it's closed.
2. Assemble the walls and roof
The crocheted part of the inner walls are created by sewing the blue crocheted section above the white section (i.e. the cast of each of the white section is sewn to the cast-on edge of the blue section), as shown below.


After this you need to sandwich the cardboard part of the wall between this inner section and the outer (red) crocheted section. Sew around the edge to secure thinner and outer walls together, with the cardboard in between. Don't worry about the windows for the minute - we'll get to that later.


For the roof sections you should sandwich the cardboard between one red and one silver crocheted piece and sew around the edge to secure the outer and inner sections together

3. Create the windows
The first step of creating the windows is to sew the outer edge of the windows onto the corresponding walls, around where you have taped the plastic. The yellow windows go on he outside of the rocket, the blue ones go upstairs and the green ones go downstairs.
After you have done this you will need to attach the inner edge if the windows. This is done by sewing the inner edges of the inside and outside parts of the window together, sewing through the plastic in between. This can be seen in the images below.


4. Sew the top floor in place
You should attach the top (blue end) of the 30cm tall crocheted piece to the circumference of the top floor (the grey/blue one, with the grey side facing upwards. Try to sew it using small stitches so that they are hidden by the surrounding crochet.


5. Add the control room interior
Skip to the control room section (part 2A) of the control room and make the desk, screen and blackboard. These are much easier to sew in place before you add the floor
6. Sew the middle floor in place
Sew the middle floor (blue and white) to the centre of the rocket, where the white and blue sections of the walls meet. The blue side should be facing upwards.

7. Add the living room interior
Again I would really recommend adding the living room interior furniture (part 2B) before you move on to the next step.
8. Sew the bottom floor in place
This is red and white, and the white side should be facing upwards. It should be added in the same way as you did for the other floors

9. Add the roof (including the top spike)
Start by sewing the first roof panel to the top of the outer wall, so that its corner lines up with the right-hand side of the opening. You should use red yarn and sew the shortest edge of the triangle to the top of the outer edge of the rocket. This can be seen below (although in this photo the roof piece isn't lined up with the front edge of the rocket. This is fine but it looks a lot neater if you line it up correctly (this will ensure the the roof opening lines up with the rocket door).

You should then move around the top edge of f the wall, attaching the short edge of each of the roof sections as you do so. When you get round to the left-hand opening you should have a small overhang, and have 2 roof sections left over.
You should then sew the edges of the attached roof sections together so they form a cone shape.


Next sew the long edge of 2 remaining roof sections together, then sew this section to the long edge of the roof section you have already created (as shown in the image below).


You then need to stuff the top spike section firmly and sew this to the very top of the roof section, at the point where all of the pieces meet (ignore the rocket legs in the image below)

10. Create the 'legs' of the rocket and attach them
To create the crochet section sew the gusset to the sides of 2 of the sides sections. The ridges made by crocheting the back loop of some of the stitches should be on the outside. You should start with the cast-on edge touching the top corner of the gusset (where you fastened off on the side section), and continue sewing around until you run out of gusset. The ridges should line up with the corners of the side sections.
You then need to use a glue gun to glue the parts of the legs together. Each leg consists of 2 of the pentagon shapes, 2 of the 8.5cm long rectangles, and one of each of the other 2 rectangles. You should glue the 3cm and 8cm long rectangles to the corresponding length side of the pentagon, then glue the 8.5cm rectangles to the diagonal sides. Glue up the cracks in between them, then glue the other pentagon shape to the top (as shown below)


Because the legs are the part of the rocket that comes over the most strain, I have glued barbecue skewers in the cracks between them.
You will need to cut the following sizes of skewers:
- 3cm (cut out 6)
- 8cm (cut out 6)
- 8.5cm (cut out 12)
- 2.8cm (cut out 18)

These need to be glued along the edges of the legs, following the cracks where glue has been used to join 2 edge sections together. Each skewer should match up with the length of the side it is being glued to.
Pull the crocheted section of the legs over the cardboard section. The crochet should line up with and follow the contours of the cardboard.
These legs then need to be sewn to the sides of the rocket. Two of them should be sewn either side of the down, and the other should be sewn t the back of the rocket (halfway between the other 2 legs), as can be seen in the image below.
11. Add the fastening for the door
Wrap the crocheted section of the fastening around the cardboard section and sew up the edges, so that the cardboard section is completely enclosed. Sew one of these sections to the edge of the front door, and the other to the edge of the opening (so that they line up when the door is closed). Sew the top of this section to one of the roof pieces, and the other end to the base of the rocket.
Sew 3 snap fasteners to the opening, so that they line up when the door is shut.There should be one at the top, one at the bottom, and one in the middle, as shown below.

Part 2: The furniture
Part A: The control room
For the screen:
with black dk yarn and a 2mm hook ch12
Round 1: sc in the 2nd chain st from hook, then sc in each of the following 9 chain sts. make 3sc in the first chain st you made, then sc in the back of the previous 9 chain sts you crocheted into. Make 2sc in the back of the first chain st you crocheted into (24sc)
Round 2: make 3sc in the first st, sc9, make 3sc in the next st, sc, make 3sc in the following st, sc9, make 3sc in the next st, sc (32sc)
Round 3: sc, make 3sc in the next st, sc11, make 3sc in the following st, sc3, make 3sc in the next st, sc11, make 3sc in the following st, sc2 (40sc)
Round 4: sc2, make 3sc in the next st, sc13, make 3sc in the following st, sc5, make 3sc in the next st, sc13, make 3sc in the following st, sc3 (48sc)
Round 5: sc3, make 3sc in the next st, sc15, make 3sc in the following st, sc7, make 3sc in the next st, sc15, make 3sc in the following st, sc4 (56sc)
Fasten off neatly

Rejoin brown yarn to one of these sts. Slip all the way round, then fasten off neatly


Embroider a small red spot along the bottom of the screen to act as an on/ off button, then sew to the (control room) wall on one side of the window.

For the chalkboard:
Using dark blue 4ply yarn ch14
Round 1: sc in the 2nd chain st from hook, then sc in each of the following 11 chain sts. make 3sc in the first chain st you made, then sc in the back of the previous 11 chain sts you crocheted into. Make 2sc in the back of the first chain st you crocheted into (28sc)
Round 2: make 3sc in the first st, sc11, make 3sc in the next st, sc, make 3sc in the following st, sc11, make 3sc in the next st, sc
Round 3: sc, make 3sc in the next st, sc13, make 3sc in the following st, sc3, make 3sc in the next st, sc13, make 3sc in the following st, sc2
Round 4: sc2, make 3sc in the next st, sc15, make 3sc in the following st, sc5, make 3sc in the next st, sc15, make 3sc in the following st, sc3
Round 5: sc3, make 3sc in the next st, sc17, make 3sc in the following st, sc7, make 3sc in the next st, sc17, make 3sc in the following st, sc4
Round 6: sc4, make 3sc in the next st, sc19, make 3sc in the following st, sc9, make 3sc in the next st, sc19, make 3sc in the following st, sc5
Round 7: sc5, make 3sc in the next st, sc21, make 3sc in the following st, sc11, make 3sc in the next st, sc21, make 3sc in the following st, sc6
Round 8: sc6, make 3sc in the next st, sc23, make 3sc in the following st, sc13, make 3sc in the next st, sc23, make 3sc in the following st, sc7
Round 9: sc7, make 3sc in the next st, sc25, make 3sc in the following st, sc15, make 3sc in the next st, sc25, make 3sc in the following st, sc8
Fasten off neatly
After this you should use embroidery thread to sew some equations onto the chalkboard. I have included images below to show some rocket equations that I found, which I used as inspiration.


Sew the chalkboard to the wall on the other side of the window.

For the control desk:
Use a pencil and pair of compasses to draw a semicircle of 7.3cm radius.
Inside this draw a semicircle of radius 3.5cm with the origin at the same point. Join the ends of the semicircles together with straight lines. Cut this out.

For the top and bottom (make 2):
With turquoise dk yarn ch29
Row 1: sc in the 2nd chain st from hook, sc in each of the next 7sts, then make 2sc in the following chain st (sc8, make 2sc in the next st) twice, sc. ch1, turn (31sc)
Row 2: (sc9, make 2sc in the next st) 3 times, sc. ch1, turn (34sc)
Row 3: sc5, (make 2sc in the next st, sc10) twice, make 2sc in the following st, sc6. ch1, turn (37sc)
Row 4: sc3, (make 2sc in the next st, sc11) twice, make 2sc in the following st, sc9. ch1, turn (40sc)
Row 4: sc3, (make 2sc in the next st, sc11) twice, make 2sc in the following st, sc9. ch1, turn (40sc)
Row 5: (sc12, make 2sc in the next st) 3 times, sc. ch1, turn (43sc)
Row 6: sc9, make 2sc in the next st, (sc13, make 2sc in the following st) twice, sc5. ch1, turn (46sc)
Row 7: sc7, make 2sc in the next st, (sc14, make 2sc in the following st) twice, sc8. ch1, turn
Fasten off
Sandwich the cardboard section between these 2 crocheted sections and sew around the outside (as you did for the walls and floors)
For the buttons (make one in yellow, green, and red):
With 4ply yarn and a 2mm hook make a magic loop with 6sc
Round 1: sc in the back loop of each st
Fasten off
Sew these to the top of the control desk, on the left-hand side (as shown below)
For the purple button:
For the purple button:
With a 2mm hook and purple 4ply yarn make a magic loop with 6sc
Row 1: make 2sc in each st (12sc)
Row 2: sc in the back loop of each st
Row 3: sc in each st
Fasten off
Stuff slightly and sew just above the other buttons on the left-hand side of the control desk

For the sliders (make 3):
Cut 2 lengths of cocktail stick 2.5cm in length, and one 2cm in length
Wrap white 4ply yarn around each of these sticks, securing it at each end with PVA glue, as shown below.

With white 4ply yarn and a 2mm hook make a magic loop with 5sc
Round 1 - 2: (2 round) sc in each st
Fasten off
Cut a length of barbeque skewer 1cm long, then insert it into the crochet, then sew the end to the centre of the 2cm cocktail stick. Use a glue gun to glue the ends of the cocktail sticks (to make them larger, as shown below)


For the knobs (make 4 for each slider):
white #10 crochet cotton and a 1mm hook make a magic loop with 5sc
Round 1 - 2: (2 round) sc in each st
Fasten off
Sew these to the centre of the control desk. The centre of the knobs should be 2.5cm apart length-ways, and 1.5cm apart width-ways.

Place the crochet/barbeque skewer section of the sliders between each set of upper and lower knobs. You then need to glue the 2.5cm long stick sections vertically, so that each end is glued to one of the knobs. This seen be seen in the images below.


For the keypad (make 12):
with black 4ply yarn and a 2mm hook make a magic loop with 5sc
make a slip st in the first st you made
Fasten off
Use a sewing needle and sewing thread (or one strand of embroidery thread) to embroider the digits 0 - 9, plus a forwards and backwards arrow onto these sections of crochet. Sew them in to the right-hand side of the control desk, as shown below:


Sew to the wall of the control room, just underneath the windows, as shown below. If you are struggling to sew it in place you can just sew the ends of the desk in place (as long as it isn't wobbling around it's fine)

Part B: The bedroom
For the cupboard:
On a section of cardboard draw a 1/4 circle with a 7.3cm radius. Mark both edges 3cm in from the circumference, then join these marks together with a straight line. Repeat this and then cut out both shapes from the cardboard.

For the sides of the cupboard cut two 3x5cm squares. Then cut two 2.8 x 5cm squares for the cupboard doors, and one 5x11.5cm square for the back.
Take one of the cupboard door sections and draw a line through the centre of the section. Mark a dot 1cm from the edge of this line. Use a pair of compasses to craw a circle 4mm in diameter, centred at this dot. Cut this out using a craft knife.


For the back (make one in white and one in turquoise):
ch22
Row 1: sc in the 2nd chain st from hook, then sc in every following chain st. ch1, turn (21sc)
Rows 2 - 11: (10 rows) sc in each st. ch1, turn
Row 12: sc in each st
Fasten off
For the cupboard door with the hole in (make 1 in white and 1 in turquoise):
ch8
ch8
Row 1: sc in the 2nd chain st from hook, then sc in every following chain st. ch1, turn (7sc)
Rows 2 - 4: (3 rows) sc in each st. ch1, turn
Row 5: sc2tog. ch1, turn (1sc)
Row 6: sc
Fasten off
Rejoin yarn to row 4 to the 2nd st from this section
Row 5: sc2tog between this st and the next, sc2. ch1, turn (3sc)
Row 6: sc3 in each of these 3sts
Fasten off
Rejoin yarn to row st to the st of the first of these 2 sections you made
Row 7: make 2sc in this st, ch1, make 2sc in the first st of the next section, sc in the next 2sts of this section. ch1, turn (7sc)
Rows 8 - 10: (3 rows) sc in each st. ch1, turn
Row 11: sc in each st
Fasten off
For the cupboard door fastening:
ch6
ch6
Fasten off
For the sides (make 2 in white and 2 in turquoise):
with a 2mm hook ch9
with a 2mm hook ch9
Row 1: sc in the 2nd chain st from hook, then sc in every following chain st. ch1, turn (8sc)
Rows 2 - 11: (10 rows) Sc in each st. ch1, turn
Row 12: sc in each st. turn
Rows 2 - 11: (10 rows) Sc in each st. ch1, turn
Row 12: sc in each st. turn
Row 13: Slip each st
Fasten off
Sandwich each cardboard side section between one white and one turquoise crocheted section, then sew around the edge .
For the cupboard door without the hole in (make 1 in white and 1 in turquoise):
Ch8
Row 1: sc in the 2nd chain st from hook, then sc in every following chain st. ch1, turn (7sc)
Rows 2 - 11: (10 rows) Sc in each st. ch1, turn
Row 12: sc in each st. turn
Row 13: Slip each st
Fasten off
Sandwich the cupboard door cardboard section (without the hole in) in between the two crocheted sections, and sew around the edge.
For the top and bottom (make 2 in white and 2 in turquoise):
Ch12
Row 1: make 2sc in the 2nd chain st from hook, sc9, make 2sc in the last chain st. ch1, turn (13sc)
Row 2: make 2sc in the first st, sc11, make 2sc in the last st. ch1, turn (15sc)
Row 3: make 2sc in the first st, sc13, make 2sc in the last st. ch1, turn (17sc)
Row 4: make 2sc in the first st, sc15, make 2sc in the last st. ch1, turn (19sc)
Row 5: make 2sc in the first st, sc2, hdc13, sc2, make 2sc in the last st. ch1, turn (21sts)
Row 6: make 2sc in the first st, sc3, hdc13, sc3, make 2sc in the last st. ch1, turn (23sts)
Row 7: Slip2, sc4, hdc11, sc4, slip1. ch1, turn
Row 8: Skip1, slip2, sc3, hdc8, sc3, slip1
Fasten off
Sandwich each cardboard section between one white and one turquoise crocheted section, then sew around the edge
You now need to assemble the parts of the cupboard you have made so far. The first step is to sew the top and bottom of the cupboards to the back section. You will need to band the back section slightly so that it follows the curve of the top/bottom.

The next step is to sew the cupboard sides in place. These act like part of the door, so are only attached at the back. In order to strengthen the cupboard I have sewn barbecue sticks to the hinges between the parts of the doors.
Cut out 4 sections of barbecue skewers 5cm in length.

One of these needs to be sewn to one edge of each of the cupboard sides. You then need to sew this edge of the sides of the back of the cupboard, as shown below.


Repeat this process with the cupboard doors, placing the barbecue skewers at the hinges.
For the handle:
Draw a circle on cardboard with a diameter of 5mm. Cut this out. (ignore the semicircle in the diagram below)

For the back of the handle:
With turquoise make a magic loop with 6sc
Fasten off neatly
Don't tighten the magic loop
For the front of the handle:
With turquoise make a magic loop with 8sc
Fasten off neatly
For the axle cut a section of barbecue skewer 16mm long.
For the bolt:
With turquoise make a magic loop with 6sc
Fasten off neatly
Don't tighten the magic loop
For the front of the handle:
With turquoise make a magic loop with 8sc
Fasten off neatly
For the axle cut a section of barbecue skewer 16mm long.
For the bolt:
Draw on cardboard an L-shape with the dimensions shown in the diagram below. Cut this out.

Cut out 2 lengths of bamboo skewer, one 2cm long and one 1cm long. glue them to the sides of the bolt as shown below.

Glue the axle to one side of the bolt, positioning it in the top right-hand corner, as shown below.


For the bolt back:
With white 4ply yarn ch5
With white 4ply yarn ch5
Row 1: sc in the 2nd chain st from hook, sc in every following chain st to end. ch1, turn (4sc)
Row 2: sc in each st. ch1, turn
Row 2: sc in each st. ch1, turn
Rows 3 - 5: (3 rows) sc in the first 2sts. ch1, turn
Row 6: sc in these 2sts
Fasten off
For the bolt front:
Fasten off
Fasten off
For the bolt front:
With white 4ply yarn ch5
Row 1: sc in the 2nd chain st from hook, sc in every following chain st to end. ch1, turn (4sc)
Row 2: sc in each st. ch1, turn
Row 2: sc in each st. ch1, turn
Rows 3 - 5: (3 rows) sc in the first 2sts. ch1, turn
Row 6: sc in the first st, ch2Fasten off
Sew the end of the chain sts to the end of row 5, to make a loop with a little hole in it, as shown below

Slide this hole over the axle in the bolt, then sandwich the cardboard bolt section between this and the back crocheted section that you made. Sew around the edges so that the cardboard is enclosed, as shown below:


Insert the bolt into the hole in the door of the cupboard.

Slide the exposed end of the axle into the hole in the centre of the back crocheted section of the handle (made by not tightening the magic loop).

Glue the 0.5cm radius circle of cardboard you made earlier onto the exposed end of the axle. Place the front crocheted section of the handle over the top, and sew it to the back section, so that the cardboard circle is exposed.


Finally sew the cupboard door fastening onto the ledge of the left-hand cupboard door, so that the downwards part of the bold slots into it to keep the doors closed.
For the bed:
The astronaut's bed takes the form of a sleeping bag strapped to the wall (this is similar to the sleeping setup they have on the international space station)
With yellow 4ply yarn ch10
Round 1: Sc in the 2nd chain st from hook, then sc in each of the next 7 chain sts. Make 3sc in the last chain st, then sc in the back of each of the previous 7 chain sts you crocheted into in turn. Make 2sc in the back of the first chain st you crocheted into. (20sc)
Rounds 2-29: (28 rounds) Sc in each st
Fasten off neatly
Cut a length of white yarn and sew one end to the top of the sleeping bag. Sew the other end to the wall of the living area of the rocket.


For the straps (make 2 of each):
With a 2mm hook and black 4ply yarn ch3
With a 2mm hook and black 4ply yarn ch3
Row 1: sc in the 2nd chain st from hook, then sc int eh next chain st. ch1, turn (2sc)
Rows 2 - 6: (5 rows) sc in each st. ch1, turn
Row 7: sc in each st
Fasten off
Fasten off
With a 2mm hook and black 4ply yarn ch3
Row 1: sc in the 2nd chain st from hook, then sc int eh next chain st. ch1, turn (2sc)
Rows 2 - 10: (9 rows) sc in each st. ch1, turn
Row 11: sc in each st
Row 12: sc2tog
Fasten off
Fasten off
For the buckles (make 2):
The buckles are made by folding a section of wire into shape. Take one end of the wire and fold it over by about 1cm. Make a 45 degree angle 0.5cm from this bend (see image 2), then make another 90 degree bend 1cm from this last one (image 3).Continue bending the wire as shown in the images: The next 2 sections are both 1cm long, then the next fold is 0.5cm. This should result in the buckle looking as shown in the 6th image below. Fold the length of wire over the top of the buckle and back down, as shown in the last image.


The buckles are made by folding a section of wire into shape. Take one end of the wire and fold it over by about 1cm. Make a 45 degree angle 0.5cm from this bend (see image 2), then make another 90 degree bend 1cm from this last one (image 3).Continue bending the wire as shown in the images: The next 2 sections are both 1cm long, then the next fold is 0.5cm. This should result in the buckle looking as shown in the 6th image below. Fold the length of wire over the top of the buckle and back down, as shown in the last image.
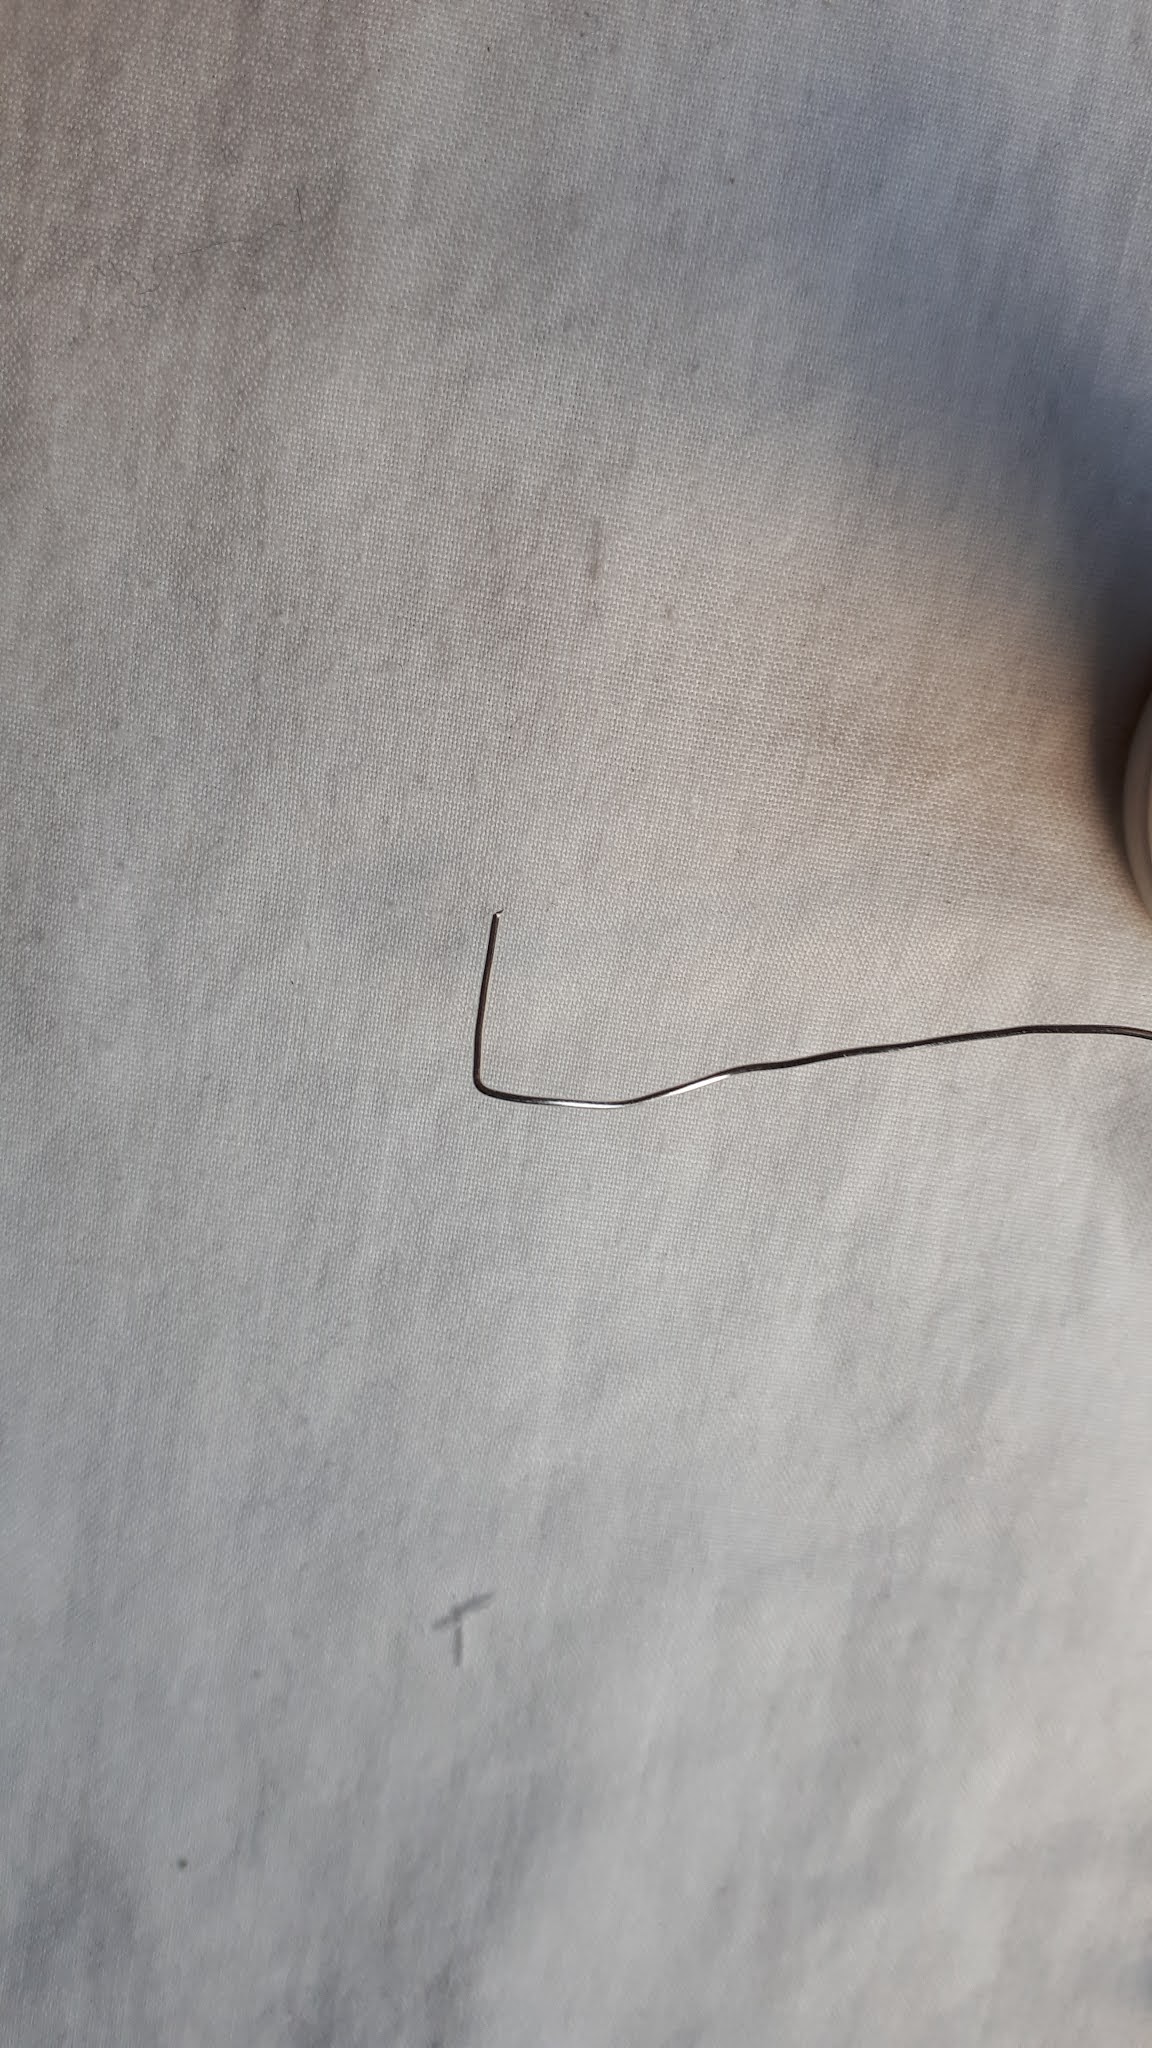


Sew one of these to one end of each of the shorter straps. Sewing around the central region where the ends of the wire are.
Sew these straps to the walls of the rocket, such that they can fasten the sleeping bag in place. The shorter strap should be on the bottom, with a corresponding larger strap above it. Their positioning can be seen in the images below


Sew the cupboard underneath the bed.
.


That's all from this pattern! I hope you have enjoyed it. If you have any comments or questions please feel free to contact me, either by leaving a comment below, or via my Ravelry or Instagram page. You are very welcome to sell finished products, but I do ask that you don't re-post this pattern or claim it as your own. Thank you!!!


