2023 update: Since making this pattern I have created a life-sized version including all the ligaments: you can find the patterns I've published so far in this series here. My other blog, Adventures into Anatomical Crochet, also contains a load of other anatomical patterns if you're interested :)


This skeleton stands at 40cm tall and contains all 206 bones in the body. It is made to 1/5th size scale. The structure of the skeleton is female (due to the shape/ size of the hips and the shaping of the skull), and she's called Milda, after my very tall friend (since her legs are slightly longer than would be proportionally average).


I have done my best to be as detailed as possible with my explanation and include as many diagrams and photographs as I can. If at any point you are unsure about anything please feel free to leave a comment below and I'll try to help you out as best I can.
I am not a doctor or medical student so although I have tried my best to make this skeleton as accurate as possible there may be some slight inaccuracies. If you notice anything out-of-place with the skeleton please let me know and I will try to rectify it.
Difficulty:

You will need:
Note:
Tips:
Section 1: The Legs
Part A: The large bones

For the femur:
With a 2mm hook and 4ply yarn make a magic loop with 6sc
Round 1: sc in each st
Round 2: (sc, make 2sc in the next st) 3 times (9sc)
Round 3: sc in each st
Stuff this section firmly
Round 4: (sc, sc2tog) 3 times (6sc)
Round 5: sc2, 3sc in the next st, sc2, slip1
Round 6: slip1, sc, sc4tog, sc2 (5sc)
Stuff this next section firmly
Rounds 7 - 25: (19 rounds) sc in each st
Round 26: 2sc in the first st, sc, 2sc in the next st, sc2 (7sc)
Round 27: sc in each st
Round 28: 2sc in the first st, sc2, 2sc in the next st, slip2, sc (9sc)
Tape 2 cocktail sticks together end-to-end, as shown below, and trim the ends to that they measure the same length as the humerus. Tape a third cocktail stick to the centre of the sticks, as shown below. Insert this into the bone.


Rejoin yarn to round 28 to the next st after this last section you just made
Round 29: slip this same st, sc2, slip1
Round 30: slip the first st of last round, sc2
Fasten off


For the Tibia:
With a 2mm hook and 4ply yarn make a magic loop with 6sc
Round 1: 2sc in each st (12sc)
Round 2: (sc2, sc2tog) 3 times (9sc)
Round 3: sc in each st
Round 4: (sc, sc2tog) 3 times (6sc)
Round 5: sc in each st
Stuff this section firmly
Round 6: sc2tog, sc4 (5sc)
Rounds 7 - 23: (17 rounds) sc in each st
Round 24: 2sc in the first st, sc, 2sc in the next st, sc2 (7sc)
Round 25: 2sc in the first st, sc2, 2sc in the next st, sc3 (9sc)
Tape three cocktail sticks together in the same was as you did for the femur, and insert them into your crochet to keep it stiff.
Round 26: (sc, sc2tog) 4 times (5sc)
Fasten off
For the Fibula:
With a 1mm hook and 2ply yarn make a magic loop with 4sc
Round 1: (sc, make 2sc in the next st) twice (6sc)
Round 2: sc in each st
Round 3: sc2, sc2tog, sc2 (5sc)
Round 4: sc3, sc2tog (4sc)
Stuff this section firmly
Rounds 5 - 24: (20 rounds) sc in each st
Round 25: make 2sc in the first st, sc3 (5sc)
Round 26: sc in each st
Change to a 1.25mm hook
Round 27: sc in each st
Cut a section of wire slightly longer than the length of this bone. Fold each end back on itself so that the ends aren't sharp, then insert this wire into the bone. Stuff this bottom section firmly.


Round 28: sc5, sc2tog
change back to a 1mm hook
Round 29: sc in the first 4sts
Fasten off

For the patella:
With a 1mm hook and 2ply yarn make a magic loop with 6sc
Round 1: (sc, make 2sc in the next st) 3 times
Round 2: sc in each st
Round 3: (sc2, make 2sc in the next st) 3 times (12sc)
Round 4: sc2tog 6 times (6sc)
Stuff this section firmly
Round 5: sc2tog 3 times (3sc)
Fasten off


Part B: The foot bones
Like for the hands I have decided to publish the pattern for the feet separately. This can be found here.
Part C: Making up
Lay out the femurs on their side with the head (the round section on the top) pointing inwards, and place the patella bones on top of the arched section at the bottom. The more pointed end of the patella should be pointing downwards (i.e. away from the head of the femur)


Place the tibia underneath the femurs, as shown below. Sew these bones together around the knee joint.


Section 2: The arms
Part A: The long bones
For the humerus:
With a 1.5mm hook
make a magic loop with 6sc
Round 1: (sc, make 2sc in the next st) 3 times (9sc)
Round 2: sc3tog, sc2, make 2sc in each of the next 2sts, sc, slip1 (9sts)
Round 3: slip2, sc6, slip1
Round 4: (sc, sc2tog) 3 times (6sc)
Round 5: sc in each st
stuff this section firmly
Round 6: sc2tog, sc4 (5sc)
Rounds 7 - 17: (11 rounds) sc in each st
Round 18: sc, make 2sc in the next st, sc2, make 2sc in the last st (7sc)
Round 19: sc2, make 3sc in the next st, sc2, make 2sc in the next st, sc (10sc)
Round 20: sc in each st
tape 2 cocktail sticks together (as shown below) and insert them into your crochet to hold it firm

 Round 21: sc2, sc4tog, sc, sc4tog
Fasten off
For the Ulna:
With a 1mm hook and 2ply yarn ch3
sc6 around
Rounds 2 - 4: (3 rounds) sc in each st
Row 5: sc3, ch1, turn
Row 6: hdc3, ch1, turn
Round 7: sc3, sc2tog between the gap between rows 5 and 6 and the and the next st of round 4, sc in the following st of round 4, sc2tog between the next st and the gap between rows 5 and 6 (6sc)
change to a 1.25mm hook
Rounds 8 - 9: (2 rows) sc in each of these 6sts
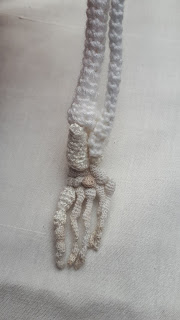
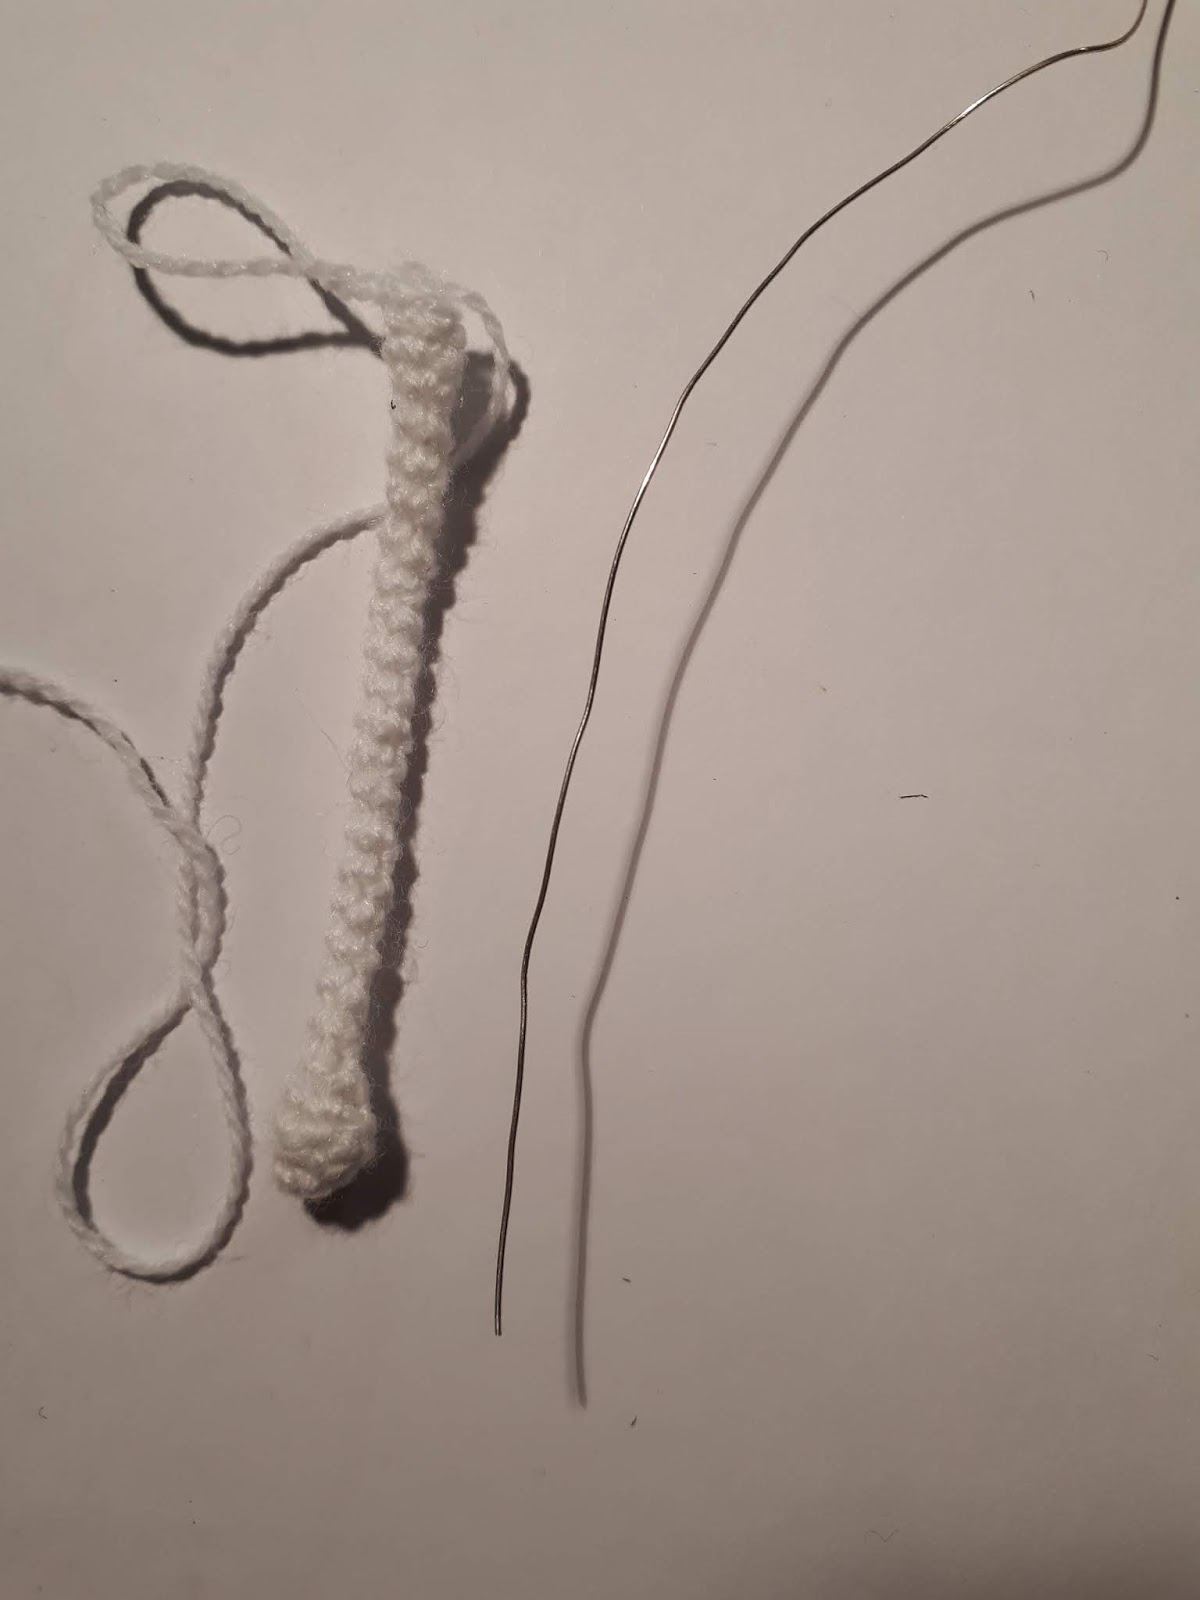
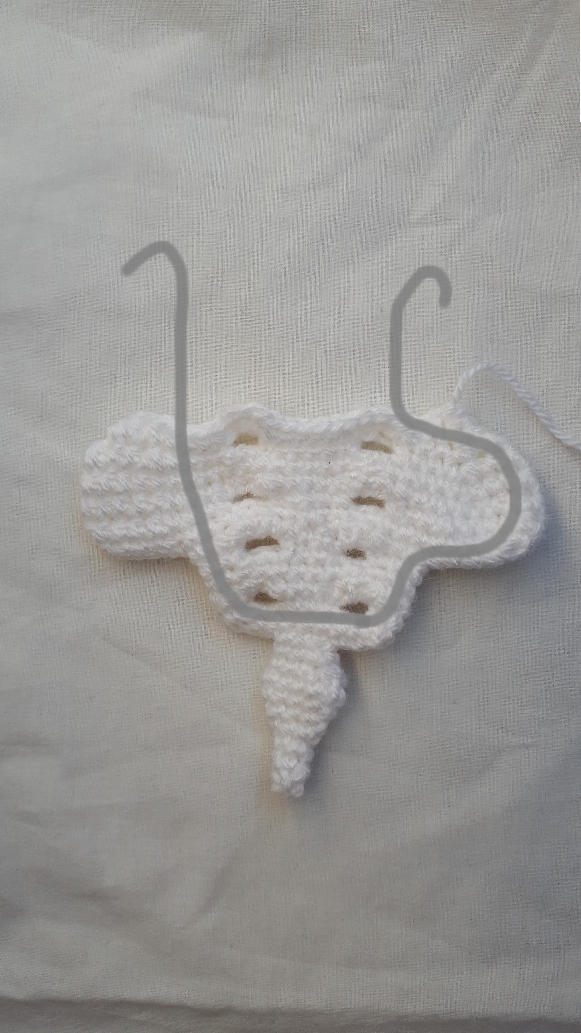
Cut a section of wire around 5cm long and curl it round into a sort of rectangle shape with the same dimensions as the flat top section of the bone you've made so far (as shown in the 2nd and 3rd photo below). Tape the ends of the wire together to help it keep its shape. Insert the wire into the crochet so that it lies flat inside the top section that you modelled it around, keeping it stiff. Finally, curve the end of the crochet (i.e. the first few rounds you made) around to make a sort of hook shape, as shown in the final image below.


Round 10: sc in each st
change to a 1mm hook
Rounds 11 - 15: (5 rounds) sc in each st
Round 16: sc2tog, sc4
Rounds 17 - 19: (3 rounds) sc in each st
Round 20: sc2tog, sc3
Rounds 21 - 23: (3 rounds) sc in each st
Round 24: (sc, make 2sc in the next st) 3 times
Round 25: sc in each st
Round 26: sc2tog 3 times
Insert a cocktail stick into the bone to hold it stiff.
For the radius:
With a 0.9mm hook and 2ply yarn make a magic loop with 6sc
Round 1: (sc, make 2sc in the next st) 3 times (9sc)
Round 2: (sc, sc2tog) 3 times (6sc)
stuff firmly
Swap to a 1mm hook
Round 3: (sc, sc2tog) twice (4sc)
Rounds 4 - 17: (13 rounds) sc in each st
Round 18: (sc, make 2sc in the next st) twice (6sc)
Round 19: sc in each st
change to a 1.25mm hook
Round 20: sc in each st
Round 21: slip1, hdc2, slip1, hdc2
Cut a section of wire slightly longer than the bone, fold the ends over to make sure they're not sharp, then insert this into the bone (as you did for the fibula)
stuff firmly
Round 22: slip2, sc, hdc, slip1
Fasten off
Part B: the hands
This section has been published in a separate pattern that can be found here
Part C: Making up
Sew the top of the radius to the base of the humerus. After you've done this, curve the top section of the ulna (the bit with the wire in) around the base section of the humerus and sew into place, as shown below (the first image shows the front of the left arm and the 2nd image shows the back of the same arm).


Section 4: The thorax
Part A: The ribs
The ribs are worked from the outside inwards (this is important to note for ribs 5 - 9)
After you have made each rib (or for some of them just before you make the last round) you will need to insert a length of wire into it to help it keep its shape. To do this you should cut a section of wire a little longer than the rib and the fold over each end. You should then use a pair of pliers to clamp down on the folded section of wire to make it as slim as possible so that it fits inside the crochet.


For the 1st rib:
Make a magic loop with 6sc
Round 1: make 2sc in each st (12sc)
Rounds 2 - 7: (6 rounds) sc in each st
Rounds 8 - 10: (3 rounds) sc6, hdc6
Rounds 11 - 13: (3 rounds) sc in each st
Round 14: sc, slip4, sc3, sc2tog, sc2 (11sts)
Round 15: sc, slip4, sc6
Rounds 16 - 17: (2 rounds) sc in each st
Stuff firmly
Round 18: sc2tog 5 times
Fasten off
For the 2nd rib:
Make a magic loop with 5sc
sc in each st until the rib measures 4.8cm (approx. 32 rounds)
Fasten off
For the 3rd rib:
Make a magic loop with 5sc
sc in each st until the rib measures 4.8cm (approx. 32 rounds)
Fasten off
For the 4th rib:
Make a magic loop with 5sc
sc in each st until the rib measures 5.8cm (approx. 38 rounds)
Fasten off
When making the wire sections for ribs 5 - 9 you shouldn't clamp down so hard on the top end of the wire (the 'bottom' is the end you will insert into the crochet first), since you want them to follow the same sort of shape as you crochet, which will be slightly wider for the final few rounds.
For the 5th rib:
Make a magic loop with 5sc
sc in each st until the rib measures 4.8cm (approx. 32 rounds)
Round 33: make 2sc in the first st, sc4 (6sc)
Round 34: sc3, make 2sc in the next st, sc2 (7sc)
Round 35: sc6, make 2sc in the last st (8sc)
Insert wire
Round 36: sc2tog 3 times
Fasten off
For the 6th rib:
Make a magic loop with 5sc
sc in each st until the rib measures 4.8cm (approx. 32 rounds)
Round 33: make 2sc in the first st, sc4 (6sc)
Round 34: sc3, make 2sc in the next st, sc2 (7sc)
Round 35: sc6, make 2sc in the last st (8sc)
Insert wire
Round 36: sc2tog 3 times
Fasten off
For the 7th rib:
Make a magic loop with 5sc
sc in each st until the rib measures 4.8cm (approx. 32 rounds)
Round 33: make 2sc in the first st, sc4 (6sc)
Round 34: sc in each st
Round 35: sc3, make 2sc in the next st, sc2 (7sc)
Round 36: sc in each st
Insert wire
Round 37: sc2tog 3 times
Fasten off
For the 8th rib:
Make a magic loop with 5sc
sc in each st until the rib measures 4.8cm (approx. 32 rounds)
Round 33: make 2sc in the first st, sc4 (6sc)
Rounds 34 - 36: (3 rounds) sc in each st
Insert wire
Round 37: sc2tog 3 times
Fasten off
For the 9th rib:
Make a magic loop with 5sc
sc in each st until the rib measures 4.5cm (approx. 29 rounds)
Round 30: make 2sc in the first st, sc4( 6sc)
Round 31: sc in each stsc3, make 2sc in the next st, sc2 (7sc)
Rounds 32 - 34: (3 rounds) sc in each st
Insert wire
Round 35: sc2tog 3 times
For the 10th rib:
Make a magic loop with 5sc
Sc in each st until your rib measures 4.5cm long (approx. 29 rounds)
Fasten off
For the 11th rib:
Make a magic loop with 5sc
Sc in each st until your rib measures 3cm long (approx. 24 rounds)
Fasten off
For the 12th rib:
Make a magic loop with 5sc
Rounds 1 - 9: (9 rounds) sc in each st
Fasten off
Part B: The cartilages
The cartilages of the ribs lie between the rib bones and the sternum in order to keep them in position. You should make 2 of each type listed below (unless otherwise stated). You should make them using a 0.6mm hook and cream- coloured sewing cotton.
For the 1st rib:
Make a magic loop with 6sc
Rounds 1 - 2: (2 rounds) sc in each st
Fasten off
For the 2nd rib:
Make a magic loop with 4sc
Rounds 1 - 2: (2 rounds) sc in each st
Fasten off
For the 3rd and 4th rib (make 4 in total):
Make a magic loop with 4sc
Rounds 1 - 3: (3 rounds) sc in each st
Fasten off
For the 5th and 6th rib (make 4 in total):
Make a magic loop with 5sc
Rounds 1 - 4: (4 rounds) sc in each st
Fasten off
For the remaining cartilage:
(first section)
make a magic loop with 5sc
Rounds 1 - 5: (5 rounds) sc in each st
Fasten off neatly
(2nd section)
Make a magic loop with 5sc
Rounds 1 - 4: (4 rounds) sc in each st
Round 5: sc around 4 of the sts of round 5 on the first section you made, skip the first st of round 4 of this second section you made, then sc in each of the next 4sts.These last 8sts you crocheted form a new round
Round 6: sc in the first st of the previous round, sc2tog, sc2, sc2tog, sc (6sc)
Rounds 7 - 8: (2 rounds) sc in each st
Fasten off neatly
(3rd section)
Make a magic loop with 5sc
Rounds 1 - 4: (4 rounds) sc in each st
Round 5: sc in the 'new' st you made when fastening off neatly on the 2nd section,and sc in each of the next 3sts of this section. Skip the following st on round 4 of section 3, then sc in each of the next 4sts. These last 8sts form a new round
Round 6: sc2tog between the first 2sts of the last round, sc3, sc2tog, sc2, sc2tog (6sc)
Round 7: sc in each st
Fasten off neatly
(4th section)
Make a magic loop with 5sc
Rounds 1 - 4: (4 rounds) sc in eac st
Round 5: sc in the 'new' st you made then fastening off neatly on section 3, then sc in the next 4sts of this section. Skip the first st of round 4 of the 4th section, then sc in each of the next 3sts (8sc)
Round 6: sc2tog between the first 2sts of the previous round, sc2, sc2tog, sc2 sc2tog (5sc)
Rounds 7 - 12: (6 rounds) sc in each st
Fasten off
Part C: The sternum
Part D: The shoulder girdle
For the clavicle (make 2):
Using # 8 crochet cotton and a 0.8mm hook make a magic loop with 4sc
Round 1- 7: (7 rounds) sc in each st
Fasten off
Measure a length of wire slightly longer than the section of crochet you have just made, then fold over each end of the wire and insert it into the clavicle to help it keep its shape (as you did with the ribs)
For the right scapula:
Using # 8 crochet cotton and a 0.8mm hook ch4
Round 1: sc in the 2nd chain st from hook, sc in the next chain st, then make 3sc in to the first chain st you made. Sc in to the back of the previous chain st you crocheted into, then make 2sc into the back of the first chain st you crocheted into (8sc)
Rounds 2 - 3: (2 rounds) sc in ecah st
Round 4: (sc3, make 2sc in the next st) twice (10sc)
Round 5: sc3, make 2sc in the next st, sc6 (11sc)
Round 6: (sc4, make 2sc in the next st) twice, sc (13sc)
Round 7: sc4, make 2sc in the next st, sc8 (14sc)
Round 8: sc, hdc2, make 2hdc in the next st, hdc2, sc2, slip5, sc (15sc)
Round 9: sc2, hdc2, make 2hdc in the next st, hdc2, sc2, slip5, sc (16sc)
Round 10: sc2, hdc6, sc, slip7
Round 11: sc7, ch4, skip4, sc5. These last 16 sts/chain sts form a new round (16sts)
Rounds 12 - 13: (2 rounds) sc in each of these 16sts
Round 14: slip3, sc, skip3, sc5, sc3tog, slip1 (11sts)
Round 15: slip3, sc2, hdc4, sc, slip1
Round 16: (this is slightly more than 1 round) slip6, sc, sc5tog, slip1
Fasten off
Rejoin yarn to round 14 to the same st as the last st you crocheted in before you skipped 3, as shown below

Round 15: sc in this st and the next 4sts.
Round 16: sc in the first st of the last round, ch3, sc in the 2nd loop from hook, sc in the next chain st, then slip the same st as the last st you crocheted in before the ch3.
Fasten off
Rejoin yarn to round 10 to the the last st you crocheted in before you made the chain 4, as shown below.

Round 11: Sc in this st and the next 5sts of round 11, then sc in the back of the 4 chain sts (10sts)
Round 12: make 2hdc in the first st of the last round, hdc, sc2, sc3tog, sc2, hdc (9sc)
Round 13: hdc, make 2hdc in the next st, hdc, sc, sc4tog, sc (7sts)
Round 14: (slightly more than 1 round) sc, make 2hdc in each of the next 2sts, hdc, sc4tog (6sts)
Round 15: (slightly more than 1 round) hdc, make 2hdc in the next st, hdc, sc, sc3tog (5sts)
Fasten off
For the left scapula:
Using # 8 crochet cotton and a 0.8mm hook ch4
Round 1: sc in the 2nd chain st from hook, sc in the next chain st, then make 3sc in to the first chain st you made. Sc in to the back of the previous chain st you crocheted into, then make 2sc into the back of the first chain st you crocheted into (8sc)
Rounds 2 - 3: (2 rounds) sc in ecah st
Round 4: (sc3, make 2sc in the next st) twice (10sc)
Round 5: Sc8, make 2sc in the next st, sc (11sc)
Round 6: Sc3, make 2sc in the next st, sc4, make 2sc in the following st, sc2 (13sc)
Round 7: Sc9, make 2sc in the next st, sc3 (14sc)
Round 8: sc, Slip5, sc2, hdc2, 2hdc, hdc2, sc (15sc)
Round 9: sc, Slip6, sc2, hdc2, 2hdc, hdc2, sc (16sc)
Round 10: Slip7, sc, hdc6, sc2
Round 11: Sc6, ch4, skip4, sc6 (16sc)
Rounds 12 -13: (2 rounds) sc in each st
Round 14: Sc2, slip4, sc5, skip3, sc2 (13sts)
Round 15: slip3, Sc, sc3tog, hdc4, sc, slip1 (11sts)
Round 16: sc2, sc5tog, sc, slip1
Fasten off
Rejoin yarn to the last st you crocheted in in round 14 before you skipped 3,
Round 15: sc in this st and in each of the next 4sts (5sc)
Round 16: Sc3, ch3, sc in the 2nd loop from hook and in the next chain st, then slip the same st as the one you crocheted before the chain 3
Fasten off
Rejoin yarn to round 10 in the last st you crocheted in before the ch4 (as you did for the other scapula),
Round 11: Sc in this st and the next 5sts of round 10, then sc in the back loop of each of the 4 chain sts (10sc)
Round 12: (slightly more than 1 round) sc3, hdc, make 2hdc in the next st, hdc, sc2, sc3tog (9sts)
Round 13: Sc, hdc, make 2hdc in the next st, hdc, sc, sc3tog, sc (8sts)
Round 14: make 2hdc in the first 2sts, hdc, sc, sc4tog, (7sts)
Round 15: (slightly more than 1 round) sc, hdc, make 2hdc in the next st, hdc, slip1, sc3tog (6sc)
Fasten off
For the acromium (i.e. the shoulder sockets) (make 2):
With a 0.8mm hook and #8 crochet cotton ch3
Round 1: sc in the 2nd loop from hook, then make 3sc in the first chain st you made. Make 2sc in the back of the previous chain st (the first one you crocheted into) (6sc)
Round 2: (Sc2, make 2sc in the next st) twice (8sc)
Round 3: sc in each st
Round 4: (sc2, sc2tog) twice (6sc)
Fasten off
Sew one of these to each of the scapula, as shown below (the photo shows the back of the right scapula)

Part E: Making up
Start by sewing the cartilages for the first 6 ribs to the ends of their respective ribs. Make sure that you are sewing them to the correct ends of ribs 5 and 6 (the thinner end).
Next you should sew the ribs to the vertebrae. They should be sewn in between the thoracic vertebrae, with the 1st rib articulating with the bottom of T1 and top of T2, and the 12th rib articulating with the bottom of T12 and the top of L1. Make sure you are sewing them the right way round: ribs 5 - 9 should be sewn so that the wider end of them articulates with the vertebrae.

After you have sewn the ribs to the vertebrae you will need to sew in place the remaining cartilage section. This should be sewn to ribs 7 - 10, as can be seen in the photos below.
Once this is completed you will need to sew the cartilage to the sternum. The first 3 ribs should be sewn to the upper section of the sternum, with the first rib being sewn to the widest part of this section. The remaining cartilage sections should be sewn to the lower part of the sternum at equally- spaced intervals. The cartilage section that joins to ribs 7 - 10 should be the lowest one down, being sewn just above where the size of the sternum starts reducing (as shown below)


Sew the clavicle to the top of the sternum next to the little knobbly sections at the top (as shown below). The other end should be sewn to the top of the acromium on the scapula. Try to ensure that the scapula curve into the correct sort of shape by curling the wire round.


This skeleton stands at 40cm tall and contains all 206 bones in the body. It is made to 1/5th size scale. The structure of the skeleton is female (due to the shape/ size of the hips and the shaping of the skull), and she's called Milda, after my very tall friend (since her legs are slightly longer than would be proportionally average).


I have done my best to be as detailed as possible with my explanation and include as many diagrams and photographs as I can. If at any point you are unsure about anything please feel free to leave a comment below and I'll try to help you out as best I can.
I am not a doctor or medical student so although I have tried my best to make this skeleton as accurate as possible there may be some slight inaccuracies. If you notice anything out-of-place with the skeleton please let me know and I will try to rectify it.
Difficulty:
Difficult
This is a very long pattern and is very intricate in places. However, don't let this put you off - if you are determined enough you can get it made, and it will be very rewarding when you do finish it. Please let me know if you get stuck at any point and I will do my best to help you as soon as possible. The quickest way to get to me would be to DM me on my Instagram page, but you can also message me on Ravelry, or just leave a comment below,
You will need:
- White 4ply yarn
- White 2ply yarn
- Regular sewing cotton in white, cream, and beige
- white #8 crochet cotton
- The following sized crochet hooks, those in brackets are optional: 0.6mm, 0.8 (0.9mm), 1mm, 1.25mm, 1.5mm, 2mm
- At least 18 cocktail sticks
- 0.5mm craft wire
- PVA glue
- A pair of scissors
- PVA glue and water
- A pair of pliers
- Regular toy stuffing
- Various sizes of needles for sewing up (at the very minimum you will need a regular sewing needle and a darning needle)
Note:
- If unspecified use a 0.6mm hook and regular sewing thread
- 'sc12' means 'sc in each of the next 12sts'
- 'fasten off neatly' refers to a special way of fastening off which is neater and makes it easier to see where you should be crocheting on the next round (also known as invisible fastening off). This involves pulling up your yarn through your stitch, threading the yarn underneath the second stitch from where you pulled your yarn up, then threading your yarn back through the top of this stitch and down through the back of the work. There is a very helpful site that explains it clearly found here. Just make sure when you do this that you thread your needle through the SECOND stitch after the last stitch you made, otherwise you will end up with an extra stitch which may mean that all of the following rounds are out of line with each other.
Tips:
- Use a cocktail stick to stuff small parts. Do this as you go along and it will make it a lot easier (but be aware that the long bones (tibia, femur, ulna etc.) aren't stuffed)
- If you don't own any or many small-sized crochet hooks I would recommend purchasing this bulk pack from Amazon, they are correctly sized, reasonably priced, comfortable to hold and overall good quality.
- This project requires a lot of intricate work and so you may find it useful to use a magnifying glass when working on the very small bones
Section 1: The Legs
Part A: The large bones
The femur, tibia and fibula are worked from the head downwards, and the patella is worked from the bottom up.

For the femur:
With a 2mm hook and 4ply yarn make a magic loop with 6sc
Round 1: sc in each st
Round 2: (sc, make 2sc in the next st) 3 times (9sc)
Round 3: sc in each st
Stuff this section firmly
Round 4: (sc, sc2tog) 3 times (6sc)
Round 5: sc2, 3sc in the next st, sc2, slip1
Round 6: slip1, sc, sc4tog, sc2 (5sc)
Stuff this next section firmly
Rounds 7 - 25: (19 rounds) sc in each st
Round 26: 2sc in the first st, sc, 2sc in the next st, sc2 (7sc)
Round 27: sc in each st
Round 28: 2sc in the first st, sc2, 2sc in the next st, slip2, sc (9sc)
Tape 2 cocktail sticks together end-to-end, as shown below, and trim the ends to that they measure the same length as the humerus. Tape a third cocktail stick to the centre of the sticks, as shown below. Insert this into the bone.


Firmly stuff this bottom section of the bone (after round 25).
Round 29: sc, slip1, skip4, slip1, sc
Fasten offRejoin yarn to round 28 to the next st after this last section you just made
Round 29: slip this same st, sc2, slip1
Round 30: slip the first st of last round, sc2
Fasten off


For the Tibia:
With a 2mm hook and 4ply yarn make a magic loop with 6sc
Round 1: 2sc in each st (12sc)
Round 2: (sc2, sc2tog) 3 times (9sc)
Round 3: sc in each st
Round 4: (sc, sc2tog) 3 times (6sc)
Round 5: sc in each st
Stuff this section firmly
Round 6: sc2tog, sc4 (5sc)
Rounds 7 - 23: (17 rounds) sc in each st
Round 24: 2sc in the first st, sc, 2sc in the next st, sc2 (7sc)
Round 25: 2sc in the first st, sc2, 2sc in the next st, sc3 (9sc)
Tape three cocktail sticks together in the same was as you did for the femur, and insert them into your crochet to keep it stiff.
Round 26: (sc, sc2tog) 4 times (5sc)
Fasten off
For the Fibula:
With a 1mm hook and 2ply yarn make a magic loop with 4sc
Round 1: (sc, make 2sc in the next st) twice (6sc)
Round 2: sc in each st
Round 3: sc2, sc2tog, sc2 (5sc)
Round 4: sc3, sc2tog (4sc)
Stuff this section firmly
Rounds 5 - 24: (20 rounds) sc in each st
Round 25: make 2sc in the first st, sc3 (5sc)
Round 26: sc in each st
Change to a 1.25mm hook
Round 27: sc in each st
Cut a section of wire slightly longer than the length of this bone. Fold each end back on itself so that the ends aren't sharp, then insert this wire into the bone. Stuff this bottom section firmly.

Round 28: sc5, sc2tog
change back to a 1mm hook
Round 29: sc in the first 4sts
Fasten off

With a 1mm hook and 2ply yarn make a magic loop with 6sc
Round 1: (sc, make 2sc in the next st) 3 times
Round 2: sc in each st
Round 3: (sc2, make 2sc in the next st) 3 times (12sc)
Round 4: sc2tog 6 times (6sc)
Stuff this section firmly
Round 5: sc2tog 3 times (3sc)
Fasten off


Part B: The foot bones
Like for the hands I have decided to publish the pattern for the feet separately. This can be found here.
Part C: Making up
Lay out the femurs on their side with the head (the round section on the top) pointing inwards, and place the patella bones on top of the arched section at the bottom. The more pointed end of the patella should be pointing downwards (i.e. away from the head of the femur)


Place the tibia underneath the femurs, as shown below. Sew these bones together around the knee joint.


Lay the fibula alongside the tibia so that the head sits just underneath the wide section at the top of the tibia, and the other end extends below the tibia's end, as shown below. Sew this in place where the 2 bones are in contact at their top and bottom


Now you just need to sew the feet to the legs (the assembly of the feet was explained in the pattern linked above). If you imaging the Talus as being Y-shaped, the top of the tibia should fit on top of it and nestle nicely between the bumps that make the arms of the Y (hopefully this will make sense looking at the photos below). The fibula should then extend a little further and be sewn to the side of the talus just above the calcaneus.


Part A: The long bones
For the humerus:
With a 1.5mm hook
make a magic loop with 6sc
Round 1: (sc, make 2sc in the next st) 3 times (9sc)
Round 2: sc3tog, sc2, make 2sc in each of the next 2sts, sc, slip1 (9sts)
Round 3: slip2, sc6, slip1
Round 4: (sc, sc2tog) 3 times (6sc)
Round 5: sc in each st
stuff this section firmly
Round 6: sc2tog, sc4 (5sc)
Rounds 7 - 17: (11 rounds) sc in each st
Round 18: sc, make 2sc in the next st, sc2, make 2sc in the last st (7sc)
Round 19: sc2, make 3sc in the next st, sc2, make 2sc in the next st, sc (10sc)
Round 20: sc in each st
tape 2 cocktail sticks together (as shown below) and insert them into your crochet to hold it firm


Fasten off
For the Ulna:
With a 1mm hook and 2ply yarn ch3
sc6 around
Rounds 2 - 4: (3 rounds) sc in each st
Row 5: sc3, ch1, turn
Row 6: hdc3, ch1, turn
Round 7: sc3, sc2tog between the gap between rows 5 and 6 and the and the next st of round 4, sc in the following st of round 4, sc2tog between the next st and the gap between rows 5 and 6 (6sc)
change to a 1.25mm hook
Rounds 8 - 9: (2 rows) sc in each of these 6sts
Cut a section of wire around 5cm long and curl it round into a sort of rectangle shape with the same dimensions as the flat top section of the bone you've made so far (as shown in the 2nd and 3rd photo below). Tape the ends of the wire together to help it keep its shape. Insert the wire into the crochet so that it lies flat inside the top section that you modelled it around, keeping it stiff. Finally, curve the end of the crochet (i.e. the first few rounds you made) around to make a sort of hook shape, as shown in the final image below.


Round 10: sc in each st
change to a 1mm hook
Rounds 11 - 15: (5 rounds) sc in each st
Round 16: sc2tog, sc4
Rounds 17 - 19: (3 rounds) sc in each st
Round 20: sc2tog, sc3
Rounds 21 - 23: (3 rounds) sc in each st
Round 24: (sc, make 2sc in the next st) 3 times
Round 25: sc in each st
Round 26: sc2tog 3 times
Insert a cocktail stick into the bone to hold it stiff.
For the radius:
With a 0.9mm hook and 2ply yarn make a magic loop with 6sc
Round 1: (sc, make 2sc in the next st) 3 times (9sc)
Round 2: (sc, sc2tog) 3 times (6sc)
stuff firmly
Swap to a 1mm hook
Round 3: (sc, sc2tog) twice (4sc)
Rounds 4 - 17: (13 rounds) sc in each st
Round 18: (sc, make 2sc in the next st) twice (6sc)
Round 19: sc in each st
change to a 1.25mm hook
Round 20: sc in each st
Round 21: slip1, hdc2, slip1, hdc2
Cut a section of wire slightly longer than the bone, fold the ends over to make sure they're not sharp, then insert this into the bone (as you did for the fibula)
stuff firmly
Round 22: slip2, sc, hdc, slip1
Fasten off
This section has been published in a separate pattern that can be found here
Sew the top of the radius to the base of the humerus. After you've done this, curve the top section of the ulna (the bit with the wire in) around the base section of the humerus and sew into place, as shown below (the first image shows the front of the left arm and the 2nd image shows the back of the same arm).


Next you will need to sew the ends of the arms to the hands. The Ulna should be sewn to the base of the lunate, and the radius should be sewn to the base of the trapezioid (although if you can't figure this out its fine to just sew them to the hands however you can). You should also use a few stitches to sew the ends of the ulna and radius together.


The first image below shows the front of the left hand, and the 2nd image shows the back of the same hand.


Section 3: The Spine
As I did for the hands and feet I have created another blog post detailing the creation of the spine. This pattern can be found here.

For the Hyoid (optional):
The hyoid bone isn't articulated with any other bone in the body, so is often left off of skeleton models. I have, however, included it in this pattern for completeness.

For the Hyoid (optional):
The hyoid bone isn't articulated with any other bone in the body, so is often left off of skeleton models. I have, however, included it in this pattern for completeness.
With a 0.6mm hook and white sewing cotton ch13,
Row 1: Slip the 2nd chain st from hook and the next 3sts, sc4, slip4
Fasten off
Add a dab of PVA glue to the hyoid bone to help it keep its shape.
Add a dab of PVA glue to the hyoid bone to help it keep its shape.

This bone should be sewn to the underneath of the skull. Its positioning is explained in section 6 of this pattern, so keep it somewhere safe until you reach that point.
Section 4: The thorax
Part A: The ribs
The ribs are worked from the outside inwards (this is important to note for ribs 5 - 9)
After you have made each rib (or for some of them just before you make the last round) you will need to insert a length of wire into it to help it keep its shape. To do this you should cut a section of wire a little longer than the rib and the fold over each end. You should then use a pair of pliers to clamp down on the folded section of wire to make it as slim as possible so that it fits inside the crochet.


For the 1st rib:
Make a magic loop with 6sc
Round 1: make 2sc in each st (12sc)
Rounds 2 - 7: (6 rounds) sc in each st
Rounds 8 - 10: (3 rounds) sc6, hdc6
Rounds 11 - 13: (3 rounds) sc in each st
Round 14: sc, slip4, sc3, sc2tog, sc2 (11sts)
Round 15: sc, slip4, sc6
Rounds 16 - 17: (2 rounds) sc in each st
Stuff firmly
Round 18: sc2tog 5 times
Fasten off
For the 2nd rib:
Make a magic loop with 5sc
sc in each st until the rib measures 4.8cm (approx. 32 rounds)
Fasten off
For the 3rd rib:
Make a magic loop with 5sc
sc in each st until the rib measures 4.8cm (approx. 32 rounds)
Fasten off
For the 4th rib:
Make a magic loop with 5sc
sc in each st until the rib measures 5.8cm (approx. 38 rounds)
Fasten off
When making the wire sections for ribs 5 - 9 you shouldn't clamp down so hard on the top end of the wire (the 'bottom' is the end you will insert into the crochet first), since you want them to follow the same sort of shape as you crochet, which will be slightly wider for the final few rounds.
For the 5th rib:
Make a magic loop with 5sc
sc in each st until the rib measures 4.8cm (approx. 32 rounds)
Round 33: make 2sc in the first st, sc4 (6sc)
Round 34: sc3, make 2sc in the next st, sc2 (7sc)
Round 35: sc6, make 2sc in the last st (8sc)
Insert wire
Round 36: sc2tog 3 times
Fasten off
For the 6th rib:
Make a magic loop with 5sc
sc in each st until the rib measures 4.8cm (approx. 32 rounds)
Round 33: make 2sc in the first st, sc4 (6sc)
Round 34: sc3, make 2sc in the next st, sc2 (7sc)
Round 35: sc6, make 2sc in the last st (8sc)
Insert wire
Round 36: sc2tog 3 times
Fasten off
Make a magic loop with 5sc
sc in each st until the rib measures 4.8cm (approx. 32 rounds)
Round 33: make 2sc in the first st, sc4 (6sc)
Round 34: sc in each st
Round 35: sc3, make 2sc in the next st, sc2 (7sc)
Round 36: sc in each st
Insert wire
Round 37: sc2tog 3 times
Fasten off
For the 8th rib:
Make a magic loop with 5sc
sc in each st until the rib measures 4.8cm (approx. 32 rounds)
Round 33: make 2sc in the first st, sc4 (6sc)
Rounds 34 - 36: (3 rounds) sc in each st
Insert wire
Round 37: sc2tog 3 times
Fasten off
For the 9th rib:
Make a magic loop with 5sc
sc in each st until the rib measures 4.5cm (approx. 29 rounds)
Round 30: make 2sc in the first st, sc4( 6sc)
Round 31: sc in each stsc3, make 2sc in the next st, sc2 (7sc)
Rounds 32 - 34: (3 rounds) sc in each st
Insert wire
Round 35: sc2tog 3 times
For the 10th rib:
Make a magic loop with 5sc
Sc in each st until your rib measures 4.5cm long (approx. 29 rounds)
Fasten off
For the 11th rib:
Make a magic loop with 5sc
Sc in each st until your rib measures 3cm long (approx. 24 rounds)
Fasten off
For the 12th rib:
Make a magic loop with 5sc
Rounds 1 - 9: (9 rounds) sc in each st
Fasten off
Part B: The cartilages
The cartilages of the ribs lie between the rib bones and the sternum in order to keep them in position. You should make 2 of each type listed below (unless otherwise stated). You should make them using a 0.6mm hook and cream- coloured sewing cotton.
For the 1st rib:
Make a magic loop with 6sc
Rounds 1 - 2: (2 rounds) sc in each st
Fasten off
For the 2nd rib:
Make a magic loop with 4sc
Rounds 1 - 2: (2 rounds) sc in each st
Fasten off
For the 3rd and 4th rib (make 4 in total):
Make a magic loop with 4sc
Rounds 1 - 3: (3 rounds) sc in each st
Fasten off
For the 5th and 6th rib (make 4 in total):
Make a magic loop with 5sc
Rounds 1 - 4: (4 rounds) sc in each st
Fasten off
For the remaining cartilage:
(first section)
make a magic loop with 5sc
Rounds 1 - 5: (5 rounds) sc in each st
Fasten off neatly
(2nd section)
Make a magic loop with 5sc
Rounds 1 - 4: (4 rounds) sc in each st
Round 5: sc around 4 of the sts of round 5 on the first section you made, skip the first st of round 4 of this second section you made, then sc in each of the next 4sts.These last 8sts you crocheted form a new round
Round 6: sc in the first st of the previous round, sc2tog, sc2, sc2tog, sc (6sc)
Rounds 7 - 8: (2 rounds) sc in each st
Fasten off neatly
(3rd section)
Make a magic loop with 5sc
Rounds 1 - 4: (4 rounds) sc in each st
Round 5: sc in the 'new' st you made when fastening off neatly on the 2nd section,and sc in each of the next 3sts of this section. Skip the following st on round 4 of section 3, then sc in each of the next 4sts. These last 8sts form a new round
Round 6: sc2tog between the first 2sts of the last round, sc3, sc2tog, sc2, sc2tog (6sc)
Round 7: sc in each st
Fasten off neatly
(4th section)
Make a magic loop with 5sc
Rounds 1 - 4: (4 rounds) sc in eac st
Round 5: sc in the 'new' st you made then fastening off neatly on section 3, then sc in the next 4sts of this section. Skip the first st of round 4 of the 4th section, then sc in each of the next 3sts (8sc)
Round 6: sc2tog between the first 2sts of the previous round, sc2, sc2tog, sc2 sc2tog (5sc)
Rounds 7 - 12: (6 rounds) sc in each st
Fasten off
For the bottom section:
With a 0.6mm hook and white sewing thread ch3
With a 0.6mm hook and white sewing thread ch3
Round 1: sc in the 2nd st from hook, make 3sc in the next chain st (the first one you made), then make 2sc in the back of the previous chain st you crocheted into (6sc)
Round 2: Sc in each st
Round 3: (Sc2, make 3sc in the next st) twice (10sc)
Round 4: Sc3, make 2sc in the next st, sc5, make 2sc in the following st, sc (14sc)
Rounds 5 - 9: (5 rounds) sc in each st
Round 10: Sc2tog, sc5, sc2tog, sc5 (12sc)
Rounds 11 -14: (4 rounds) sc in each st
Round 15: Sc2tog, sc4, sc2tog, sc4 (10sc)
Rounds 16 - 17: (2 rounds) sc in each st
Round 18: (Sc2tog, sc3) twice (8sc)
Fasten off
Stuff firmly
For the top section:
Stuff firmly
For the top section:
With a 0.6mm hook and white sewing thread ch5
Round 1: sc in the 2nd chain st from hook, sc in each of the next 2 chain sts. Make 3sc in the next chain st (the first one you made), then sc in the back loop of each of the previous chain sts in turn. Make 2sc in teh back loop of the first chain st you crocheted into (10sc)
Round 2: (Sc4, make 2sc in the next st) twice (12sc)
Round 3: Sc in each st
Round 4: Sc4, make 2sc in each of the next 3sts, sc3, make 2sc in each of the next 2sts (17sc)
Round 5: Make 2sc in the first st, sc5, make 2sc in the next st, sc7, make 2sc in the following st, sc2 (20sc)
Rounds 6 - 7: (2 rounds) Sc in each st
Round 8: Sc6, make 2sc in each of the next 3sts, sc7, make 2sc in each of the next 3sts, sc (26sc)
Rounds 9 - 10: (2 rounds) Sc in each st
Round 11: (Slightly more than 1 round) Sc7, sc2tog, sc3tog, sc2tog, sc6, sc2tog, sc3tog, sc2tog (18sc)
Round 12: (Sc6, sc3tog) twice (14sc)
Stuff firmly
Round 13: Sc3, ch1, skip9, sc2
Round 14: Sc in these last 6 sts
Fasten off
Skip 2 sts on round 12, then rejoin to next st,
Round 13: sc into this st and next 4sts, ch1
Round 13: sc into this st and next 4sts, ch1
Round 14: Sc in these last 5sts and chain st in turn
Fasten off
Sew these 2 sections together, sewing the cast on edge of the top section to the cast off edge of the bottom section.
Sew these 2 sections together, sewing the cast on edge of the top section to the cast off edge of the bottom section.
Part D: The shoulder girdle
For the clavicle (make 2):
Using # 8 crochet cotton and a 0.8mm hook make a magic loop with 4sc
Round 1- 7: (7 rounds) sc in each st
Fasten off
Measure a length of wire slightly longer than the section of crochet you have just made, then fold over each end of the wire and insert it into the clavicle to help it keep its shape (as you did with the ribs)
For the right scapula:
Using # 8 crochet cotton and a 0.8mm hook ch4
Round 1: sc in the 2nd chain st from hook, sc in the next chain st, then make 3sc in to the first chain st you made. Sc in to the back of the previous chain st you crocheted into, then make 2sc into the back of the first chain st you crocheted into (8sc)
Rounds 2 - 3: (2 rounds) sc in ecah st
Round 4: (sc3, make 2sc in the next st) twice (10sc)
Round 5: sc3, make 2sc in the next st, sc6 (11sc)
Round 6: (sc4, make 2sc in the next st) twice, sc (13sc)
Round 7: sc4, make 2sc in the next st, sc8 (14sc)
Round 8: sc, hdc2, make 2hdc in the next st, hdc2, sc2, slip5, sc (15sc)
Round 9: sc2, hdc2, make 2hdc in the next st, hdc2, sc2, slip5, sc (16sc)
Round 10: sc2, hdc6, sc, slip7
Round 11: sc7, ch4, skip4, sc5. These last 16 sts/chain sts form a new round (16sts)
Rounds 12 - 13: (2 rounds) sc in each of these 16sts
Round 14: slip3, sc, skip3, sc5, sc3tog, slip1 (11sts)
Round 15: slip3, sc2, hdc4, sc, slip1
Round 16: (this is slightly more than 1 round) slip6, sc, sc5tog, slip1
Fasten off
Rejoin yarn to round 14 to the same st as the last st you crocheted in before you skipped 3, as shown below

Round 15: sc in this st and the next 4sts.
Round 16: sc in the first st of the last round, ch3, sc in the 2nd loop from hook, sc in the next chain st, then slip the same st as the last st you crocheted in before the ch3.
Fasten off
Rejoin yarn to round 10 to the the last st you crocheted in before you made the chain 4, as shown below.

Round 11: Sc in this st and the next 5sts of round 11, then sc in the back of the 4 chain sts (10sts)
Round 12: make 2hdc in the first st of the last round, hdc, sc2, sc3tog, sc2, hdc (9sc)
Round 13: hdc, make 2hdc in the next st, hdc, sc, sc4tog, sc (7sts)
Round 14: (slightly more than 1 round) sc, make 2hdc in each of the next 2sts, hdc, sc4tog (6sts)
Round 15: (slightly more than 1 round) hdc, make 2hdc in the next st, hdc, sc, sc3tog (5sts)
Fasten off
For the left scapula:
Using # 8 crochet cotton and a 0.8mm hook ch4
Round 1: sc in the 2nd chain st from hook, sc in the next chain st, then make 3sc in to the first chain st you made. Sc in to the back of the previous chain st you crocheted into, then make 2sc into the back of the first chain st you crocheted into (8sc)
Rounds 2 - 3: (2 rounds) sc in ecah st
Round 4: (sc3, make 2sc in the next st) twice (10sc)
Round 5: Sc8, make 2sc in the next st, sc (11sc)
Round 6: Sc3, make 2sc in the next st, sc4, make 2sc in the following st, sc2 (13sc)
Round 7: Sc9, make 2sc in the next st, sc3 (14sc)
Round 8: sc, Slip5, sc2, hdc2, 2hdc, hdc2, sc (15sc)
Round 9: sc, Slip6, sc2, hdc2, 2hdc, hdc2, sc (16sc)
Round 10: Slip7, sc, hdc6, sc2
Round 11: Sc6, ch4, skip4, sc6 (16sc)
Rounds 12 -13: (2 rounds) sc in each st
Round 14: Sc2, slip4, sc5, skip3, sc2 (13sts)
Round 15: slip3, Sc, sc3tog, hdc4, sc, slip1 (11sts)
Round 16: sc2, sc5tog, sc, slip1
Fasten off
Rejoin yarn to the last st you crocheted in in round 14 before you skipped 3,
Round 15: sc in this st and in each of the next 4sts (5sc)
Round 16: Sc3, ch3, sc in the 2nd loop from hook and in the next chain st, then slip the same st as the one you crocheted before the chain 3
Fasten off
Rejoin yarn to round 10 in the last st you crocheted in before the ch4 (as you did for the other scapula),
Round 11: Sc in this st and the next 5sts of round 10, then sc in the back loop of each of the 4 chain sts (10sc)
Round 12: (slightly more than 1 round) sc3, hdc, make 2hdc in the next st, hdc, sc2, sc3tog (9sts)
Round 13: Sc, hdc, make 2hdc in the next st, hdc, sc, sc3tog, sc (8sts)
Round 14: make 2hdc in the first 2sts, hdc, sc, sc4tog, (7sts)
Round 15: (slightly more than 1 round) sc, hdc, make 2hdc in the next st, hdc, slip1, sc3tog (6sc)
Fasten off
For the acromium (i.e. the shoulder sockets) (make 2):
With a 0.8mm hook and #8 crochet cotton ch3
Round 1: sc in the 2nd loop from hook, then make 3sc in the first chain st you made. Make 2sc in the back of the previous chain st (the first one you crocheted into) (6sc)
Round 2: (Sc2, make 2sc in the next st) twice (8sc)
Round 3: sc in each st
Round 4: (sc2, sc2tog) twice (6sc)
Fasten off
Sew one of these to each of the scapula, as shown below (the photo shows the back of the right scapula)
Part E: Making up
Start by sewing the cartilages for the first 6 ribs to the ends of their respective ribs. Make sure that you are sewing them to the correct ends of ribs 5 and 6 (the thinner end).
Next you should sew the ribs to the vertebrae. They should be sewn in between the thoracic vertebrae, with the 1st rib articulating with the bottom of T1 and top of T2, and the 12th rib articulating with the bottom of T12 and the top of L1. Make sure you are sewing them the right way round: ribs 5 - 9 should be sewn so that the wider end of them articulates with the vertebrae.

After you have sewn the ribs to the vertebrae you will need to sew in place the remaining cartilage section. This should be sewn to ribs 7 - 10, as can be seen in the photos below.
Once this is completed you will need to sew the cartilage to the sternum. The first 3 ribs should be sewn to the upper section of the sternum, with the first rib being sewn to the widest part of this section. The remaining cartilage sections should be sewn to the lower part of the sternum at equally- spaced intervals. The cartilage section that joins to ribs 7 - 10 should be the lowest one down, being sewn just above where the size of the sternum starts reducing (as shown below)


Sew the shoulder joint of the humerus to the acromium, making sure you are sewing the correct arm to the correct scapula
You then need to sew the scapula to the back of the ribs. It should articulate with the 2nd, 3rd, and 4th ribs.


Sew the clavicle to the top of the sternum next to the little knobbly sections at the top (as shown below). The other end should be sewn to the top of the acromium on the scapula. Try to ensure that the scapula curve into the correct sort of shape by curling the wire round.


Section 5: the pelvic girdle
For the sacrum:
Bend back the wire so that it fits snug inside this section, then trim it and fold over the end as you did for the other side


For the Os Coxae (make 2):
With a 0.8mm hook and #8 crochet cotton make a magic loop with 4sc
Round 1: (sc, make 3sc in the next st) twice (8sc)
Round 2: (sc2, make 3sc in the next st) twice (12sc)
Round 3: sc4, make 3sc in the next st, sc5, make 3sc in the following st, sc (16sc)
Round 4: sc5, make 3sc in the next st, sc7, make 3sc in the following st, sc2 (20sc)
Round 5: sc6, make 3sc in the next st, sc9, make 3sc in the following st, sc3 (24sc)
Round 6: sc7, make 3sc in the next st, sc10, make 3sc in the following st, sc5 (28sc)
Round 7: sc8, make 3sc in the next st, sc12, make 3sc in the following st, sc6 (32sc)
Rounds 8 - 9: (2 rounds) sc in each st
Round 10: sc8, sc5tog, sc10, sc2tog, sc, sc2tog, sc4 (26sc)
Round 11: sc7, sc2tog, sc9. sc2tog, sc, sc2tog, sc3 (23sc)
Round 12: sc17, sc3tog, sc3
Round 13: sc15, sc2tog 3 times (18sc)
Round 14: (this is slightly more than 1 round) sc14, sc5tog (14sc)
Rounds 15 - 16: (2 rounds) sc in each st
Round 17: sc6, sc2tog, sc6 (13sc)
Rounds 18 - 21: (4 rounds) sc in each st
Round 22: sc in the first 11sts
Round 23: skip8, then sc in the next 5sts (5sc)
Round 24: sc in each of these 5sts
Rounds 25 - 28: (4 rounds) slip1, sc, hdc2, sc
Round 29: sc in each st
Round 30: sc, make 2sc in the next st, sc2, make 2sc in the following st (7sc)
Round 31: sc in each st
Fasten off
Sew the cast-off edge to the skip 8 section of round 23, as shown below:


For the hip joint (make 2):
Make a magic loop with 6sc
Round 1: make 2sc in each st (12sc)
Round 2: (sc in the first st, make 2sc in the next st) 6 times (18sc)
Rounds 3 - 7: (5 rounds) sc in each st
Round 8: (sc in the first st, sc2tog) 6 times (12sc)
Round 9: sc2tog 6 times
Fasten off
Sew this to the main section of the bone, as shown in the photos below. Sew the edges of the os coxae to the sacrum, and sew together the lower edge of the os coxae together (around there you sewed the cast-off edge to round 23)
Once you've done this sew the head of the femur into the hip joint.


Section 6: The skull
I have published the pattern for this separately, and it can be found here.
Sew the head to the top of the neck, as shown below


Finally sew the hyoid bone to the head, just underneath the jaw. Ideally you should try to suspend it using a small length of sewing cotton so that it hangs down a little from the skull.


For the sacrum:
With regular sewing thread and a 0.6mm hook make a magic loop with 4sc
Rounds 1 - 2: (2 rounds) Sc in each st
Round 3: (sc, make 2sc in the next st) twice (6sc)
Round 4: (sc2, make 2sc in the next st) twice (8sc)
Round 5: (sc3, make 2sc in the next st) twice (10sc)
Round 6: (sc4, make 2sc in the next st) twice (12sc)
Round 7: Sc3, sc3tog, sc3, sc3tog (8sc)
Rounds 8 - 9: (2 rounds) Sc in each st
Round 10: Ch4, sc in the 2nd loop from you hook and the next 2 chain sts, sc in the next 4sts along the main section, ch4, sc in the first 3 chain sts you made back down to the chain section, sc4 along the main section(20sts)
Round 11: Sc in the back loop of the first 2 chain sts if the last round, then make 2sc in the loop back of the last chain st. sc in the next 7 sts you made on the last round, sc in the back loop of the next 2 chain sts, sc in the back loop of the last chain st, sc in the next 7sts (20sc)
Round 12: (This is slightly less than one round) Ch4, skip1, sc4, ch4, skip1, sc4, ch4, skip1, sc4, ch4, skip1, sc3 (32sts)
Round 13: Sc2tog between the next st and the following chain st, sc in the next 2 chain sts, sc2tog between the chain st and the following st, sc2 (sc2tog, sc2) 6 times (24sc)
Round 14: Sc in each st
Sew up the holes to the other side of the bone (picture)
Round 15: sc, ch5, skip2, make 2sc in the next st, sc3, make 2sc in the next st, ch5, skip2, sc3, ch5, skip2, make 2sc in the next st, sc3, make 2sc in the next st, ch5, skip2, sc2 (40sc)
Round 15: Sc2tog, sc in the next 3 chain sts, sc2tog, sc2, ch6, sc in the 2nd loop from hook and the next 4 chain sts. Skip the next st of the main section then sc in the following 2sts. sc2tog, sc3, sc2tog, sc, sc2tog, sc3, ch6, sc in the 2nd loop from hook and the next 4 chain sts. Skip the next st of the main section then sc in the following 2sts. sc2tog, sc3, sc2tog, sc (50sts)
Round 8: Sc7, sc in the backs of the first 4 chain sts, make 2sc in the back of the last chain st, sc in the next 20sts, sc in the back of the first 4 chain sts, make 2sc in the back of the next chain st, sc in the next 13sts (52sc)
Sew the holes on opposite sides of the bone together as you did for the first holes
Round 9: Sc2, ch5, skip2, sc4, hdc4, make 2hdc in the next st, hdc4, sc4, ch5, skip2, sc5, ch5, skip2, sc4, hdc4, make 2hdc in the next st, hdc4, sc4, ch5, skip2, sc3 (66sc)
Round 10: sc, Sc2tog, sc3, sc2tog, sc3, hdc10, sc3, (sc2tog, sc3) 4 times, hdc10, sc3, sc2tog, sc3, sc2tog, sc2 (58sc)
Round 10: Sc9, hdc10, sc20, hdc10, sc9 (58sts)
Sew together holes on opposite side of bone
Round 11: Sc3, ch5, skip2, sc4, hdc2tog, hdc2, hdc3tog, hdc2, hdc2tog, sc4, ch5, skip2, sc6, ch5, skip2, sc4, hdc2tog, hdc2, hdc3tog, hdc2, hdc2tog, sc4, ch5, skip2, sc3 (62sts)
Round 12: sc2, sc2tog, sc3, sc2tog, sc3, hdc2tog, hdc, hdc2tog, hdc, hdc2tog, sc2, sc2tog, sc3, sc2tog, sc4, sc2tog, sc3, sc2tog, sc3, hdc2tog, hdc, hdc2tog, hdc, hdc2tog, sc2, sc2tog, sc3, sc2tog, sc2 (48sts)
Round 13: Sc9, hdc2tog, sc3tog, sc2tog, sc2,
Round 14: skip38 , sc in the next st (the 5th st before the st you just crocheted), then sc in the next 4sts. Fasten off.
Round 14: skip38 , sc in the next st (the 5th st before the st you just crocheted), then sc in the next 4sts. Fasten off.
It is at this point that you need to sew up the holes in your crochet. Pressing your sacrum flat you should be able to see that the holes on each side of the crochet match up. Sew around the outside of each of these holes to join the front and back sections together, as shown below


This is an enlarged photo of the sacrum, since it makes it easier to see what's going on
After this you will need to insert a length of wire into your crochet. It will need to be inserted into the top and curl round underneath the bottom holes you have sewn together, before emerging at the top again on the other side. Leave the ends of the wire long, as you will need to shape it further.


You will then need to shape one side of the wire so that it follows the curve of the wing-shaped section you fastened off at (as shown below). Trim the end of this end of your wire so that it just sticks out of the crochet a little bit, then fold this end over inside your crochet so that it is tucked out of sight.
Rejoin yarn to round 12 to the 2nd st after the last st you crocheted in when making the previous section.

Round 13: Sc in this st, then make 2sc in the next st, skip33, sc int eh next st, make 2sc in the following st


This is an enlarged photo of the sacrum, since it makes it easier to see what's going on
After this you will need to insert a length of wire into your crochet. It will need to be inserted into the top and curl round underneath the bottom holes you have sewn together, before emerging at the top again on the other side. Leave the ends of the wire long, as you will need to shape it further.


You will then need to shape one side of the wire so that it follows the curve of the wing-shaped section you fastened off at (as shown below). Trim the end of this end of your wire so that it just sticks out of the crochet a little bit, then fold this end over inside your crochet so that it is tucked out of sight.


Round 13: Sc in this st, then make 2sc in the next st, skip33, sc int eh next st, make 2sc in the following st
Rounds 14 - 15: (2 rounds) sc in each of these 6 sts in turn
Fasten off
Fasten off
Rejoin yarn to round 12 to the 10th st from this last section you made.
Round 13: sc in this st then make 2sc int eh next st, skip11, sc in the next st, then make 2sc in the following st
Round 13: sc in this st then make 2sc int eh next st, skip11, sc in the next st, then make 2sc in the following st
Rounds 14 - 15: (2 rounds) Sc in each of these 6sts
Fasten off
Rejoin yarn to round 12 to the 2nd st from this section

Round 13: sc in this st, hdc2tog, hsc3tog, hdc2tog, sc
Rejoin yarn to round 12 to the 2nd st from this section

Round 13: sc in this st, hdc2tog, hsc3tog, hdc2tog, sc
Round 14: Sc in each of these last 5sts
Fasten off
Bend back the wire so that it fits snug inside this section, then trim it and fold over the end as you did for the other side

Rejoin yarn to round 12 to the st after the third section you made (as shown below)
Round 13: sc in this st and the next 7sts, then sc in the st after the 2nd section you made (as shown below). Sc in the following 8sts (17sc)


Round 14: Sc in the first 8 of these last 17sts you made, then hdc in the next 9sts.
Round 15: (slightly less than 1 round) Sc8, hdc8
Stuff down the centre of the sacrum (between the holes), and in this little top section
Round 16: Sc2tog twice, slip3, sc2tog 3 times, slip, sc2tog, slip1
Fasten off
Sew this opening closed.
Sew a few stitches round the edge of the sacrum around where the wire is to hold it in place.
Sew this opening closed.
Sew a few stitches round the edge of the sacrum around where the wire is to hold it in place.


Sew this to the base of the spine, as can be seen in the photos below


For the Os Coxae (make 2):
With a 0.8mm hook and #8 crochet cotton make a magic loop with 4sc
Round 1: (sc, make 3sc in the next st) twice (8sc)
Round 2: (sc2, make 3sc in the next st) twice (12sc)
Round 3: sc4, make 3sc in the next st, sc5, make 3sc in the following st, sc (16sc)
Round 4: sc5, make 3sc in the next st, sc7, make 3sc in the following st, sc2 (20sc)
Round 5: sc6, make 3sc in the next st, sc9, make 3sc in the following st, sc3 (24sc)
Round 6: sc7, make 3sc in the next st, sc10, make 3sc in the following st, sc5 (28sc)
Round 7: sc8, make 3sc in the next st, sc12, make 3sc in the following st, sc6 (32sc)
Rounds 8 - 9: (2 rounds) sc in each st
Round 10: sc8, sc5tog, sc10, sc2tog, sc, sc2tog, sc4 (26sc)
Round 11: sc7, sc2tog, sc9. sc2tog, sc, sc2tog, sc3 (23sc)
Round 12: sc17, sc3tog, sc3
Round 13: sc15, sc2tog 3 times (18sc)
Round 14: (this is slightly more than 1 round) sc14, sc5tog (14sc)
Rounds 15 - 16: (2 rounds) sc in each st
Round 17: sc6, sc2tog, sc6 (13sc)
Rounds 18 - 21: (4 rounds) sc in each st
Round 22: sc in the first 11sts
Round 23: skip8, then sc in the next 5sts (5sc)
Round 24: sc in each of these 5sts
Rounds 25 - 28: (4 rounds) slip1, sc, hdc2, sc
Round 29: sc in each st
Round 30: sc, make 2sc in the next st, sc2, make 2sc in the following st (7sc)
Round 31: sc in each st
Fasten off
Sew the cast-off edge to the skip 8 section of round 23, as shown below:


For the hip joint (make 2):
Make a magic loop with 6sc
Round 1: make 2sc in each st (12sc)
Round 2: (sc in the first st, make 2sc in the next st) 6 times (18sc)
Rounds 3 - 7: (5 rounds) sc in each st
Round 8: (sc in the first st, sc2tog) 6 times (12sc)
Round 9: sc2tog 6 times
Fasten off
Sew this to the main section of the bone, as shown in the photos below. Sew the edges of the os coxae to the sacrum, and sew together the lower edge of the os coxae together (around there you sewed the cast-off edge to round 23)
Once you've done this sew the head of the femur into the hip joint.


Section 6: The skull
I have published the pattern for this separately, and it can be found here.
Sew the head to the top of the neck, as shown below


Finally sew the hyoid bone to the head, just underneath the jaw. Ideally you should try to suspend it using a small length of sewing cotton so that it hangs down a little from the skull.


And that's all! I hope you have enjoyed this pattern; I can't express how much fun I've had making it! As I've said before, if you have any questions about this pattern, or you find any mistakes in it, please don't hesitate to contact me, wither by leaving a comment below, or via my Instagram or Ravelry pages (If you'd like a reply quickly its best to contact me via Instagram).
As usual you are very welcome to sell finished products, but I do ask that you don't re-post this pattern or claim it as your own. Thank you!


a-MAZ-ing!!! What detail! Kudos for the attention to detail. I will take a stab at this for display at my LYS. Many thanks. :)
ReplyDeletehey! do you sell these?
ReplyDeleteNo I don't, sorry
DeleteCan you make the organs next to stuff into it? I am desperately looking for a internal organs pattern.
ReplyDeleteHey, so I'm not planning to make any organs for this particular pattern, but I'm currently working on a life-size skeleton pattern, and after I'm done with that the plan is to move onto making some organs for that one :)
DeleteI am working on the foot section but am missing pattern for navicular and the 2 bones for the big toe. I have the tip and the meta. Do you have the pattern???
ReplyDeleteSorry about that, I'll try to locate the pattern asap, and will let you know when I publish it
DeleteHave just updated the pattern, so should all be correct now. Thanks for letting me know!
DeleteI love this! I'll be starting an anthropology degree soon so this'll be great to study from. Do you have a pattern for a larger or life size version?
ReplyDeleteHello! Not sure if you'll pick this up but I have made a life-sized version! I'm currently slowly writing up the pattern on my other blog (anatomicalcrochet.com) and you can see photos on my instagram (dippy_cat_crochet). Also if you want any specific parts of the life sized skeleton pattern that I haven't published let me know and I can make an effort to write it up/ send it to you (the actual pattern is all there it just needs a lot of checking/ clarifying things)
DeleteOh my! Thank you! You're so so talented, I've just seen the photos on your Instagram. I'll definitely check it out on your blog.
Deletehi! this is incredible and i'd love to give it a go! could this pattern be done with slightly thicker yarn (lace or fingering instead of thread for example) and would you have any suggestions for substitutions and alternative hook sizes?
ReplyDeleteHi! Sorry for the late reply. I'm sure it could be done with thicker yarn and just increasing the hook size - I don't have a great deal of experience with lace but I'd guess at maybe using a 1mm hook size. You'd also want to scale up the parts made with other weights of yarn (eg. some parts use #10 or 4ply) - If you're interested I can work out the guages required to allow you to scale them up accordingly.
DeleteHope that helps!
p.s. If you want more info the best way to contact me is by emailing lhodginscrochet@gmail.com :)
Hi Linda, so glad you like it! I can convert each part of the pattern to pdf and send it to you if you send me your email address. As for the organs, I don't have patterns for these to a scale related to this project, but I am currently publishing a series of life-sized organs on my other blog (www.anatomicalcrochet.com). You'd need to make them using smaller weight yarn and might have to play around with the guage a bit to get them to a scale compatible for this skeleton (though if you fancy a challenge I'm also publishing a life-sized skeleton pattern over there)
ReplyDeleteDo you think that I could feasibly adapt this pattern to be larger by subsituting the yarn size and hook sizes to be larger? Or will that possibly make the finished project off?
ReplyDeleteYou could certaintly give it a go! The only difficulty would be that there arre a few different weights and hok sizes used so you'd need to take care to scale them accordingly.
Delete