This pattern for the 7th Doctor (Sylvester McCoy) from Doctor who is part of my little animals collection, meaning that the clothes for this doctor will fit any of the other patterns in that collection.


Difficulty:

Medium
You will need:
- A 2.5mm crochet hook
- A 2mm crochet hook
- Dk yarn in beige and dark brown
- 4ply yarn in yellow, bright blue, red, cream, dark brown, dark green, white, dark beige, dark red, maroon, and black
- Embroidery thread in dark brown, white, blue, grey-blue, black, purply-grey, gold, and dark blue,
- Three 5mm white buttons
- Polyester toy stuffing
- A darning needle
- An embroidery needle
- A pair of scissors
- A pet brush and some hot water
Note:
- 'fasten off neatly' refers to a special way of fastening off which is neater and makes it easier to see where you should be crocheting on the next round (also known as invisible fastening off). This involves pulling up your yarn through your stitch, threading the yarn underneath the second stitch from where you pulled your yarn up, then threading your yarn back through the top of this stitch and down through the back of the work. There is a very helpful site that explains it clearly found here. Just make sure when you do this that you thread your needle through the SECOND stitch after the last stitch you made, otherwise you will end up with an extra stitch which may mean that all of the following rounds are out of line with each other.
- This pattern includes the back-to-front single crochet stitch (bfsc). A video to show you how to do this can be found here. It's pretty simple but if you can't work it out you can just use a regular single crochet stitch, but this will give it a slightly different look.
- The 'loop behind the back loop' refers to the '3rd loop' in the diagram below


For the body:
With beige make a magic loop with 6sc
Round 1: 2sc in each st (12sc)
Round 2: sc in the first st, 2sc in the next st, rep to end (18sc)
Round 3: sc in the first 2 sts, 2sc in the next st, rep to end(24sc)
Rounds 4 - 9: (6 rounds) sc in each st (24sc)
Round 10: sc in the first 2 sts, sc2tog, rep to end (18sc)
Round 11: sc in the first st, sc2tog, rep to end (12sc)
Round 12: (sc in the first 2sts, sc2tog) 3 times (9sc)
Rounds 13 - 15: (3 rounds) sc in each st
Fasten off
Stuff firmly
For the arms:
With beige make a magic loop with 6sc
Round 1: sc in the first st, 2sc in the next st, rep to end (9sc)
Rounds 2 - 3: (2 rounds) sc in each st (9sc)
Round 4: sc in the first st, sc2tog, rep to end (6sc)
Round 5: sc in each st
Fasten off black yarn and fasten on grey yarn.
Rounds 6 - 9: (4 rounds) sc in each st (6sc)
Fasten off
Lightly stuff these arms and sew them to the sides of the body
For the legs (make 2):
With beige make a magic loop with 6sc
Round 1: 2sc in each st (12sc)
Rounds 3- 4: (2 rounds) sc in each st (15sc)
Round 5: sc2tog 3 times, sc in the last 9 sts (12sc)
Round 6: sc in the first 2 sts, sc2tog, rep to end (9sc)
Fasten off. Fasten on in grey yarn
Rounds 7 - 11: (5 rounds) sc in each st (9sc)
Stuff the legs and sew them to the underside of the body.
 |
| You may want to refer to this image when making the head and face |
For the head:
With beige yarn make a magic loop with 6sc
Round 1: make 2sc in each st (12sc)
Round 2: Sc3, (sc2, make 2sc in the next st) 3 times (15sc)
Round 3: Sc3, (make 2sc in the first st, sc3) 3 times (18sc)
Round 4: Sc3, (sc4, make 2sc in the next st) 3 times (21sc)
Round 5: Sc in each st
Round 6: Sc3, (sc5, make 2sc in the next st) 3 times (24sc)
Rounds 7 - 11: (5 rounds) Sc in each st
Round 12: Sc3, (sc, sc2tog) 3 times, sc3, (sc, sc2tog) 3 times (18sc)
Round 13: Sc3, sc2tog 3 times, sc3, sc2tog 3 times (12sc)
Stuff firmly
Round 14: Sc2tog 6 times (6sc)
Fasten off

Use the yarn end to shape the head slightly, marking the chin and jaw more pronounced (as seen below)

Sew the head to the body, as shown below


For the nose:
Ch2
Row 1: sc in the 2nd chain st from hook
Row 2: make 2sc in this st
Row 3: Sc, make 2sc in the 2nd st (3sc)
Row 4: Sc, make 2sc in the next st, sc (4sc)
Fasten off
Ch2
Row 1: sc in the 2nd chain st from hook
Row 2: make 2sc in this st
Row 3: Sc, make 2sc in the 2nd st (3sc)
Row 4: Sc, make 2sc in the next st, sc (4sc)
Fasten off
Sew the the centre of the face


For the left ear:
Ch3
Row 1: make 3sc in the 2nd chain st from hook, then make 3sc in the next st (6sc)
Row 2: make 2sc in the first st, sc, slip4
Fasten off
Ch3
Row 1: make 3sc in the 2nd chain st from hook, then make 3sc in the next st (6sc)
Row 2: make 2sc in the first st, sc, slip4
Fasten off
For the right ear:
Ch3
Row 1: make 3sc in the 2nd chain st from hook, then make 3sc in the next st (6sc)
Row 2: Slip4, sc, make 2sc in the last st
Sew these ears to the sides of the face, as shown below.

For the eyes:
To make the eye sockets make repeated stitches through the head around where the eyes should be and pull tight to draw the crochet back into the head.


You should then embroidery the whites of the eyes using white embroidery thread. Over the top of this embroider the irises using blue embroidery thread, then outline this using a single strand of blue-grey thread. Finally add the pupils using black embroidery thread.


For the hair:
Cut out a rectangle of cardboard approx. 4.5cm wide and wrap the yarn around it many times. Cut each of the strands of yarn along one side of the card so you get left with a large number of 9cm long strands.
Cut out a rectangle of cardboard approx. 4.5cm wide and wrap the yarn around it many times. Cut each of the strands of yarn along one side of the card so you get left with a large number of 9cm long strands.

Attach these to the head by folding each strand in half, pulling the looped end through a stitch in the head, and then threading the free ends through this loop you created before pulling tight. (A photo tutorial can be found on my David Bowie pattern to help you)


Next you need to get a dog brush and brush the hair until it is smooth and fluffy.
You then need to boil a kettle full of hot water, pour it into a bowl and then dip the head of your model into it. Smooth the hair down onto the head, then leave overnight in a warm place to dry off


Once your model is dry, trim the hair so that it ends around the base of the head (but shorter around the ears).


For the shirt:
With white 4ply yarn and a 2mm hook ch33
Row 1: sc in the 2nd chain st from hook, sc in every following chain st. ch1, turn (32sc)
Row 2: bfsc in each st. ch1, turn
Row 3: sc in the first 30 sts, ch1, skip1, sc in the last st. ch1,turn
Row 4: Bfsc, make 2bfsc in the hole made by the chain st, skip1, bfsc 29. ch1,turn
Row 5: sc in each st
Row 6: Bfsc in each st
Row 7: sc30, ch1, skip1, sc in the last st
Row 8: Bfsc, make 2bfsc in the hole made by the chain st, skip1, bfsc 29. ch1,turn
Row 9: Sc5, sc2tog. ch1, turn (6sc)
Row 10: Bfsc6. ch1, turn
Row 11: Sc5, 2sc in the last st. ch1, turn (7sc)
Fasten off
Rejoin yarn to row 8 to 3rd st from this last section (as shown below)
Row 9: Sc2tog, sc9, sc2tog. ch1, turn (11sc)
Row 10: BfSc2tog, bfsc7, bfsc2tog. ch1, turn (9sc)
Row 11: make 2sc in the first st, sc7, 2sc in the last st. ch1, turn (11sc)
Fasten off
Row 9: Sc2tog, sc9, sc2tog. ch1, turn (11sc)
Row 10: BfSc2tog, bfsc7, bfsc2tog. ch1, turn (9sc)
Row 11: make 2sc in the first st, sc7, 2sc in the last st. ch1, turn (11sc)
Fasten off
Rejoin yarn to row 7 to 3rd st from last section.
Row 9: Sc2tog, sc7. ch1, turn (8sc)
Row 10: Bfsc8. ch1, turn
Row 11: make 2sc in the first st, sc3, ch1, skip1, sc. ch1, turn (7sc)
Row 12: Bfsc, bfsc in the hole made by the chain st, skip1, bfsc3, ch2, across next section: Bfsc3tog, bfsc5, bfsc3tog, ch2, across next section: bfsc5. turn (22sts)
Row 13: slip2, ch1, sc3, sc2tog between the chain sts, sc7, sc2tog between the chain sts, sc4. ch1, turn (16sts)
Row 14: bfsc in each st
Row 15: in the front loop only of each st: bfsc3, make 2bfsc in each of the next 2sts, bfsc6, make 2bfsc in each of the next 2sts, bfsc3 ch1, turn (20sc)
Row 16: (sc5, make 2sc in the next st) 3 times, sc2 (23sc)
Fasten off
For the sleeves:
sc18 around the edge of the armhole (as shown below)

Rounds 1 - 2: (2 rounds) sc in each of these 18sts
Round 3: (Sc4, sc2tog) 3 times (15sc)
Rounds 4 - 11: (8 rounds) sc in each st
Fasten off
Sew the buttons to the edge of the shirt, opposite the buttonholes (the gaps you make by chaining 1 and skipping a stitch)

Finally use a single strand of embroidery thread to embroider a red question mark on each collar.
For the trousers:
With a 2mm hook and dark green 4ply yarn ch32
With a 2mm hook and dark green 4ply yarn ch32
Round 1: sc in the first chain st you made, then sc in each of the next 31 sts to end (32sc)
Rounds 2 - 7: (6 rounds) sc in each st)
Round 8: sc16, ch6, skip16 (22sts)
Round 9: sc22 around each of the sts and chain sts of last round (22sc)
Rounds 10 - 15: (6 rounds) sc in each st (22sc)
Fasten off
Rounds 10 - 15: (6 rounds) sc in each st (22sc)
Fasten off
Rejoin yarn to row 7 to the st after where you first crocheted into after the ch6 of the previous leg.
Row 8: sc16, ch6 (22sts)
Rows 9 - 15: (7 rounds) sc in each of these last 22sts of the previous round
Fasten off neatly
Fasten off neatly
You now need to add the brown and cream stripes to the trousers. The vertical stripes should be alternating brown, cream, brown, cream, brown (5 stripes in total), and this should be repeated 4 or 5 times at equal internals around the edges of the trousers.


The horizontal stripes take the same pattern, and should be repeated 2 or 3 times, as can be seen below.


For the jumper:
Round 1: sc in the first chain st you made, then sc in each of the next 33sts to make a loop (34sc)
Rounds 2 - 10: (9 rounds) sc in each st
Row 11: Ch1, turn, bfsc12. ch1, turn (12sc)
Row 12: Sc5, sc2tog, sc5. ch1, turn (11sc)
Row 13: Bfsc4, bfsc2tog. ch1, turn (5sc)
Row 14: Sc2tog, sc3. ch1, turn (4sc)
Row 12: Sc5, sc2tog, sc5. ch1, turn (11sc)
Row 13: Bfsc4, bfsc2tog. ch1, turn (5sc)
Row 14: Sc2tog, sc3. ch1, turn (4sc)
Row 15: bfsc2, bfsc2tog. ch1, turn (3sc)
Row 16: sc3. ch1, turn
Row 17: Bfsc3. ch1, turn
Row 18: Sc3
Fasten off
Row 17: Bfsc3. ch1, turn
Row 18: Sc3
Fasten off
Rejoin to the end st on round 12 (as shown in the photo below)

Row 13: Sc4, sc2tog (one of these are you will have already crocheted into when making the other side). ch1, turn (5sc)

Row 14: Bfsc2tog, bfsc3. ch1, turn (4sc)
Row 15: Sc2, sc2tog. ch1, turn (3sc)
Row 16: Bfsc3. ch1, turn
Row 17: Sc3. ch1, turn
Row 18: Bfsc3
Fasten off
Row 17: Sc3. ch1, turn
Row 18: Bfsc3
Fasten off
Rejoin yarn to round 10 the 5th st from this section.

Row 11: Sc2tog between this st and the next, sc10, sc2tog. ch1, turn
Row 12: Bfsc12. ch1, turn
Row 13: Hdc4, sc4, hdc4. ch1, turn
Row 14: Bfsc4, slip4, bfsc4. ch1, turn
Row 15: Sc3, ch1, slip6, ch1, sc3
Fasten off
Sew the shoulder seams closed
Join turquoise 4ply yarn to the cast-on edge of the jumper, then sc34 around the bottom jumper hem

Sc in each of these 34sts
Fasten off neatly
Rejoin turquoise yarn to each of the armhole in turn, and sc21 around said armhole


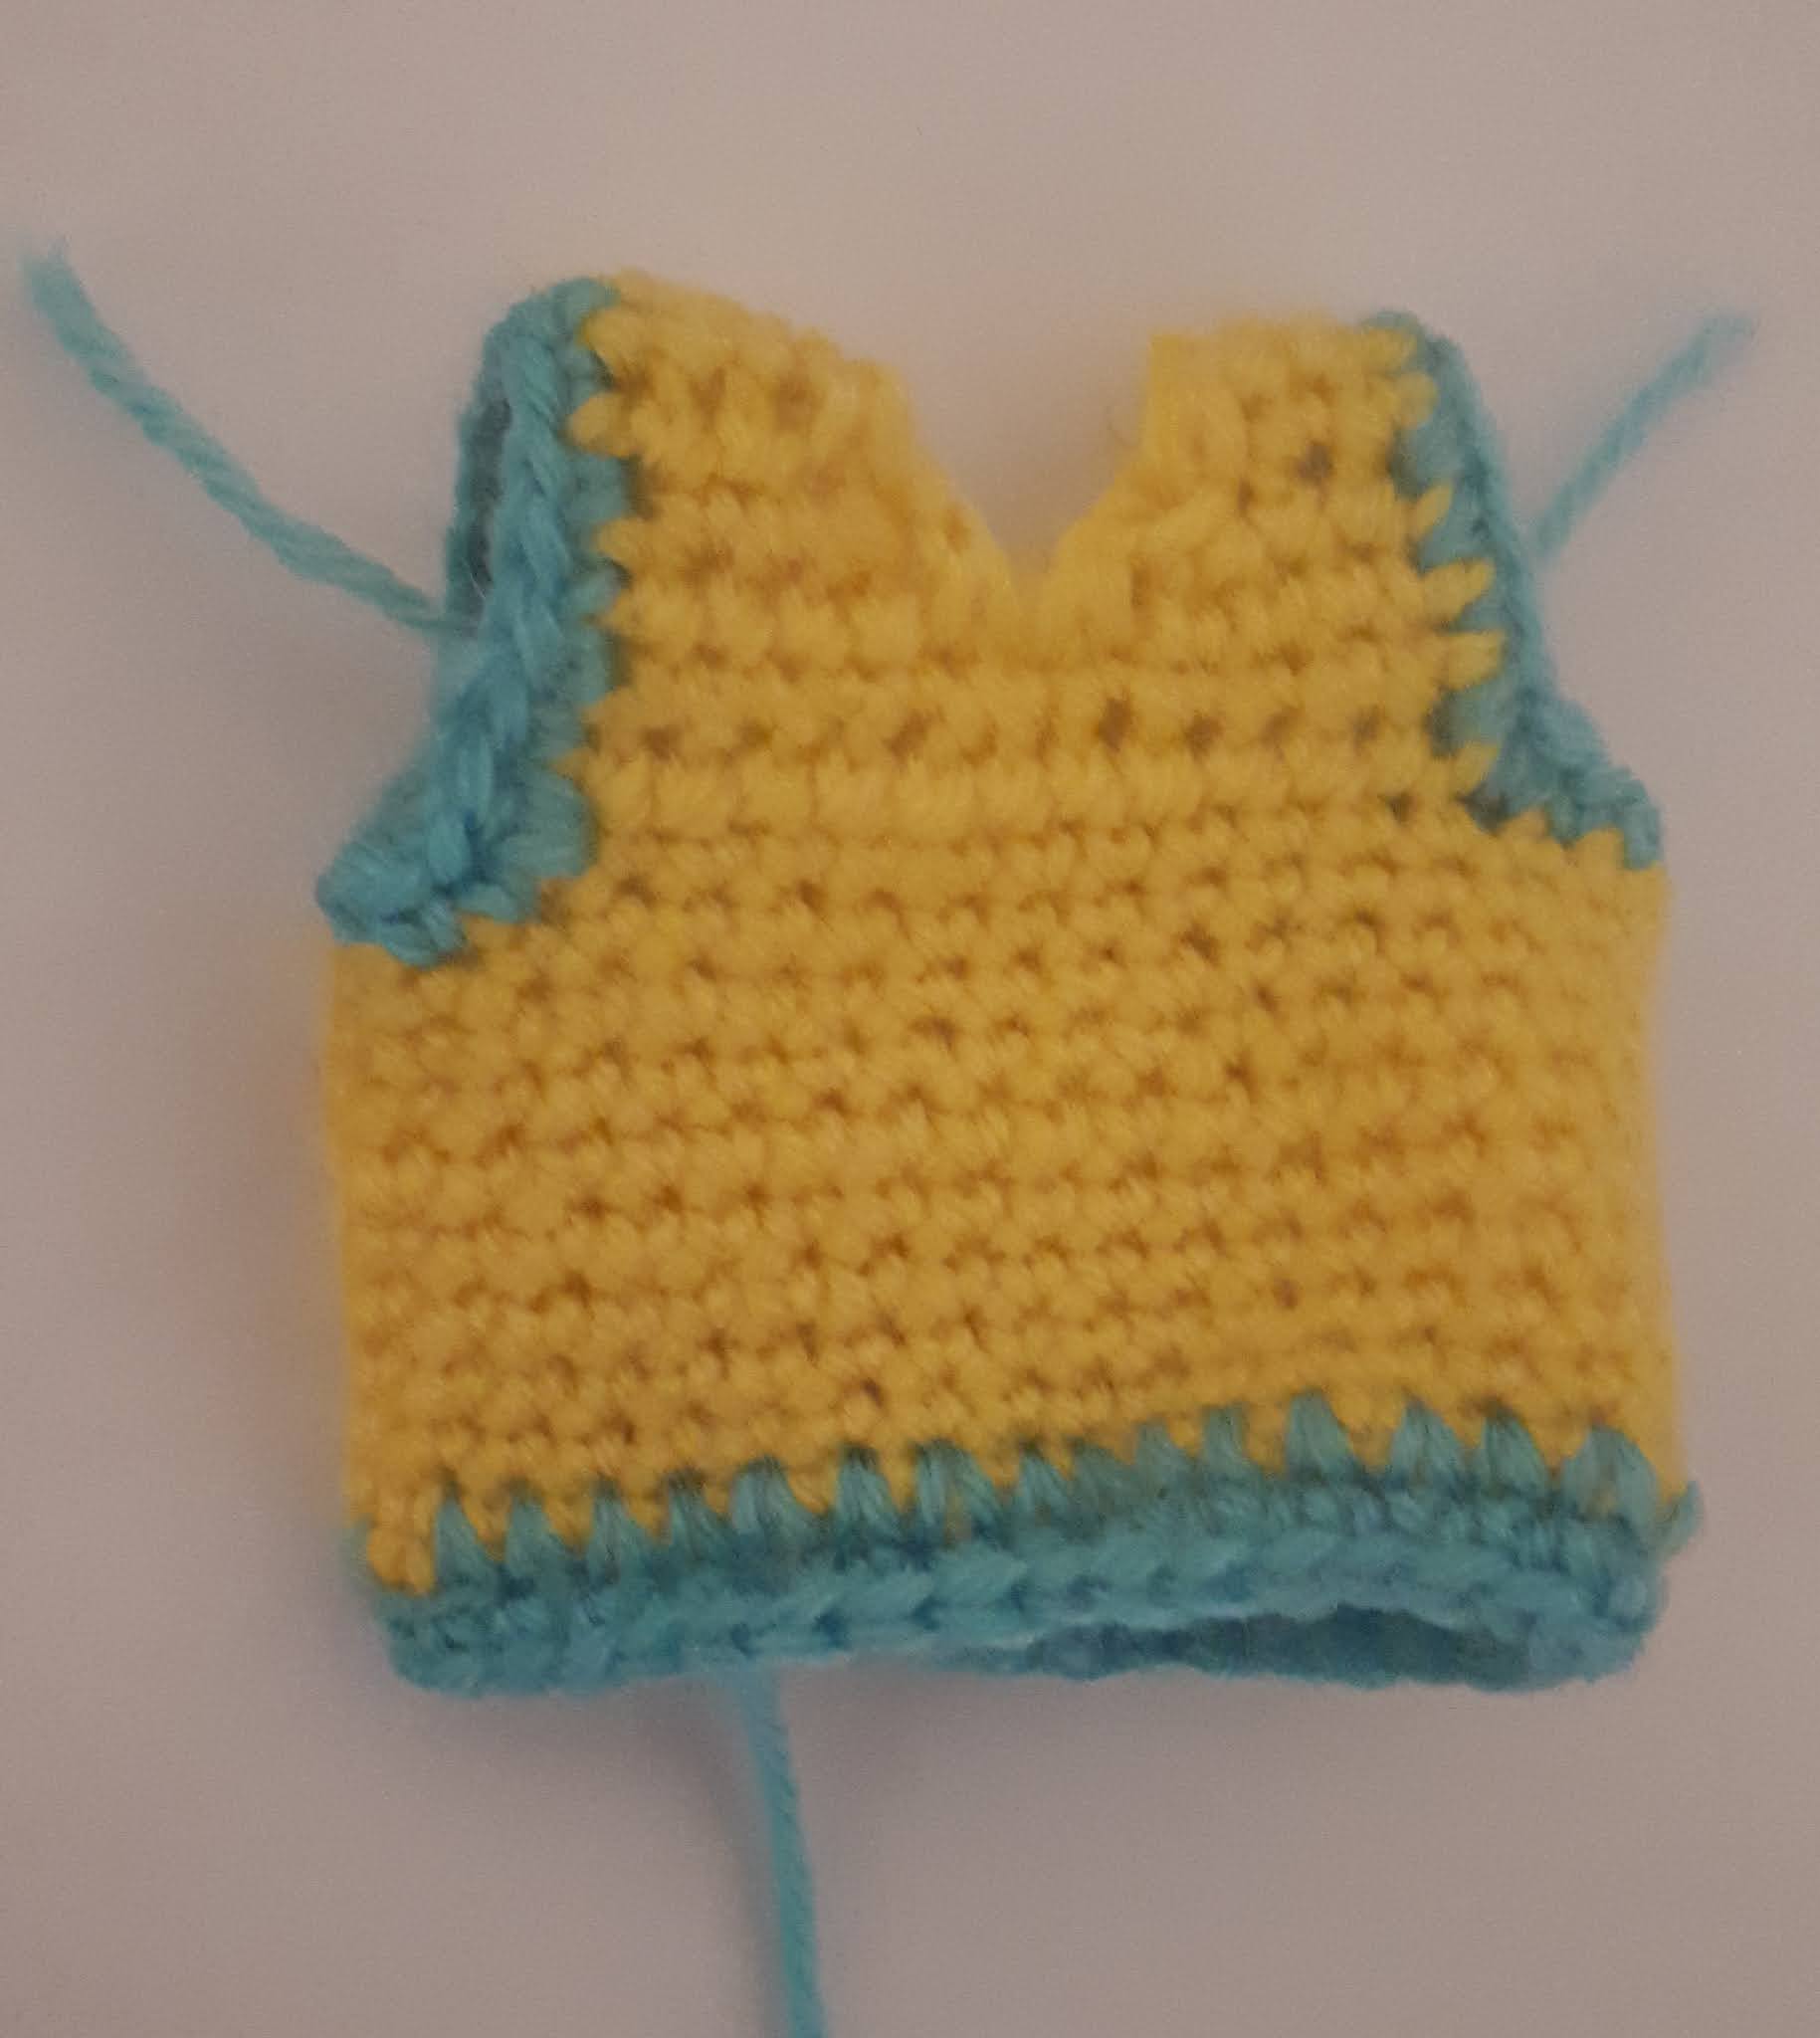
Do the same for the neckline, joining yarn to the base of the v-shape at the from of the jumper, then crocheting 26 around the neckline. Fasten off neatly
For the pockets (make 2):
With a 2mm hook and turquoise 4ply yarn ch5
Row 1: sc in the 2nd chain st from hook and the next 3 chain sts
Fasten off
For the pockets (make 2):
With a 2mm hook and turquoise 4ply yarn ch5
Row 1: sc in the 2nd chain st from hook and the next 3 chain sts
Fasten off
Sew these to the front of the jumper, as shown below

You now need to embroider zig-zag stripes around the jumper. These should be sewn every 3-4 rows, and I found it easiest to get them neat by following the natural zig-zag of the crochet stitches on each row I was adding them to.


Finally you need to use red 4ply yarn to embroider rows o question marks in between the zig-zags.


With a 2mm hook and cream 4ply yarn make a magic loop with 6sc
Round 1: make 2sc in each st (12sc)
Round 2: (sc, make 2sc in the next st) 6 times (18sc)
Round 3: (sc2, make 2sc in the next st) 6 times (24sc)
Round 4: (sc3, make 2sc in the next st) 6 times (30sc)
Round 5: (sc4, make 2sc in the next st) 6 times (36sc)
Rounds 6 - 12: (7 rounds) sc in each st
Round 13: (sc5, make 2sc in the next st) 6 times (42sc)
Round 14: (sc6, make 2sc in the next st) 6 times (48sc)
Round 15: (sc7, amek 2sc in the next st) 6 times (56sc)
Round 16: (sc8, make 2sc in the next st) 6 times (60sc)
Round 17: (sc9, make 2sc in the next st) 6 times (66sc)
Fasten off
For the bandanna:
With a 2mm hook and red yarn ch36
Round 1: sc in the first chain st you made, then sc in every following chain st to make a loop (36sc)
Rounds 2 - 4: (3 rounds) sc in each st
Fasten off
Turn this so that the wrong side is on the outside.
You now need to add embroidery to this. This can either be done in the same pattern as I did it, or following more accurate screenshots from the TV show (see the 2 references below). It doesn't particularly matter how accurate your embroidery is - the main point is just to add a bit of extra detail to the hat.
 |
| reference I used |
 |
| Reference matching TV show |
If you chose to use the same reference as I did, you may also find the images below helpful.


For the jacket:
With a 2mm hook and dark beige 4ply yarn ch35
Row 1: sc in the 2nd chain st from hook and each of the next 33sts. ch1, turn (34sc)
Rows 2 - 10: (9 rows) sc in each st. ch1, turn)
Row 11: Sc2tog, sc30, sc2tog. ch1, turn (32sc)
Rows 12 - 13: (2 rows) sc in each st. ch1, turn
Row 14: Sc4, sc2tog. ch1, turn (5sc)
Row 15: Sc5. ch1, turn
Row 16: Sc2tog, sc3. ch1, turn (4sc)
Row 17: make 2sc in the first st, sc3. ch1, turn (5sc)
Row 18: Sc2tog, sc3. ch1, turn (4sc)
Row 19: Sc4
Fasten off
Rejoin yarn to row 10 to the 4th st from this last section
Row 11: Sc in this st and the next 13sts. ch1, turn (14sc)
Row 12: Sc2tog, sc10, sc2tog. ch1, turn (12sc)
Row 13: make 2sc in the first st, sc10, make 2sc in the last st. ch1, turn (14sc)
Row 14: (2 rows)Sc in each st. ch1, turn
Row 15: Sc4, slip6, sc4. ch1, turn
Row 16: Sc2, hdc2, ch2, slip6, ch2, hdc2, sc2
Fasten off
Row 16: Sc2, hdc2, ch2, slip6, ch2, hdc2, sc2
Fasten off
Rejoin yarn to row 10 to the 4th st from this section

Row 11: sc2tog between this st and the next, sc4. ch1, turn (5sc)
Row 12: Sc5. ch1, turn
Row 13: Sc3, sc2tog. ch1, turn (4sc)
Row 14: Sc3, make 2sc in the last st. ch1, turn (5sc)
Row 15: Sc3, sc2tog. ch1, turn (4sc)
Row 16: Sc4
Fasten off
Sleeves (make 2):
Ch15
Row 12: Sc5. ch1, turn
Row 13: Sc3, sc2tog. ch1, turn (4sc)
Row 14: Sc3, make 2sc in the last st. ch1, turn (5sc)
Row 15: Sc3, sc2tog. ch1, turn (4sc)
Row 16: Sc4
Fasten off
Sleeves (make 2):
Ch15
Round 1: sc in the first chain st you made, then sc in every following chain st to end to make a loop (15sc)
Rounds 2 - 7: (6 rounds) sc in each st
Rrow 8: sc in the first 8sts. ch1, turn
Row 9: bfsc 8. ch1, turn
Row 10: sc2tog, sc4, sc2tog. ch1, turn (6sc)
Row 11: bfsc2tog, bfsc2, bfsc2tog (4sc)
Fasten off
Sew these to the armholes
Fasten off
Sew these to the armholes
For the upper pockets (make 2):
Ch5
Row 1: sc in the 2nd st from hook and the next 3 chain sts. ch1, turn (4sc)
Row 2: sc in each st
Fasten off
Fasten off
Sew these to the front of the jacket, approximately in line with the centre of the sleeves (as can be seen in the image below)
For the collar:
Rejoin beige yarn to the right-hand front edge, to the gap between the 9th and 10th rows, as seen below
Rejoin beige yarn to the right-hand front edge, to the gap between the 9th and 10th rows, as seen below

Row 1: Sc35 around the neckline, finishing between the 9th and 10th rows in the left-hand side front. ch1, turn
Row 2: In the back loop of each st: Sc2tog, sc8, make 2sc in each of the next 2sts, sc5, make 2sc in the next st, sc5, make 2sc in each of the next 2sts, sc8, sc2tog. ch1, turn (38sc)
Row 3: Bfsc3tog, bfsc3, hdc4, ch2, slip1, ch2, hdc2, make 2hdc in the next stc, hdc2, make 2hdc in the next st, hdc3, make 2hdc in the following st, hdc3, make 2hdc in the next st, hdc2, make 2hdc in the following st, hdc2, ch2, slip1, ch2, hdc4, bfsc3, bfsc3tog
Fasten off
For the scarf:
With a 2mm hook and maroon 4ply yarn ch5
Row 1: sc in the 2nd chain st from hook and the next 4 chain sts. ch1, turn (4sc)
Rows 2 - 55: (54 rows) sc in each st. ch1, turn
Row 56: sc in each st
Fasten off
Fasten off
With black 4ply yarn embroider stripes up/down and across the length of the scarf. These are best made by using back-stitch.
Horizontally you should embroider 3 or 4 close-together rows of stitching every 6 rows of crochet. You should then sew 2/3 rows of yarn vertically down one side of the scarf. This can be sen in the images below


With white 4ply yarn add horizontal stripes mid-way between the black horizontal rows,as well as a single vertical stripe on the opposite edge of the scarf to the black ones.

For the tie:
With a 2mm hook and dark red 4ply yarn make a magic loop with 2sc. ch1, turn
Row 2: Make 2sc in the first st, sc2, make 2sc in the last st (6sc)
Row 4: Sc in each st. ch1, turn
Row 5: Sc2, sc2tog, sc. ch1, turn (4sc)
Row 6: Sc in each st. ch1, turn
Row 7: Sc, sc2tog, sc. ch1, turn (2sc)
Row 8: Sc in each st. ch1, turn
Row 9: Sc, sc2tog. ch1, turn (2sc)
Rows 10 - 11: (2 rows) Sc in each st. ch1, turn
Row 12: Sc2tog. ch1, turn (1sc)
Fasten off
Take a few strands of purply-grey embroidery thread and embroider a rough pattern onto the tie, as shown below. I have also included a photo of the original tie to use as a reference


For the shoes:
With black 4ply yarn and a 2mm crochet hook ch4
Round 1: sc in the 2nd chain st from hook and the next chain st. Make 3sc in the first chain st you crocheted into , then sc in the back of the previous chain st you crocheted into. Make 2sc in the back of the first chain st you crocheted into (8sc)
Round 2: make 2sc in the first st, sc, make 2sc in each of the next 3sts, sc, then make 2sc in the last st (14sc)
Round 3: sc, make 2sc in the next st, sc, (sc, make 2sc in the following st) 3 times, sc, (sc, make 2sc in the next st) twice (20sc)
Round 4: (sc2, make 2sc in the next st, sc, (sc2, make 2sc in the next st) 3 times, sc, (sc2, make 2sc in the next st) twice (26sc)
Fasten off neatly
Join brown yarn to the loop behind the back loop of the 2nd st after the new st you made when casting off neatly
Round 5: Sc in the loop behind the back loop of this st and the next 25sts
Round 6: Sc in both loops of each st
Round 7: Slip3, (sc, sc2tog) 3 times, slip5, sc7, slip2 (23sts)
Round 8: Slip3, sc2tog 3 times, slip3, hdc7, slip2 (20sts)
Fasten off neatly
Join cream yarn to the 2nd st from the new st you created when fastening off neatly
Round 9: Sc2tog between this st and the next, sc2tog twice, sc4, slip6, sc4 (16sts)
Row 10: Slip3, ch1, sc5, slip4, sc5. ch1, turn
Row 11: Bfsc14
Fasten off
Rejoin cream yarn to round 10, to the same st as the last one you crocheted into
Row 11: bfscc in this st and the next 5sts
Row 12: sc6
Fasten off
Use dark brown embroidery thread to lace up the shoes


I hope you have enjoyed this pattern! If you have any questions feel free to contact me, either by leaving a comment below or via my Ravelry or Instagram pages. You can also follow me on Instagram to keep up to date with what I'm working on, and get notified when I publish a new pattern.
Please don't re-post this pattern or claim it as your own, and I ask that you don't sell finished products since Doctor who is copyrighted by the BBC. However I do have lots of other patterns for which selling finished products is totally fine!

