This model is of Captain Jack Harkness, from Doctor Who and Torchwood. He is designed to be approximately the same size as the other doctor who - related dolls I have made (eg. Missy and Bill Potts)


If you have a few spare minutes either before or after completing this pattern I would greatly appreciate if you could take a few minutes to fill out this questionnaire, in order to help me improve this website and make it more accessible. Thank you!
Difficulty:

Medium - difficult
The crochet itself isn't too challenging, but the embroidery can be difficult to try to make it look like Captain Jack.
You will need:
- 2 stitch markers (although scraps of yarn will work as well)
- dk yarn in peach (or a suitable skin colour), dark brown, and dark grey
- 4ply yarn in light blue, white, black, cream, brown, and a scrap of grey
- embroidery thread in light blue, light grey, dark grey, black, dark brown, pink(various shades for the lips), silver, a scrap of green and purple (optional), cream, and gold
- A 2mm crochet hook
- A 2.5mm crochet hook
- A 1.1mm (approx.) crochet hook
- 0.5mm silver wire
- a pair of pliers
- a pet blush
- A kettle or saucepan (for boiling water)
- Toy stuffing
- A darning needle, embroidery needle, and regular sewing needle
- 2 small black snap fasteners (approx 8mm)
- 4 small silver snap fasteners (or 6 if you would like to be able to undress the doll completely)
- One black button approx 12mm
- 7 white 8mm buttons
Note:
- To make my patterns easier to read, in most cases instead f writing'sc in the next ... sts' I have just written 'sc...' Eg. 'sc12' means 'sc in the next 12 sts'
- 'fasten off neatly' refers to a special way of fastening off which is neater and makes it easier to see where you should be crocheting on the next round (also known as invisible fastening off). This involves pulling up your yarn through your stitch, threading the yarn underneath the second stitch from where you pulled your yarn up, then threading your yarn back through the top of this stitch and down through the back of the work. There is a very helpful site that explains it clearly found here. Just make sure when you do this that you thread your needle through the SECOND stitch after the last stitch you made, otherwise you will end up with an extra stitch which may mean that all of the following rounds are out of line with each other.
- This pattern includes the foundation single crochet stitch. A handy website for learning to do this stitch can be found here, or alternatively a video tutorial can be found here.
For every part of the body, unless specifies, use a 2.5mm hook and peach dk yarn
For the legs (make 2):
ch7
Round 1: sc in the 2nd st from hook, sc in the next 4 chain sts, 3sc in the last chan st, sc in the back of the previous 4 chain sts you crocheted into, 2sc in the back of the first chain st you crocheted into (14sc)
Round 2: 2sc in the first st, sc in the next 4sts, 2sc in each of the next 3 sts, sc in the following 4sts, 2sc in each of the next 2 sts (20sc)
Round 3: (this is slightly less than one round) sc in the first 7sts, sc5tog, sc in the next 8sts (16sc)
Round 4: sc7, sc3tog, sc6 (14sc)
Round 5:(this is slightly more than 1 round) sc6, sc3tog, sc4, sc2tog (11sc)
Round 6: sc3, sc4tog, sc2, sc2tog (7sc)
Rounds 7 - 9: (3 rounds) sc in each st
Stuff the foot firmly. Continue stuffing the leg as you go along.
Round 9: sc, 2sc in the next st, sc3, 2sc in the following st, sc in the last st (9sc)
Round 10: sc in each st
Round 11: sc3, 2sc in the next st, sc3, 2sc in the following st, sc in the last st (11sc)
Round 12: sc3, 2sc in the next st, sc5, 2sc in the following st, sc in the last st (13sc)
Round 13: sc5, 2sc in the next st, sc5, 2sc in the following st, sc in the last st (15sc)
Round 14: sc6, 2sc in the next st, sc6, 2sc in the following st, sc in the next st (17sc)
Round 15: sc6, sc2tog, sc6, sc2tog, sc (15sc)
Round 16: (slightly more than 1 round) sc7, sc2tog, sc5, sc2tog (13sc)
Round 17: sc5, sc2tog, sc4, sc2tog (11sc)
Round 18: (this is slightly more than 1 round) sc4, sc2tog, sc, 3sc in each of the next 2sts, sc, sc2tog (13sc)
Round 19: sc in each st
Round 20: sc4, 2sc in the next st, sc7, 2sc in the last st (15sc)
Round 21: sc in each st
Round 22: sc5, 2sc in the next st, sc, sc3tog twice, sc, 2sc in the last st (13sc)
Round 23: sc in each st
Round 24: sc5, 2sc in the next st, sc6, 2sc in the last st (15sc)
Round 25: sc6, 2sc in the next st, sc7, 2sc in the last st (17sc)
Round 26: sc8, 2sc in the next st, sc7, 2sc in the last st (19sc)
Round 27: sc in each st
Roud 28: sc8, 2sc in the next st, sc9, 2sc in the last st (21sc)
Round 29 - 33: (5 rounds) sc in each st
Fasten off neatly
For the arms (make 2):
Make a magic loop with 6sc
Round 1: make 2sc in each st(12sc)
Round 2: sc in each st
Round 3: sc in the first 2 sts, sc2tog, rep to end (9sc)
Round 4: sc in the first st, sc2tog, rep to end (6sc)
Rounds 5 - 6: (2 rounds) sc in each st
Round 7: 2sc in the first st, sc5 (7sc)
Round 8: sc4, 2sc in the next st, sc2 (8sc)
Round 9: sc in each st
Round 10: 2sc in the first st, sc7 (9sc)
Round 11: sc5, 2sc in the next st, sc3 (10sc)
Round 12: 2sc in the first st, sc4, 2sc in the next st, sc4 (12sc)
Round 13: sc2, slip5, sc3, 2hdc in each of the next 2sts (14sts)
Round 14: sc2, slip5, sc4, 2hdc in each of the next 2sts, sc in the last st (16sts)
Round 15: sc2, slip5, sc3, sc3tog twice (12sts)
Rounds 16 - 24: (9 rounds) sc in each st
Fasten off neatly
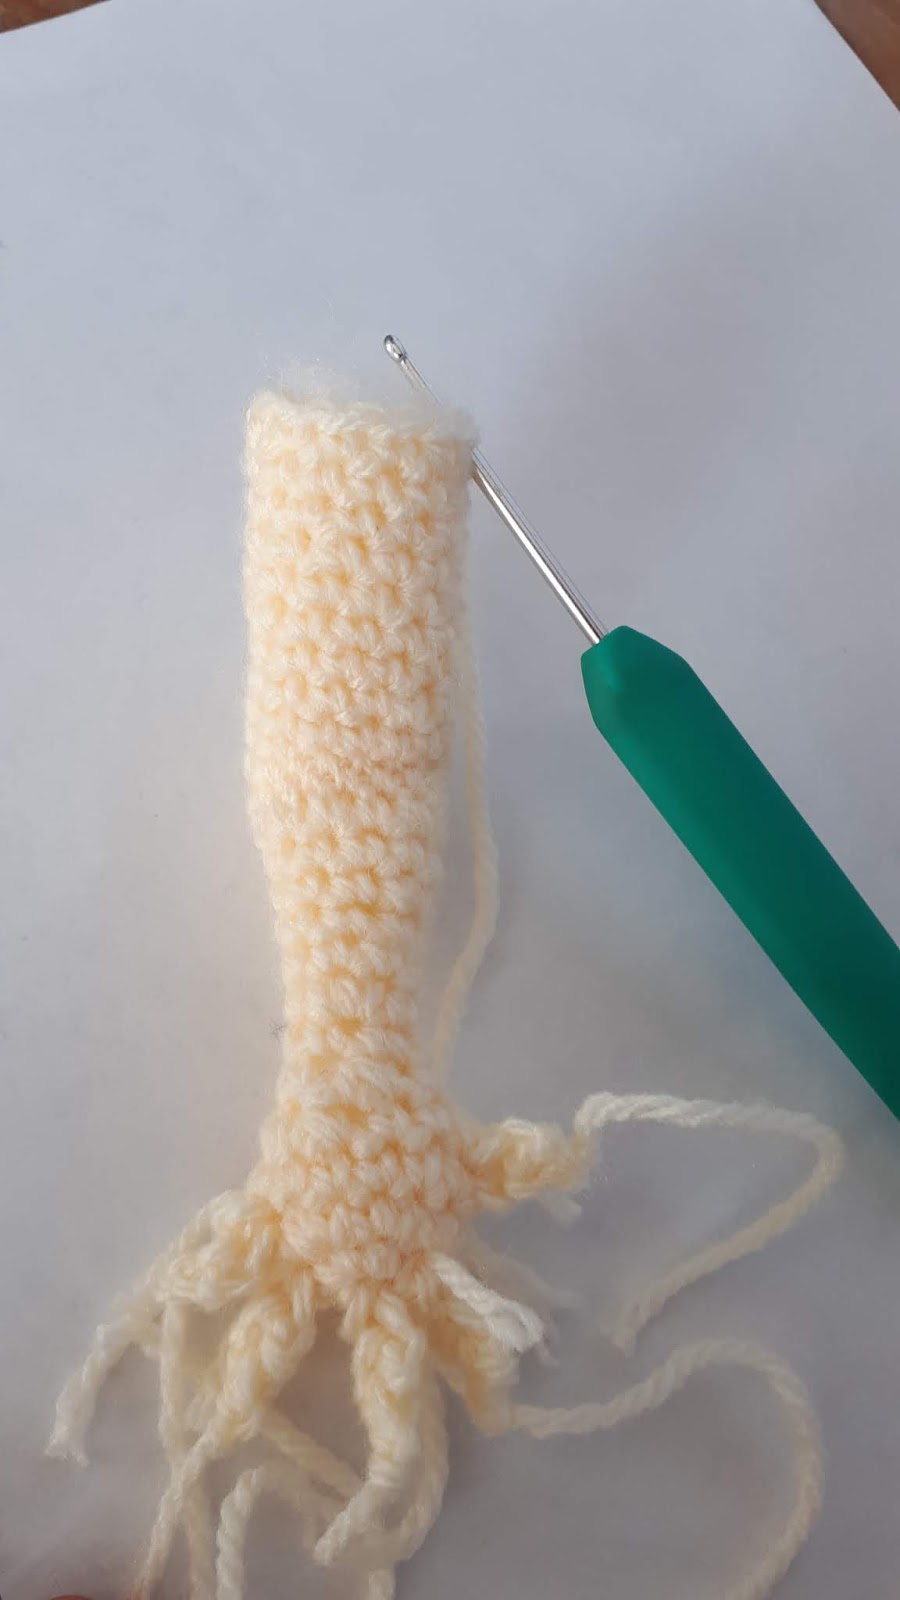
Don't stuff yet
Press the lower arm and hand flat, as shown below (image)
For the thumb:
Note: When you make the second hand make sure that it the reverse of the first hand (the thumb should be on different sides of the elbow)
Insert your hook through the post of one of the stitches in between rounds 2 and 3 (as shown below)(Note: the magic loop you made isn't counted when numbering the rows in the pattern above, so looking at your hand from the end your hook should be inserted between the 3rd and 4th circle).
Pull your yarn through, ch1, then make 2sc into where you first inserted your hook.
Ch1, then sc2tog through the 2 sts you just made.
Fasten off


Again make sure that when you make the thumb on the second hand it is on the opposite side of the hand to the first one you made, with respect to the elbow (the 2sc x2 and sc2tog x2 you did on rows 10 and 11)
For the fingers:
insert your hook through the post of the stitch between the magic loop and round 1 directly above where you made the thumb (as shown below)
pull the yarn through, ch1, then sc into where you inserted your hook. ch1, sc in this st you just made, ch1, sc in this next st you made.
Fasten off

Insert your hook into the spoke between the first and the second row on the other edge of the hand (as shown below)
Pull yarn through, ch1, sc in where you inserted your hook, ch1, sc in this st you just made. Fasten off

You now need to make 2 more fingers in the same way as you made the first one, in between the two fingers you have already made. It doesn't particularly matter where you insert your hook for each st, as long as they end up both being in between the two existing stitches. This will mean you end up with a hand looking similar to the ones below

After you have made the arms mark with either a scrap of yarn or a stitch marker the stitch on each arm directly above the thumb.

For the body:
Round 1: rejoin yarn to the 3rd stitch after the new stitch you made when fastening off neatly on one of the leg sections,sc in this st and the next 17sts, then sc in the 10th st before the new st on the other leg. Sc in the next 17sts around this leg (36sts)
Round 2: sc in the first st, 2sc in the next st, sc2, 2sc in the following st, sc13, 3sc in the next st, sc12, 2sc in the next st, sc2, 2sc in the following st, sc in the last st (42sc)
Round 3: sc20, 2sc in the next st, sc, 2sc in the following st, sc19 (44sc)
Rounds 4: sc in each st
Round 5: sc20, sc2tog, sc, sc2tog, sc19 (42sc)
Round 6: sc19, sc5tog, sc18 (38sc)
Round 7: (slightly more than 1 round) sc2, sc3tog, sc, sc3tog, sc2, sc2tog, sc14, sc2tog, sc2, sc3tog, sc3, sc3tog (28sc)
Round 8: sc in each st
Round 9: sc7, sc2tog, sc13, sc2tog, sc4 (6sc)
Round 10 - 13: (5 rounds) sc in each st
Round 14: sc7, 2sc in the next st, sc13, 2sc in the following st, sc4 (28sc)
Round 15: sc in each st
Round 16: sc9, 2sc in the next st, sc13, 2sc in the following st, sc4 (30sc)
Rounds 17 - 18: (2 rounds) sc in each st
Round 19: sc10, 2sc in the next st, sc15, 2sc in the following st, sc3
Rounds 20 - 21: (2 rounds) sc in each st
Fasten off neatly
For the shoulders:
Continue stuffing this section as you are making it
Round 22: rejoin yarn to the 4th st after the new stitch you made when fastening off neatly on the body. Sc in this st, then sc5. Sc in the 6th st before the stitch marker on the left arm (the one where the thumb is facing forward when the elbow is on the outside when attaching it at this point (as shown below)), sc in the next 8sts around this arm, skip three from where you last crocheted into on the body section, then sc14 around the body. Sc in the other arm in the second stitch before where the stitch marker is, then sc in the next 8sts around this arm. Skip 3 on the body, then sc6 (44sc)

Rounds 23 - 25: (3 rounds) sc in each st
Round 26: sc16, sc2tog, sc10, sc2tog, sc (42sc)
Round 27: sc9, sc5tog, sc2, sc2tog, sc8, sc2tog, sc2, sc5tog, sc7 *(32sc)
Round 28: sc7, sc5tog, sc10, sc5tog, sc5 (24sc)
Round 29: sc7, sc2tog, sc in the loop behind the back loop only of the next 4sts, 2sc in both loops of the next st, then sc in the loop behind the back loops only of the next 4sts. Sc2tog in both loops of the next 2sts, then sc in both loops of the last 4 sts (23sc)
Round 30: sc6, sc3tog, sc8, sc3tog, sc3 (19sc)
Round 31: sc5, sc3tog, sc6, sc3tog, sc2 (15sc)
Rounds 32 - 34: (3 rounds) sc in each st
Row 35: sc6, turn
Row 35.5: slip6
Fasten off
Add any extra stuffing if needed, then sew up the holes under the armpits

For the neck detail (optional):
To add extra detail to the body I decided to use surface crochet to try to recreate the ridges highlighted below.


Start off by attaching the yarn to the neck area just to the right of the right collarbone (looking at it from the front) (the collarbone is the ridge made by crocheting in the back loop only).

After you've done this, make slip stitches across the surface of the neck, going up and slightly to the right as you do this. Make 4 slip sts in this way then fasten off, as shown in the images below.


After doing this, rejoin the yarn to a stitch just to the left of the left collarbone (again looking at it from the front)

In the same way as you did before, make slip stitches up the neck, this time going slightly left as you do so. Make 4 of these sts then fasten off, as shown below


To finish off with the body, sew in the loose ends. You may also wish to add extra detail by using small stitches though the body to either shape the bottom better or add in a belly button, as shown below:


This can be done by making repeated stitches through the body, so that they emerge at the same place at the front of the body each time, but at the back of the body they emerge in between different stitches each time and return in exactly the same place (so that you don't get weirdly shaped indents in the back of the body)
For the head:
ch4
Round 1: sc in the 2nd chain st from hook, then sc in the following chain st. Make 3sc in the next chain st (the first one you made), then sc into the back of the previous chain st you crocheted into, before making 2sc into the back of the first chain st you crocheted into (8sc)
Round 2: sc3, 2sc in each of the next 2sts, sc2, then make 2sc in the last st (12sc)
Round 3: make 2sc in the first st, sc3, make 2sc in each of the next 2sts, sc4, make 2sc in the last st (16sc)
Round 4: 2sc in the first st, sc5, 2hdc in each of the next 2sts, hdc5, 2hdc in each of the next 2sts (20sts)
Round 5: sc8, 2hdc in the next st, hdc8, 2hdc in the following st, sc2 (22sts)
Round 6: sc9, 2hdc in the next st, hdc9, 2hdc in the following st, sc2 (24sts)
Round 7: sc10, hdc11, sc3
Round 8: sc11, hdc9, sc4
Rounds 9 - 13: (5 rounds) sc in each st
Round 14: sc5, (sc, sc2tog) 3 times, sc3, (sc, sc2tog) twice (19sc)
Round 15: sc2, sc2tog, sc3, sc2tog 3 times, sc3, sc2tog twice (13sc)
stuff firmly
Round 16: sc2tog 6 times
Fasten off
Sew up this opening
For the face:
The facial features are extremely difficult to get accurate. You really need to just do each aspect as well as you can and see how it looks when it's finished, then improve on it from there if necessary.
You may want to use the following images as references when embroidering the facial features to increase the screen-accuracy of the doll.


For the nose:
Make a magic loop with 2sc. ch1, turn
Row 1: sc in each of these sts. ch1, turn
Row 2: 2sc in each of these 2sts (4sc)
Fasten off
Sew this to the centre of the face.
For the left ear:
ch3
Round 1: Make 3sc in the 2nd loop from hook, then make 3hdc in the next chain st (the first one you made). ch1, then slip the same chain st you just crocheted in.
Fasten off
For the right ear:
ch4
Round 1: make 3hdc in the 3rd chain from hook, then make 3sc in the next chain st (the first one you made)
Fasten off
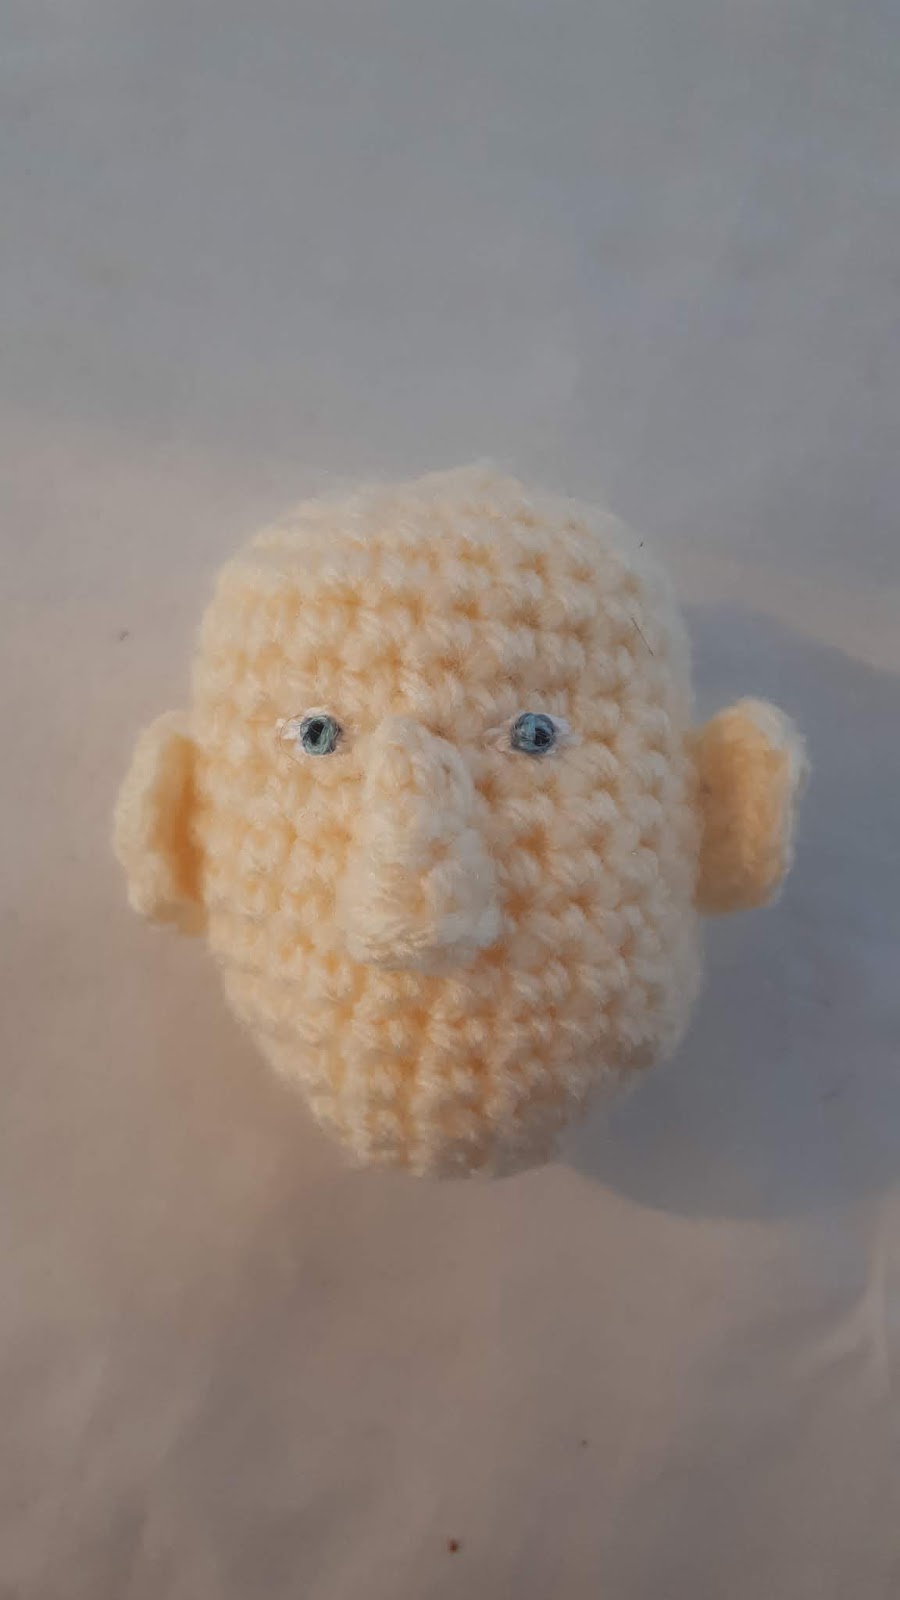
Sew the ears to the sides of the head. You can see this in the first of the images showing the eyes.
For the eyes:
With 3 strands of white embroidery thread embroider the whites of the eyes (Image 1 below). After this add a pupil in the centre using one strand of black embroidery thread (Image 2). Next add the iris by using 2 strands of light blue embroidery thread to sew a circle around the pupil (Images 3 - 4), then outline this using one strand of grey embroidery thread (Image 5). You may then want to enlarge the pupil slightly using another strand of black embroidery thread. Finally, add a highlight to the pupil using one strand of white embroidery thread.


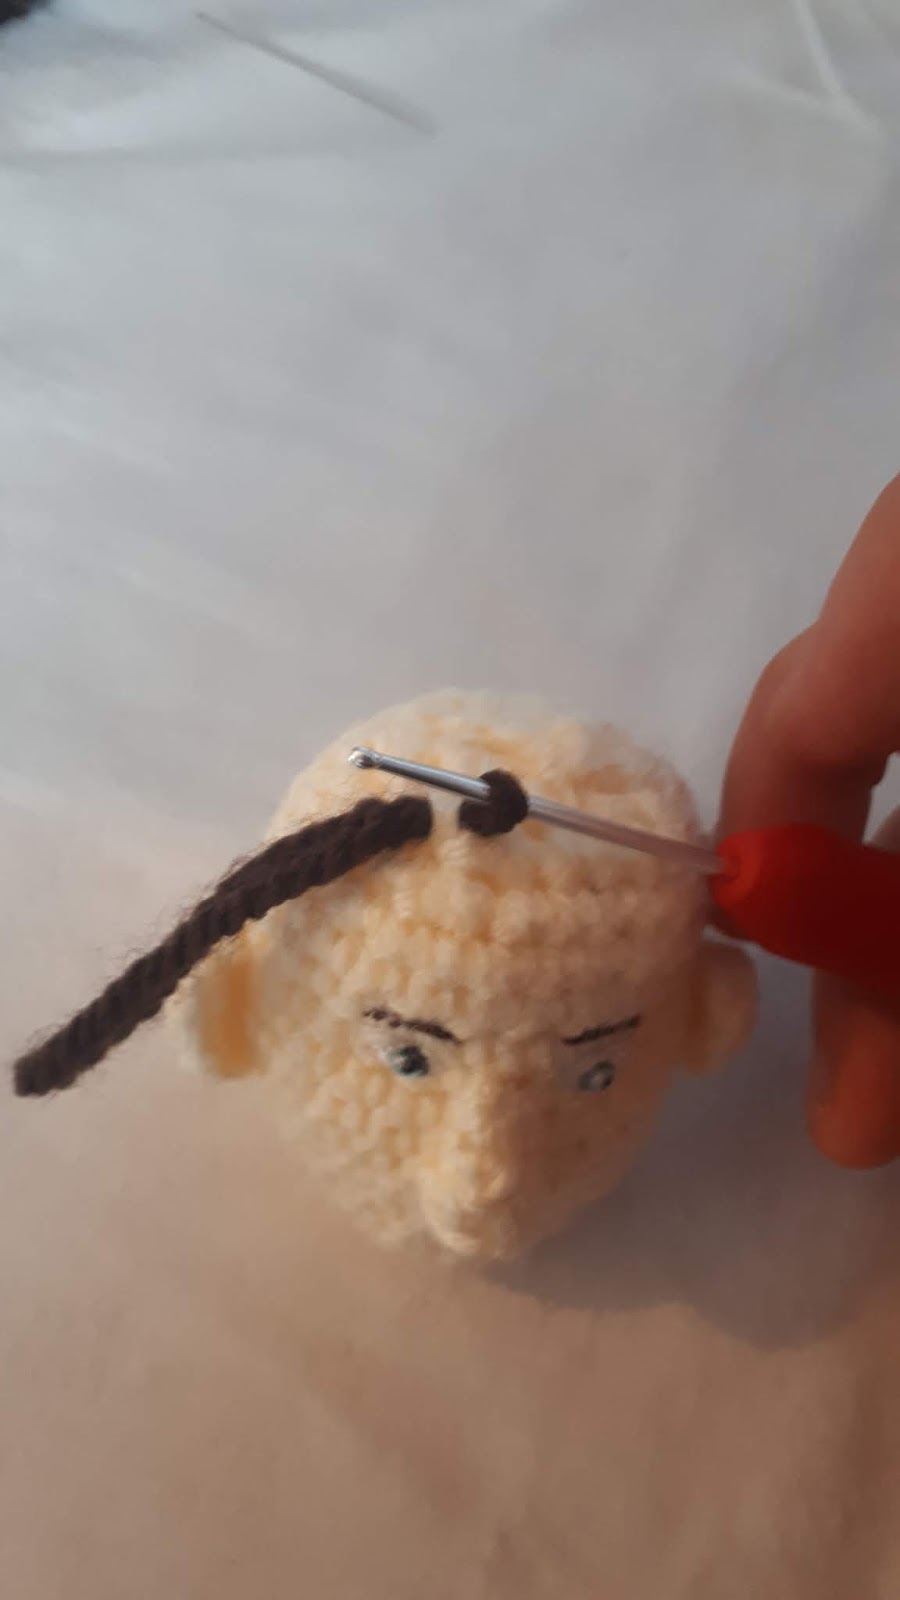
Use cream 4ply yarn to embroider eyelids over the top of the eyes, then use one strand of black embroidery thread to embroider the impression of eyelashed onto the eyelids (you can see this in the image showing the eyebrows).
For the eyebrows:
embroider the eyebrows using one strand of dark brown embroidery thread, as shown below.


For the lips:
Embroider the lips using pink embroidery thread, as shown below. You can choose to do this either before adding the hair or afterwards. Its easier to do before, but doing it afterwards will make it easier to tell how accurate the lips are.
I used no. 152 embroidery thread for the base of the lips, then added highlights using no. 224 thread.


For the hair:
Cut out a rectangle of cardboard 6cm long and wind dark brown dk yarn around it. Cut these loops of yarn at one end so you have lots of 12cm long strands.


When adding hair to the top of the head, try to recreate the side parting that Captain Jack has, as can be seen in the image below.


Repeat this process using a 4cm long piece of cardboard, and then again with a 3cm long piece of cardboard.
Attach these strands to the sides and back of the head using the same technique as before.


Don't worry at this point that the hair is very poofy and doesn't look much like Jack's - there will be some serious hair styling later.


After you have attached the hair, get a pet brush and brush the hair to make it smooth and fluffy.


Next, get a bowl of freshly boiled water and dip the head into it so that the hair is submerged. This should cause the hair to smooth down a lot. Leave the head in a warm place overnight to dry off.

You next need to trim the hair very drastically. Cut the fringe shorter and do the same with the hair at the back of the head. In places where the hair has been cut very short (such as at the back and sides of the head), you may want to add a few stitches using brown sewing cotton to reduce the risk of it falling out.


Once you are happy with the hair you may also want to shape the face to make it more similar to John Barrowman's. I did this using cream sewing cotton and using stitches in various places on the face to pull it into place. I tried to make the jawbones more defined and also shape the chin, as shown below:


You may also want to sew small sections of the hair in front of the ear to make the sideburns.
After you've done this lips and hair you may want to make adjustments to the face to improve it. I made a lot of small adjustments (although I still wasn't completely happy with how it turned out), such as making the eyebrows larger and shortening the hair at the back and sides of the head.


For the undershirt:
I made this undershirt last so it is not included in lots of the pictures, but it is designed to go underneath the shirt and show through the top where the collar is open.
With white 4ply yarn and a 2mm hook ch47
Round 1: sc in the first chain st you made, then sc in every following chain st to end to make a loop (47sc)
Rounds 2 - 23: (22 rounds) sc in each st
Fasten off, skip26, then fasten on
Round 24: Sc in this st and the next 20sts (21sc)
Fasten off
Fasten on to the st you made after fastening on on the last row.

Row 25: sc in this st and the next 8sts, sc3tog, sc9 (19sc)
Fasten off
Fasten on to the st you made after fastening on on the last row.
Row 26: sc2tog between this st and the next st, sc15, sc2tog (17sc)
Fasten off
Fasten on to the st you made after fastening on on the last row.
Row 27: sc in this st and the next 16sts
Fasten off
Fasten on to the st you made after fastening on on the last row.
Row 28: 2sc in this st, sc15, 2sc in the last st (19sc)
Fasten off
Fasten on to the st you made after fastening on on the last row.
Row 29: 2sc in this st, sc17, 2sc in the last st (21sc)
Fasten off
Fasten on to the st you made after fastening on on the last row.
Row 30: sc in this st, sc20
Fasten off
Fasten on to the st you made after fastening on on the last row.
Row 31: sc in this st, sc20
Fasten off
Fasten on to the st you made after fastening on on the last row.
Row 32: ch2, hdc in this st and the next 4sts, sc11, hdc5 (21sts)
Fasten off
Fasten on to the st you made after fastening on on the last row.
Row 33: ch2, hdc in this st and the next 3sts, sc13, hdc4 (21sts)
Fasten off
Rejoin yarn to row 23 to the 3rd st from this section.
 |
| (sorry about the terrible lighting) |
Row 24: Sc in this st and the next 21 sts (22sc)
Fasten off
Fasten on to the st you made after fastening on on the last row.
Row 25: sc2tog between this st and the next st, sc18, sc2tog (20sc)
Fasten off
Fasten on to the st you made after fastening on on the last row.
Row 26: sc in this st, sc8, sc2tog, sc9 (19sc)
Fasten off
Fasten on to the st you made after fastening on on the last row.
Row 27: 2sc in this st, sc17, 2sc in the last st (21sc)
Fasten off
Fasten on to the st you made after fastening on on the last row.
Row 28: sc in this same st, sc20
Fasten off
Fasten on to the st you made after fastening on on the last row.
Row 29: 2sc in this st, sc19, 2sc in the last st (23sc)
Fasten off
Fasten on to the st you made after fastening on on the last row.
Row 30: ch2, hdc in this st and the next 4sts, sc13, hdc5
Fasten off
Fasten on to the st you made after fastening on on the last row.
Row 31: ch2, hdc in this st and the next 4sts, sc13, hdc5
Fasten off
Fasten on to the st you made after fastening on on the last row.
Row 32: ch2, hdc in this st and the next 4sts, sc13, hdc5
Fasten off
Fasten on to the st you made after fastening on on the last row.
Row 33: ch2, hdc in this st and the next 4sts, sc13, hdc5
Fasten off
Join shoulder seams. Sewing the shoulder seams together will mean that you are unable to take the undershirt off. If you would like to be able to take this shirt off you can add a snap fastener to each of the shoulder seams.


For the underpants (optional):
Use white 4ply yarn and a 2mm hook throughout
For the leg sections (make 2):
Ch26
Round 1: sc in the first chain st you made, then sc in every following chain st to make a loop (26sts)
Rounds 2 - 5: (4 rounds) sc in each st
Fasten off neatly
Rejoin yarn to one of the sts on these leg sections,
Round 6: sc in this st and the next 20sts on this section. Sc in one of the sts on the other leg section, then sc in the next 20 sts (42sc)
These last 42 sts form a new round
Round 7: Sc15, 2sc in the next st, sc3, 2sc in each of the next 3sts, sc3, 2sc in the following st, sc14, 2sc in each of the last 2sts (49sc)
Round 8: 2sc in each of the first 2sts, sc13, 2sc in each of the following 2sts, sc13, 2sc in each of the next 2sts, sc16, 2sc in the last st (56sc)
Round 9: 2sc in the first st, sc55 (57sc)
Rounds 10 - 12: (3 rounds) sc in each st
Rounds 12 - 14: (the following instructions make up 2 rounds because of the sc5tog in the middle of them) Sc56, sc5tog, sc52 (53sc)
Round 15: Sc11, sc2tog, sc27, sc2tog, sc11 (51sc)
Round 16: sc in each st
Round 17: Sc10, sc3tog, sc6, sc2tog, sc7, sc2tog, sc6, sc3tog, sc12 (45sc)
Fasten off
Sew up the crotch


(please ignore the vortex manipulator or the wrist - we will get to how to make that later)


For the trousers:
Use a 2mm hook and black 4ply yarn throughout
For the trouser legs (make 2):
ch28
Round 1: sc in the first chain st you made, then sc in every following chain st to make a loop. (28sc)
Rounds 2 - 33: (32 rounds) sc in each st
Round 34: (sc6, 2sc in the next st) 4 times (32sc)
Round 35: sc in each st
Rounds 36 - 42: (7 rounds) sc in each st
Fasten off neatly
For the rest of the trousers:
Round 1: rejoin yarn to one of the stitches of one of these trouser legs. Sc in this st and the next 24sts of this leg. Sc in a stitch on the other trouser leg and the next 24sts (50sc)
Rounds 2 - 3: (2 rounds) sc in each of these 50 sts
Note: the next few rounds include a lot of fasting off and fastening on again, so to reduce the number of loose ends you need to sew in try to crochet over these loose ends in subsequent rows (or in the same row for the loose ends caused by fastening on.)
Round 4: (slightly more than 1 round) sc in the front loop only of the next 2sts. Fasten off then fasten on to the back loop only of the first st you crocheted in for this round (as shown below). Sc in the back loop only of this st and the next st, then sc in both loops of the next 50sts. Fasten off. (52sc)
 |
| I'm aware that it's difficult to see what's going on here since the trousers are black. If you're confused about this please get in contact with me and I would be happy to clarify it for you. |
Row 5: Rejoin yarn to the st where you fastened on for the last round (as shown below). Make 2sc in this st, then sc in the next 52sts Fasten off (53sc)

Rows 6 - 13: (8 rounds) rejoin yarn to the st when you fastened on for the last round. Sc in this st and the next 52sts. Fasten off
Row 14: rejoin yarn to the st when you fastened on for the last round. Sc in this st and the next 49sts. ch2, skip2, sc in the last st. Fasten off
Row 15: rejoin yarn to the st when you fastened on for the last round. Sc in this st and the next 49sts. Make 2sc in the hole made by the ch2, then sc in the last st. Fasten off
Row 16: rejoin yarn to the st when you fastened on for the last round. Sc in this st and the next 52sts. Fasten off
Row 17: rejoin yarn to the st when you fastened on for the last round. Sc in this st and the next 24sts.
Fasten off neatly
Rejoin yarn to the side of the last st you made on this last round (as shown below)
sc in the side of this st and sc down the front edge of the trousers (as shown below)
Fasten off


For the belt loops (make 5):
ch6
Fasten off
Sew these below loops at equal intervals around the waistband of the trousers.


With a 2mm hook and brown 4ply yarn ch3
Round 1: sc in the 2nd chain st you from hook, then sc in the next chain st. ch1, turn (2sc)
Rows 2 - 47: (46 rows) sc in each st. ch1, turn
Row 48: sc in each st
Fasten off
For the buckle:
Cut a length of wire approximately 7 - 8 times the width of the belt. Using the same yarn that you made the belt out of, sew the centre of this wire to one end of the belt.

Next, curl the longer end of the wire round so that it makes a loop and comes back the way it was going originally (as shown below). Sew over the section of wire that overlaps with where you sewed over before to attach it to the end of the belt.


Fold the other end of the length of wire back on itself the upwards so that it crosses the loop of wire you have just made perpendicularly (as shown below). Sew over the folded length of this wire to hold it in place. You will also need to trim the loose end of the wire you curved to make a loop.


Trim the end of the wire pointing upwards so that it is just a little longer than the height of the loop (so that it sticks out a bit)

Thread this belt through the belt loops of the trousers and fasten it.

For the shirt:
Use blue 4ply yarn and a 2mm hook throughout
ch46
Row 1: sc in the 2nd loop from hook and the next 44 chain sts. ch1, turn (45sc)
Rows 2 - 23: (22 rows) sc in each st. ch1, turn
Row 24: sc in the first 10sts. ch1, turn (10sc)
Row 25: sc2tog, sc8. ch1, turn (9sc)
Rows 26 - 27: (2 rows) sc in each of these 9sts. ch1, turn
Row 28: sc7, sc2tog. ch1, turn (8sc)
Rows 29 - 30: (2 rows) sc in each of these 8 sts. ch1, turn
Row 31: Make 2sc in the last st, then sc7. ch1, turn (9sc)
Row 32: sc8, then make 3sc in the last st. ch1, turn (11sc)
Row 33: sc3, hdc2, ch1, sc6, turn (12sts including the chain st)
Row 34: sc5, hdc, then hdc in the chain st, make 2sc in the next st, hdc4. ch1, turn (13sts)
Row 35: sc in the first 6sts
Fasten off
Rejoin yarn to row 23 to the 3rd st after this section
Row 24: sc in this st and the next 17sts. ch1, turn (18sc)
Row 25 - 30: (6 rows) sc in each of these 18 sts. ch1, turn
Row 31: make 2sc in the first st, sc16, then make 2sc in the last st. ch1, turn (20sc)
Row 32: make 2sc in the first st, sc18, then make 2sc in the last st. ch1, turn (22sc)
Row 33: sc3, hdc3, sc10, hdc3, sc3. turn
Row 34: slip3, sc3, ch1, slip10, ch1, sc3, slip3
Fasten off

Rejoin yarn to row 23 to the 3rd st from this section

Row 24: sc in this st and the next 12 sts to end. ch1, turn (13sc)
Row 25: Sc11, sc2tog. ch1, turn (12sc)
Rows 26 - 27: (2 rows) sc in each st. ch1, turn
Row 28: Sc2tog, sc10. ch1, turn (11sc)
Rows 29 - 30: (2 rows) sc in each st. ch1, turn
Row 31: Sc10, 3sc in the last st. ch1, turn (13sc)
Row 32: 2sc in the first st, sc12. ch1, turn (14sc)
Row 33: Sc9, ch1, hdc5. ch1, turn (15sts including the first chain st)
Row 34: Sc3, hdc3, sc9, turn (15sts)
Row 35: Slip9, ch1, sc6
Fasten off
For the sleeves:
Ch19
Ch19
Round 1: sc in the first chain st you crocheted into, then sc in each following chain st to form a loop (19sc)
Rounds 2 - 9: (8 rounds) Sc in each st
Round 10: Sc3, 2sc in the next st, (sc4, 2sc in the following st) 3 times (23sc)
Rounds 11 - 32: (22 rounds) Sc in each st
Row 33: sc in each st. ch1, turn
Rows 34 - 37: (4 rows) Sc in the first 4 rows. ch1, turn
Row 38: (Sc2, sc2tog) 4 times. ch1, turn (12sc)
Row 39: (Sc, sc2tog) 4 times. ch1, turn (8sc)
Row 40: Sc2tog 4 times (4sc)
Row 41: Sc2tog twice
Fasten off
Sew together the shoulder seams, then sew the sleeves to the armholes

Sew together the shoulder seams, then sew the sleeves to the armholes

For the collar:
Join yarn to the top left-hand corner of the shirt (looking at it front on)

Row 1: make 37sc around the neckline of the shirt. turn
Row 2: Slip each of these 37sts. ch1, turn
Row 3: crocheting over the top of the slip stitches into the previous row, Sc into each of these 37sts. turn
Row 4: Slip each st. ch1, turn
Row 5: Sc in each st, again crocheting over the top of the slip sts and into the sts underneath. ch1, turn
Row 6: Sc in the back loop only of every st. turn
Row 7: Slip each st. ch1, turn
Row 8: sc over the top of each slip st into the st underneath. turn
Row 9: Slip each st. ch1, turn
Row 10: sc over the top of each slip st into the st underneath
Row 9: Slip each st. ch1, turn
Row 10: sc over the top of each slip st into the st underneath
Fasten off
ch26
Round 1: sc in the 2nd chain st from hook, then sc in each other chain st to end. ch1, turn (25sc)
Round 2: sc in each st. ch1, turn
Round 3: sc2tog, sc10, sc2tog, sc9, sc2tog. ch1, turn (22sc)
Round 4: sc20, ch1, skip1, sc in the last st. ch1, turn (22sts including the first chain st (but not the 2nd))
Round 5: sc in the first st, sc in the hole made by the chain st, sc20. ch1, turn
Fasten off
Sew to the ends of the sleeves so that the edges of the cuff overlap slightly (as shown below)


You then need to attach all the buttons and snap fasteners to the shirt. Sew four snap fasteners to the front edges of the shirt to secure it, sewing the first one about 1/5 of the way from the bottom of the shirt, and the rest at equal intervals from then onwards. Sew four buttons to the front of the shirt just in front of where you attached the upper snap fastener. Sew a final button to the other side of the shirt to give the impression that the top button is undone, as shown below:


Sew the other two buttons to the cuffs of the shirt. You may need to sew them a little way in from the edge of the cuff so that they do up tightly around the wrists.


For the shoes (Make 2):
With a 2mm hook and brown 4ply yarn ch7
Round 1: sc in the 2nd st from hook, then sc in the next 4 chain sts. Make 3sc in the last chain st (the first one you made), then sc in the backs of each of the chain sts you had previously crocheted into in turn. Make 2sc in the back of the first chain st you crocheted into (14sc)
Round 2: make 2sc in the first st, sc4, make 2sc into each of the following 3sts, sc4, make 2sc into the last 2sts (20sc)
Round 3: sc, 2sc in the next st, sc, slip2, sc, (sc, 2sc in the following st) 3 times, sc, slip2, sc, (sc, 2sc in the following st) twice (26sts)
Fasten off neatly
rejoin yarn to the loop behind the back loop of the 3rd st after the 'new' st you made when fastening off neatly.
Round 4: sc in the loop behind the back loop of this st and the next 25sts around
Round 5: sc20, slip3, sc3 (26sts)
Round 6: sc18, slip8
Round 7: slip1, sc, slip2, sc9, slip2, sc2
Fasten off
Rejoin yarn to the 4th st from where you fastened off

Row 8: Sc in this st and the next 2sts. ch1, turn
Row 9: sc in each of these 3sts. ch1, turn
Row 10: 2sc in the first st, sc, 2sc in the last st. ch1, turn (5sc)
Row 11: 2sc in the first st, sc3, 2sc in the last st. ch1, turn (7sc)
Rows 12 - 13: (2 rows) sc in each st
Row 14: slip1, sc, hdc3, sc, slip the last st
Fasten off
Rejoin yarn to row 7 to the 4th st from this last section you made.

Row 8: Sc in this st and the next 2sts, slip3, sc6, slip3, sc, make 2sc in the last st.
Fasten off
rejoin to the start of this section you just made (as shown below)

Row 9: make 2sc in this first st, sc the next st, hdc, ch1, slip3, sc6, slip3, ch1, hdc, sc, then make 2sc in the last st (22sts including the chain sts)
Fasten off
rejoin to the start of this section
Row 10: sc in this first st and the next 2sts. hdc in the following st, ch2, slip the chain st from the previous round, then slip the next 4sts. sc4, slip4, slip the next chain st, ch2, hdc, sc3.
Fasten off


For the soles (make 2):
With black ch7
Round 1: sc in the 2nd st from hook, then sc in the next 4 chain sts. Make 3sc in the last chain st (the first one you made), then sc in the backs of each of the chain sts you had previously crocheted into in turn. Make 2sc in the back of the first chain st you crocheted into (14sc)
Round 2: make 2sc in the first st, sc4, make 2sc into each of the following 3sts, sc4, make 2sc into the last 2sts (20sc)
Round 3: sc, 2sc in the next st, sc4, (sc, 2sc in the following st) 3 times, sc4, (sc, 2sc in the next st) twice (26sts)
Round 4: sc in each st
Round 5: sc, sc2tog, sc5, ch4, skip7, sc5, (sc, sc2tog) twice (20sts including the chain sts)
Round 6: sc2tog, sc3, sc3tog between the next 2sts and following chain st, sc in the next 2 chain sts, sc3tog between the next chain st and the following 2sts, sc3, sc2tog twice (13sc)
Round 7: sc2tog, sc, sc3tog, sc, sc3tog, sc2, sc3tog (6sc)
Fasten off
rejoin yarn to round 4 to the same st you crocheted in on the last st before the chain 4 on round 5

Round 5: sc in this st and the next 7sts around, then sc in the same st as the first st you crocheted into after the chain 4 of round 5.
sc in the backs of these chain 4sts (13sc)
Round 6: sc in each of these 13sts

stuff the heel of the sole
Round 7: sc, sc2tog 3 times, sc6 (10sc)
Round 8: (this is less than 1 full round) sc3tog
Fasten off
Sew this sole to the bottom of the shoe
Use black 4ply yarn to thread the laces and do up the shoes tightly with a bow.


For the braces:
For the fastenings to the trousers (make 3):
with black 4ply yarn and a 2mm hook ch2
Row 1: sc in the 2nd chain st from hook. ch1, turn (1sc)
Rows 2 - 5:(4 rows) sc in this st. ch1, turn
Row 6: sc in this st
Fasten off
For the front of the braces (make 2):
with black 4ply yarn and a 2mm hook ch3
Row 1: sc in the 2nd chain st from hook, then sc in the following chain st. ch1, turn (2sc)
Row 2: sc in each of these 2 sts. ch1, turn
Fasten off
Fasten on to this section with cream yarn.
Row 3: sc in this st and the next st, turn
Rows 4 - 49: (the 2 rows given here are repeated 23 times) slip2. ch1, turn, then sc over the top of each of these slip sts into the sts underneath, as you did previously for the shirt collar. turn
Fasten off


With black 4ply yarn rejoin to one of these sections
Row 50: sc in this st and the next st of this section, then sc in both sts of the other section you made. ch1, turn


Row 52: sc, sc2tog, sc. ch1, turn (3sc)
Row 53: sc2tog, sc (2sc)
Fasten off
rejoin with cream 4ply yarn.
Row 54: sc in this st and the next st. turn


Fasten off
Fasten on to this st with black 4ply yarn
Row 68: sc in this st and the next st. ch1, turn
Row 69: sc in each of these 2sts
Fasten off

Fold the fastenings for the braces in half and sew the ends of them to the trousers, sewing one to the middle back of the trousers and the other two to the edges of the fronts of the braces. After you've done this, sew the ends of the braces to the middle of these fastenings, making sure they aren't twisted as you do so.


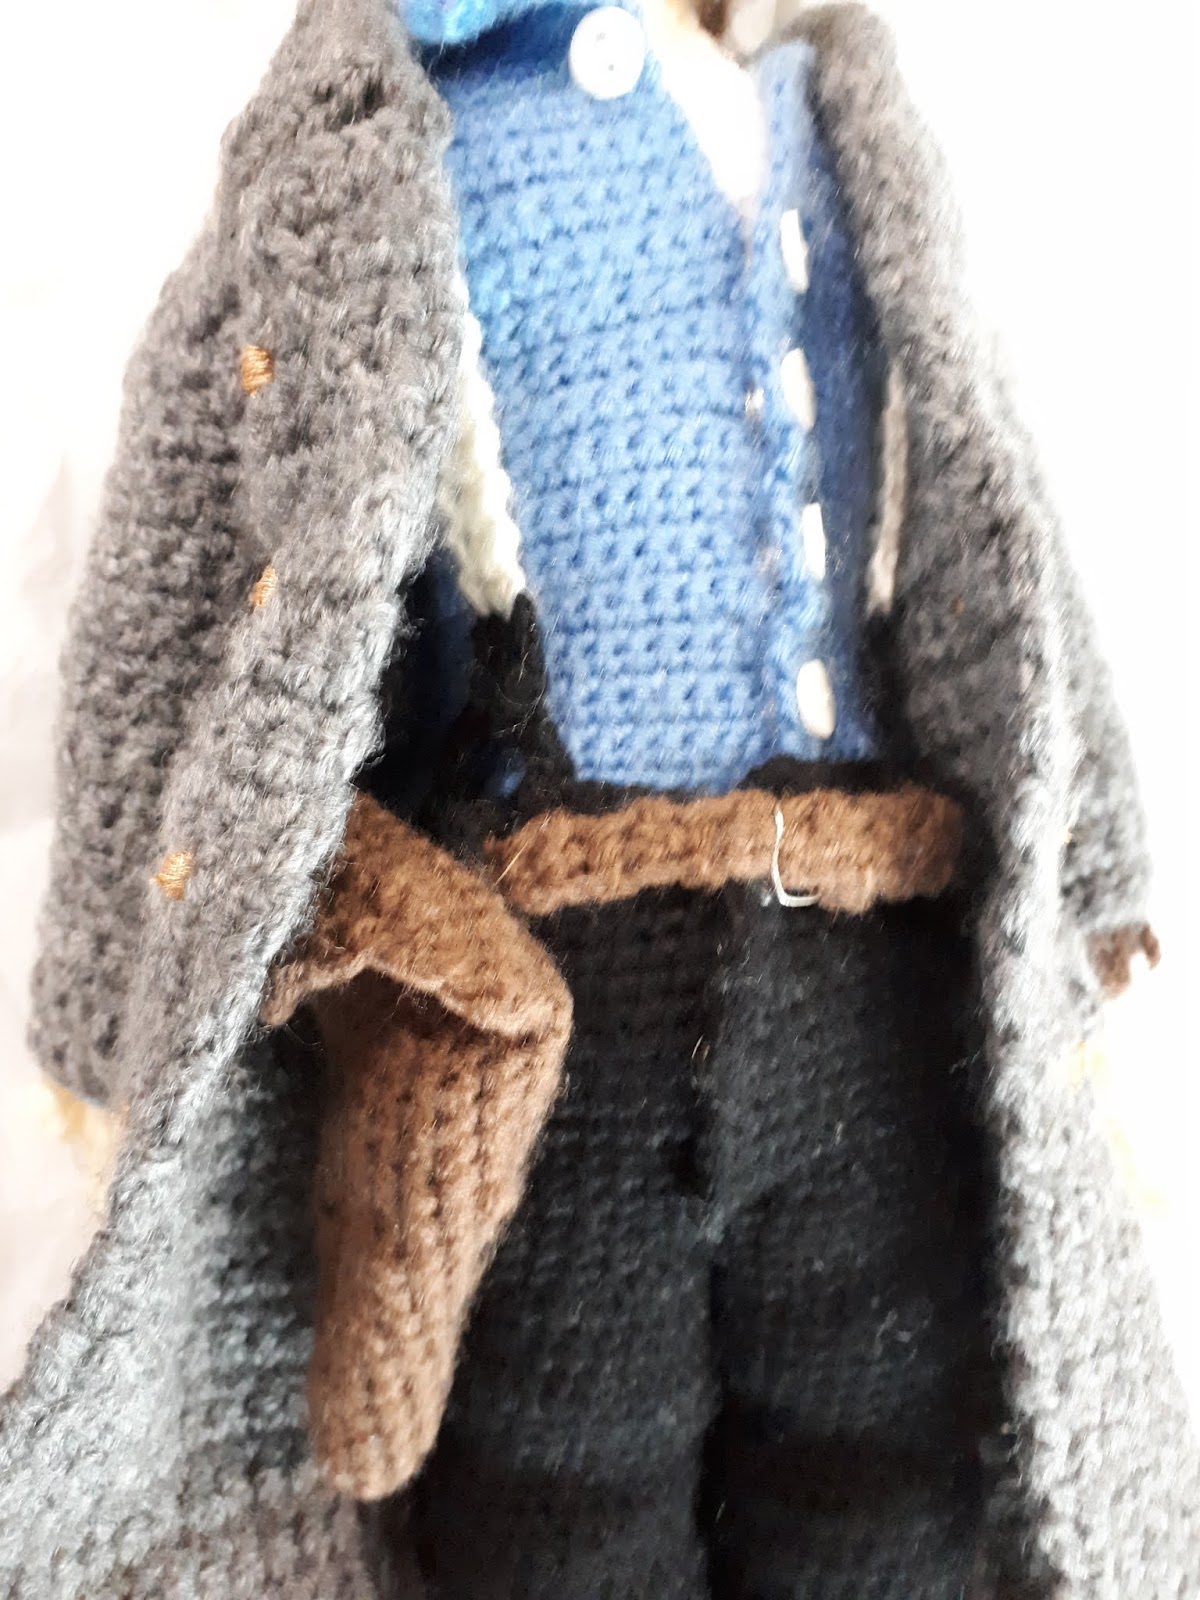
For the coat:
Use dark grey dk yarn and a 2.5mm hook unless otherwise specified
You may find it useful to refer to the following image when adding details to the coat.
 Ch46
Ch46Row 1: sc in the 2nd chain st from hook. sc in every following chain st to end. ch1, turn (45sc)
Rows 2 - 42: (41 rows) Sc in each st. ch1, turn
Row 43: 2sc in the first st, sc43, 2sc in the last st. ch1, turn (47sc)
Row 44: Sc in each st. ch1, turn
Row 45: 2sc in the first st, sc45, 2sc in the last st. ch1, turn
Row 46: Sc12, sc2tog. ch1, turn (13sc)
Row 47: Sc in each of these 13 sts. ch1, turn
Row 48: 2sc in the first st, sc12. ch1, turn (14sc)
Row 49: sc in each of these 14 sts. turn
Row 50: Slip4, sc10. ch1, turn
Row 51: 2sc in the first st, sc9, ch5
Row 52: Sc in the 2nd chain st from hook, then sc in the next 3 chain sts, sc11. ch1, turn (15sc)
Row 53: 2sc in the first st, sc12, sc2tog (15sc)
Fasten off
Rejoin yarn to row 45 to the 22nd st from this section you just made

Row 46: Sc2tog between this st and the next, sc12 (13sc)
Row 47: Sc in each of these 13 sts. ch1, turn
Row 48: Sc12, 2sc in the last st. ch1, turn (14sc)
Row 49: Sc in each of these 14 sts. ch1, turn
Row 50: Sc in the first 10 sts. ch1, turn
Row 51: Sc9, 2sc in the last st. ch1, turn (11sc)
Row 52: Sc11, fsc4. ch1, turn
Row 53: Sc2tog, sc12, 2sc in the last st (15sc)
Fasten off
Rejoin yarn to row 45 to the 3rd st from the first section you made

Row 46: Sc in this st and the next 16sts. ch1, turn (17sc)
Row 47: Sc7, sc2tog, sc8. ch1, turn (16sc)
Rows 48 - 50:(3 rows) Sc in each of these 16sts. ch1, turn
Row 51: 2sc in the first st, sc14, 2sc in the last st. ch1, turn (18sc)
Row 52: sc in each of these 18 sts. ch1, turn
Row 53: 2sc in the first st, sc16, 2sc in the last st. ch1, turn (20sc)
Row 54: 2sc in the first st, sc, hdc2, ch1, sc12, ch1, hdc2, sc, 2sc in the last st. turn (24sts including the chain sts)
Row 55: Slip5, hdc, ch1, sc12, ch1, hdc, slip5
Fasten off
Rejoin yarn to the end of the first section you made

Row 54: Sc2tog between this st and the next st, sc in the next 8sts, skip the first 6sts of the next section (image 1), then sc in the following 14 sts of this section. Sc in the 7th st on the next section (image 2) and sc in the next 7sts, sc2tog (31sts)

 Row 55: Sc2tog, sc27, sc2tog (29sts)
Row 56: Sc2tog, sc25, sc2tog (27sts)
Row 57: Sc2tog, sc23, sc2tog (25sts)
Row 58: Sc2tog, sc21, sc2tog (23sts)
Row 59: Sc2tog, sc19, sc2tog (21sts)
Row 60: Sc2tog, sc17, sc2tog (19sts)
Fasten off

Row 46: Sc in this st and the next 16sts. ch1, turn (17sc)
Row 47: Sc7, sc2tog, sc8. ch1, turn (16sc)
Rows 48 - 50:(3 rows) Sc in each of these 16sts. ch1, turn
Row 51: 2sc in the first st, sc14, 2sc in the last st. ch1, turn (18sc)
Row 52: sc in each of these 18 sts. ch1, turn
Row 53: 2sc in the first st, sc16, 2sc in the last st. ch1, turn (20sc)
Row 54: 2sc in the first st, sc, hdc2, ch1, sc12, ch1, hdc2, sc, 2sc in the last st. turn (24sts including the chain sts)
Row 55: Slip5, hdc, ch1, sc12, ch1, hdc, slip5
Fasten off
Rejoin yarn to the end of the first section you made

Row 54: Sc2tog between this st and the next st, sc in the next 8sts, skip the first 6sts of the next section (image 1), then sc in the following 14 sts of this section. Sc in the 7th st on the next section (image 2) and sc in the next 7sts, sc2tog (31sts)


Row 56: Sc2tog, sc25, sc2tog (27sts)
Row 57: Sc2tog, sc23, sc2tog (25sts)
Row 58: Sc2tog, sc21, sc2tog (23sts)
Row 59: Sc2tog, sc19, sc2tog (21sts)
Row 60: Sc2tog, sc17, sc2tog (19sts)
Fasten off
sew the shoulder seams together
For the sleeves (make 2):
ch16
Round 1: sc in the first chain st you made, then sc in every following chain st to make a loop (16sc)
Rounds 2 - 11: (10 rounds) slip1, ch1, turn, sc16
Round 12: slip1, ch1, turn, 2sc in the slip st st, sc7, 2sc in the next st, sc7
Rounds 13 - 19: (7 rounds) slip1, ch1, turn, sc18
Round 20: slip1, ch1, turn, skip the slip st, slip1, sc14, ch1, turn
Row 21: sc2tog, sc10, sc2tog. ch1, turn (12sc)
Row 22: sc2tog, sc8, sc2tog. ch1, turn (10sc)
Row 23: sc2tog, sc6, sc2tog. ch1, turn (8sc)
Row 24: sc2tog, sc4, sc2tog. ch1, turn (6sc)
Row 25: sc2tog, sc2, sc2tog. ch1, turn(4sc)
Fasten off
Sew these sleeves to the armholes of the coat
For the pockets (make 2):
ch7
Row 1: sc in the 2nd chain st from hook, then sc in each of the following 5 chain sts. ch1, turn (6sc)
Row 2: sc in each st. ch1, turn
Row 3: sc in each st
Fasten off
Sew these pockets to the sides of the coat, as shown below.

For the belt:
ch3
Row 1: sc in the 2nd cahin st from hook, then sc in teh following chain st. ch1, turn (2sc)
Rows 2 - 45: (44 rows) sc in each st. ch1, turn
Row 46: sc2tog
Fasten off

For the belt buckle:
Get a reasonable long piece of wire and use pliers to shape it into a sort of square figure-of-eight shape, before folding the ends of the wire around the rest of the structure to keep it in place, as shown below:

Make sure that the holes in the shape are large enough that you can fit the belt through them twice and still have a little room left over (i.e. if you fold the belt in half you should be able to fit it through very easily).
After you have done this, wind golden embroidery thread around the whole of the outside of this buckle, as shown below.

Thread the 'cast on' edge (i.e. the straighter end) of the belt through each of these holes so that it loops back on itself around the middle segment. Sew this end to the rest of the belt a little way down (as shown below).


For the belt loops (make 2):
ch4
Fasten off
Sew these belt loops to the sides of the coat.

Once you've done this loop the free end of the belt through the belt loops and then through the buckle so that it is held in place as shown below.

For the shoulder pads (make 2):
ch3
Row 1: sc in the 2nd chain st from hook, then sc in the next chain st. ch1, turn (2sc)
ch3
Row 1: sc in the 2nd chain st from hook, then sc in the next chain st. ch1, turn (2sc)
Rows 2 - 4: (3 rows) sc in each of these 2 sts. ch1, turn
Row 5: sc2tog
Fasten off
Sew these to the shoulders so that the 'cat on' edge is roughly in line with the shoulder seams and the end is pointing inwards towards the collar.
After you've done this use light grey 4ply yarn to embroider 4 stripes onto these pads (these can be seen in the 2nd image below (also showing the positioning of the brass buttons)
For the brass buttons:
Use gold embroidery thread to embroider the buttons onto the coat. You will need to sew 5 buttons up each side of the coat, and then another one on the shoulder pads on the end nearest the collar.


Use a 1.1mm hook throughout
With dark brown embroidery thread ch5
Row 1: sc in the 2nd chain st from hook, then sc in each of the next 3 chain sts to end. ch1, turn (4sc)
Rows 1 - 14: (13 rows) sc in each of these 4 sts. ch1, turn#
Row 15: sc in each st
Fasten off
For the strap:
With dark brown embroidery thread ch21
Fasten off
For the buckle:
Get a section of wire and shape it into a square figure-of-eight shape, as you did before and as shown below. Make sure that each of the holes are wide enough that the strap you just made can easily fit through them (but small enough that there's not too much wiggle-room for them).


Sew one of the ends of the strap to the centre of this buckle, as shown below. After you've done this, trim any extra wire on the buckle.


For the lower flap:
With dark brown embroidery thread ch5
Row 1: sc in the 2nd chain st from hook, then sc in each of the next 3 chain sts to end. ch1, turn (4sc)
Rows 2 - 3: (2 rows) sc in each st. ch1, turn
Row 4: sc in each st
Fasten off
with silver embroidery thread ch3
Row 1: sc in the 2nd chain st from hook, then sc in the next chain st (2sc)
fasten off
Sew this section to the lower flap.
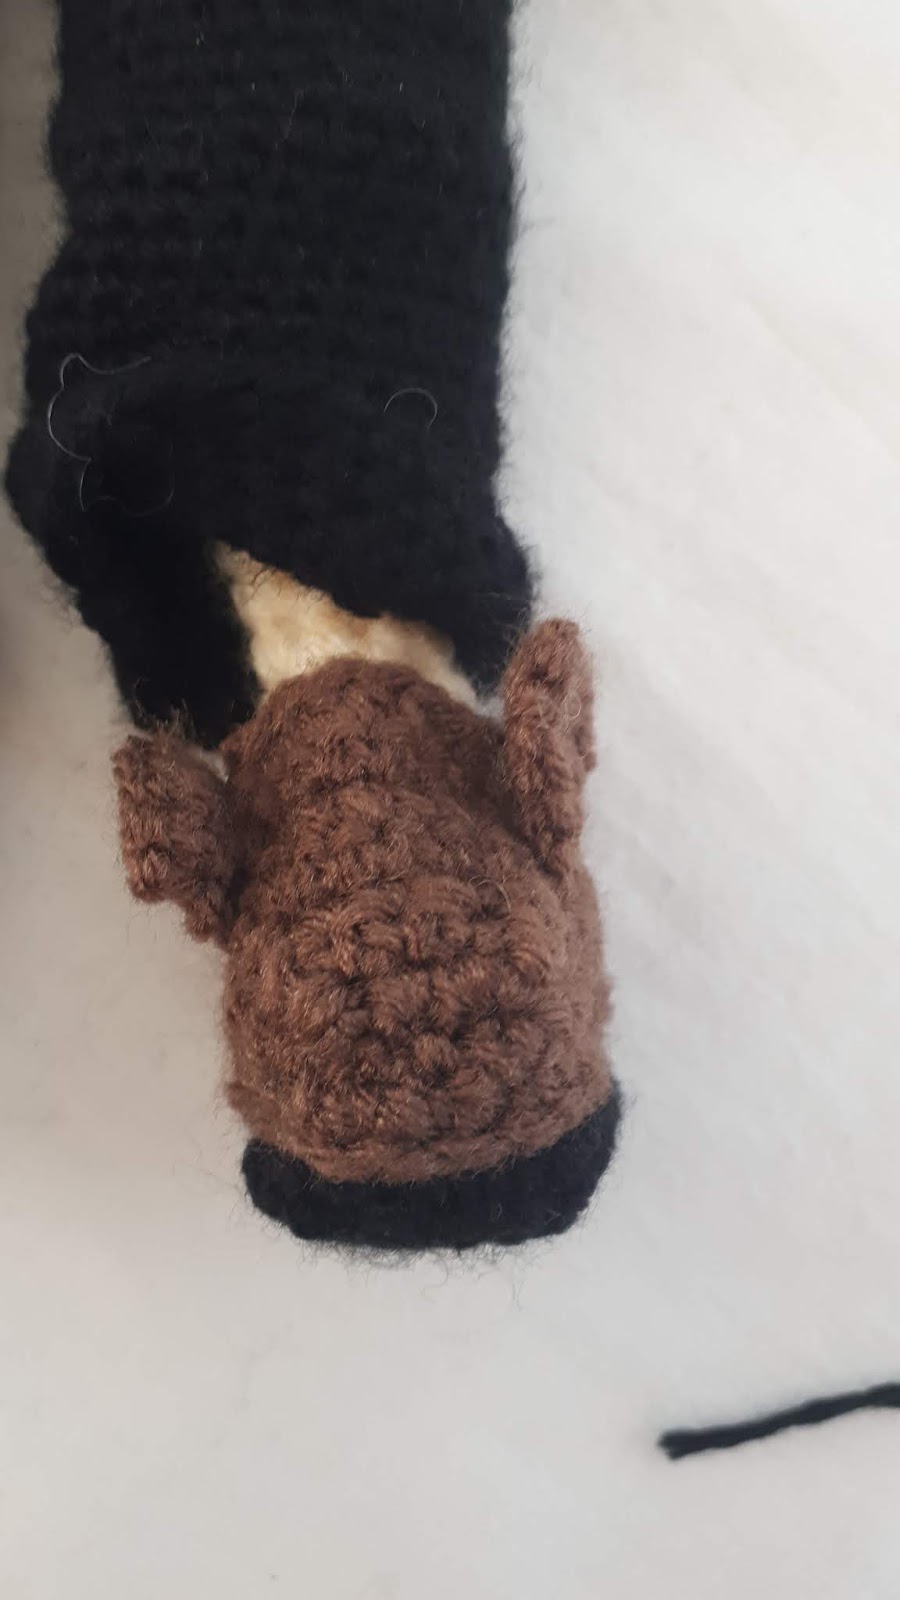
You may then want to add detail to the face of the vortex manipulator using embroidery. Refer to the reference images below as you do this. I used dark brown embroidery thread to sew a strip across the silver section, then added a small green circle to act as a screen, along with a purple button on top of the brown strip. I then added further detail using black embroidery thread.


Sew this flap to the main section of the vortex manipulator over the top of the strap so that it hangs out each end freely (as shown below)


With dark brown embroidery thread ch5
Row 1: sc in the 2nd chain st from hook, then sc in each of the next 3 chain sts to end. ch1, turn (4sc)
Rows 2 - 4: (3 rows) sc in each st. ch1, turn
Row 5: sc in each st
Fasten off
with cream embroidery thread ch4
Round 1: sc into the 2nd chain st from hook, then sc in the next chain st. Make 2sc into the following chain st (the first one you made, then sc into the back of the previous chain st you crocheted into. Finally, make 2sc into the back of the first chain st you crocheted into. (8sc)
fasten off
Sew this to the upper flap, then sew the edge of the upper flap to the edge of the lower flap.


Attach the vortex manipulator to the wrist by threading the free end of the strap through the buckle. This can be fiddly - it may help to use a needle or pin and try to hook it through the loose end of the strap to pull it through.


For the gun:
With a 1.1mm hook and black embroidery thread make a magic loop with 6sc
Round 1: make 3sc in the first st, sc5 (8sc)
Round 2: sc in each st
Round 3: sc3tog, sc5 (6sc)
Round 4: sc2tog, sc4 (5sc)
Rounds 5 - 8: (4 rounds) sc in each st
Round 9: sc4, 3sc in the last st (8sc)
Round 10: sc5, 3sc in the following st, sc in the last st (11sc)
Round 11: sc2, 2sc in the next st, sc3, 3sc in the following st, sc2 (14sc)
Rounds 12 - 16: (5 rounds) sc in each st
After this round you will need to insert some wire into the body of the gun to keep it stiff. Start by using pliers to fold the end of the wire over to prevent any sharp ends.

Insert this end into the barrel of the gun, then fold the other end round into a shape that ould fit around the rest of the gun, before inserting it and continuing with the rest of the gun.


Round 17: sc2, sc5tog, sc, sc4tog
Fasten off
For the handle:
Using the same crochet hook and black embroidery thread make a magic loop with 6sc
Round 1: sc in the first st, make 2sc in the next st, rep to end (9sc)
Rounds 2 - 6: (5 rounds) sc in each st
Fasten off
Use pliers to fold over one end of the wire to make it blunter, then fold the wire into 3 sides of a rectangle that will fit into the barrel of the gun, as shown below. Use the free end to shape into a trigger section, then fit the rectangle section of the wire into the gun hangle.


Sew the handle to the rest of the gun, then thread the other end of the trigger section through a stitch in the gun, before folding down this end and trimming it. After this wind the end of the wire around the handle section to cover over the wire.


For the barrel section (make 2):
With dark grey embroidery thread make a magic loop with 6sc
With dark grey embroidery thread make a magic loop with 6sc
Round 1 - 2: (2 rounds) sc in each st
Fasten off
Sew these to either side of the gun

For the gun holder:
Gun holder
With a 2mm hook and brown 4ply yarn, make a magic loop with 6sc
Round 1: (sc in the first 2 sts, then make 2sc in the next st) twice (8sc)
Round 2: (sc in the first 3 sts, then make 2sc in the next st) twice (10sc)
Rounds 3 - 4: (2 rounds) sc in each st
Round 5: (sc in the first 4 sts, then make 2sc in the next st) twice (12sc)
Rounds 6 - 8: (3 rounds) sc in each st
Round 9: (sc in the first 5 sts, then make 2sc in the next st) twice (14sc)
Round 9: (sc in the first 5 sts, then make 2sc in the next st) twice (14sc)
Rounds 10 - 12: (3 rounds) sc in each st
Round 13: (sc in the first 6 sts, then make 2sc in the next st) twice (16sc)
Round 13: (sc in the first 6 sts, then make 2sc in the next st) twice (16sc)
Round 14: sc in each st
Round 15: Sc14, ch4, sc in the 2nd chain st from hook and the next 2 chain sts, then sc2 along the main section
Round 15: Sc14, sc in the backs of the first 2 chain sts you made, then make 2sc in the back of the following chain st. Make 2sc in the next st, then sc4 (24sc)
Round 16: Sc16, 2sc in each of the next 2 sts, sc6 (26sc)
Rounds 17 - 19: (3 rounds) sc in each st
Fasten off
Rejoin yarn to the edge of the gun holder
Row 20: Sc12 along one side of the holder. ch1, turn
 |
| please ignore the background - I was doing this standing up on a train (it's a long story) |
Rows 21 - 22: (2 rows) sc in each of these 12 sts. ch1, turn
Row 23: Sc8, sv2tog twice (10sc)
Row 24: Sc2tog twice, sc6 (8sc)
Row 25: Sc4, sc2tog twice (6sc)
Row 26: Sc2tog twice, sc2 (4sc)
Row 27: Sc2tog twice (2sc)
Row 28: sc2tog
Fasten off

Sew this holder to the belt and then place the gun in it.

And that's it! Thank you for using this pattern - I hope you enjoyed it! If you have any queries please do get in contact with me, either by leaving a comment below or via my Ravelry or Instagram pages.
Please don't re-post this pattern or claim it as your own, and whilst I personally don't have an issue with selling finished products, the character of Captain Jack Harkness is copyrighted by the BBC, so they may have an issue with you selling related products. However, if you are looking for something to make to then sell, I have many other patterns for which you are more than welcome to sell finished products.


This is breathtaking! Well done!
ReplyDelete