


I have decided to re-jig how I write my patterns to (hopefully) make them easier to read. I am assuming that most people reading this pattern will be reasonably experienced with pattern reading, but this should make sense even if you are not. If you are confused by any parts of this pattern please leave a comment below and I will try to clarify things for you :)
Difficulty:

Medium - difficult
You will need:
- dk yarn in peach (or a suitable skin colour), dark brown, and purple
- 4ply yarn in black and white
- Embroidery thread in white, black, green, turquoise, dark pink, red and cream
- 4 white 8mm buttons
- 9 black 9mm buttons
- 10 black 4mm pearl beads
- Toy stuffing
- A darning needle (or similar)
- An embroidery needle
- A regular sewing needle (preferably long and thin)
- Black card
- Sellotape
- dark brown sewing thread
- A very small section of black cotton/ polyester fabric (by very small I mean 2.5 x 3cm)
- Fray check glue (optional)
- PVA glue
- Two thin knitting needles
- A saucepan and kettle
- A pet brush
Note:
- To make my patterns easier to read, in most cases instead f writing'sc in the next ... sts' I have just written 'sc...' Eg. 'sc12' means 'sc in the next 12 sts'
- 'fasten off neatly' refers to a special way of fastening off which is neater and makes it easier to see where you should be crocheting on the next round (also known as invisible fastening off). This involves pulling up your yarn through your stitch, threading the yarn underneath the second stitch from where you pulled your yarn up, then threading your yarn back through the top of this stitch and down through the back of the work. There is a very helpful site that explains it clearly found here. Just make sure when you do this that you thread your needle through the SECOND stitch after the last stitch you made, otherwise you will end up with an extra stitch which may mean that all of the following rounds are out of line with each other.
- This pattern includes the back-to-front single crochet stitch (bfsc). A video to show you how to do this can be found here. It's pretty simple but if you can't work it out you can just use a regular single crochet stitch, but this will give it a slightly different look.
For every part of the body, unless specifies, use a 2.5mm hook and peach dk yarn
For the legs (make 2):
ch5
Round 1: sc in the 2nd st from hook, sc in the next 2 chain sts, 3sc in the last chan st, sc in the back of the previous two chain sts you crocheted into, 2sc in the back of the first chain st you crocheted into (10sc)
Round 2: 2sc in the first st, sc in the next 2sts, 2sc in each of the next 3 sts, sc in the following 2sts, 2sc in each of the next 2 sts (16sc)
Round 3: (this is slightly less than one round) sc in the first 5sts, sc5tog, sc in the next 6sts (12sc)
Round 4: sc3, sc5tog, sc3 (8sc)
Round 5: sc2tog, sc in the next 6sc (7sc)
Round 6: (this is slightly less than 1 round) sc in the first 6sts
Round 7: sc in the first 2sts, 2sc in the next st, sc in the next 3sts, 2sc in the next st (9sc)
Round 8: sc in each st
Round 9: sc in the first 2sts, 2sc in the next st, sc in the last 6sts (10sc)
Round 10: sc in the first 2sts, 2sc in the next st, sc in the last 7sts (11sc)
Round 11: sc in the first 3sts, 2sc in each of the next 2 sts, sc in the last 6sts (13sc)
Round 12: sc in the first 4sts, sc2tog, sc in the last 7sts (12sc)
Round 13: sc in the first 4sts, sc2tog, sc in the last 6sts (11sc)
Round 14:(this is slightly more than 1 round) sc in the first 4sts, sc3tog, sc in the last 3sts (9sc)
Round 15: sc in the first 4sts, sc2tog, sc in the next 3sts, 3sc in the last st (10sc)
Round 16: (this is slightly more than 1 round) sc in the first 8sts, sc3tog (8sc)
Round 17: sc in the first 3sts, 2sc in the next st, sc in the following 3sts, 2sc in the last st (10sc)
Round 18: sc in the first 3sts, 2sc in the next st, sc in the following 5sts, 2sc in the next st, sc in the last 2sts (12sc)
Round 19: sc in each st
Round 20: sc in the first 9sts, 2sc in the next st, sc in the last 2sts (13sc)
Round 21: sc in each st (13sc)
Round 22: sc in the first 10sts, 2sc in the next st, sc in the last 2sts (14sc)
Round 23: sc in each st
Round 24: sc11, 2sc in the next st, sc4 (15sc)
Round 25: (this is less than one round)sc, 2sc in the next st, sc4.
Round 25: (this is less than one round)sc, 2sc in the next st, sc4.
Fasten off neatly
Stuff the legs
Stuff the legs
For the arms (make 2):
Make a magic loop with 6sc
Round 1: sc in the first st, 2sc in the next st, rep to end (9sc)
Round 2: sc in each st
Round 3: sc in the first st, sc2tog, rep to end (6sc)
Rounds 4 - 6: (3 rounds) sc in each st
Round 7: 2sc in the first st, sc5 (7sc)
Place a stitch marker in between the two stitches you made in the first st
Rounds 8 - 9: (2 rounds) sc in each st
Round 10: sc3, 2sc in each of the next 2sts, sc2(9sc)
Round 11: sc4, sc2tog, sc2tog, 2sc (8sc)
Place a stitch marker in between the two stitches you made in the same stitch.
Round 12 - 16: (5 rounds) sc in each st
Round 17: sc4, 2sc in the next st, sc3 (9sc)
Fasten off neatly
Don't stuff yet
Press the arm and hand flat so that the stitch markers are on the edges

For the thumb:
Note: When you make the second hand make sure that it the reverse of the first hand (the thumb should be on different sides of the elbow)
Insert your hook through the post of one of the stitches in between rounds 2 and 3 (as shown below)(Note: the magic loop you made isn't counted when numbering the rows in the pattern above, so looking at your hand from the end your hook should be inserted between the 3rd and 4th circle).
Pull your yarn through, ch1, then make 2sc into where you first inserted your hook.
Ch1, then sc2tog through the 2 sts you just made.
Fasten off


Again make sure that when you make the thumb on the second hand it is on the opposite side of the hand to the first one you made, with respect to the elbow (the 2sc x2 and sc2tog x2 you did on rows 10 and 11)
For the fingers:
insert your hook through the post of the stitch between the magic loop and round 1 directly above where you made the thumb (as shown below)
pull the yarn through, ch1, then sc into where you inserted your hook. ch1, sc in this st you just made, ch1, sc in this next st you made.
Fasten off

Insert your hook into the spoke between the magic loop and the first row on the other edge of the hand (as shown below)
Pull yarn through, ch1, sc in where you inserted your hook, ch1, sc in this st you just made. Fasten off

You now need to make 2 more fingers in the same way as you made the first one, in between the two fingers you have already made. It doesn't particularly matter where you insert your hook for each st, as long as they end up both being in between the two existing stitches. This will mean you end up with a hand looking similar to the one below (Once you've sewn in the loose ends).
 |
After you have made the arms mark with either a scrap of yarn or a stitch marker the stitch on each arm directly above the thumb.


Stuff the arms gently, making sure not to over-stuff them

For the nails:
With two strands of red embroidery thread sew painted nails onto each finger

For the body:
Round 1: rejoin yarn to the stitch before the new stitch you made when fastening off neatly on one of the leg sections, sc in this same st, sc7, sc in the second stitch after the new stitch you made when fastening off neatly on the other leg, sc13, skip 2 on the other leg, then sc in the following 5sts on that leg. (28sc)
Round 2: Sc17, 2sc in each of the next 2sts, sc5, 2sc in each of the next 2sts, sc2 (32sc)
Round 3: Sc19, 2sc in the next st, sc8, 2sc in the next st, sc3 (34sc)
Round 4: sc in each st
Round 5: Sc20, sc2tog, sc8, sc2tog, sc2 (32sc)
Round 6: Sc19, sc2tog twice, sc5, sc2tog twice (28sc)
Round 7: Sc22, sc3tog, sc3 (26sc)
Round 8: Sc, sc2tog twice, sc9, sc2tog twice, sc8 (22sc)
Round 9: Sc3tog, sc9, sc3tog, sc7 (18sc)
Round 10: sc in each st
Round 11: Sc, 2sc in the next st, sc8, 2sc in the next st, sc7 (20sc)
Round 12: Sc2, 2sc in the next st, sc8, 2sc in the next st, sc8 (22sc)
Round 13: sc in each st
Round 14: Sc2, 2sc, sc10, 2sc, sc8 (24sc)
Rounds 15 - 16: (2 rounds) Sc in each st
Round 17: Sc3, 2sc, sc11, 2sc, sc8 (26sc)
Round 18: sc in each st
Fasten off neatly
Stuff this section of the body firmly and sew up the gap in the crotch.
For the shoulders:
Continue stuffing this section as you are making it
Round 19: rejoin yarn to the 4th st before the new stitch you made when fastening off neatly on the body. Sc in this st, then sc6. Sc in the 4th st before the stitch marker on the left arm (the one where the thumb is facing forward when the elbow is on the outside when attaching it at this point (as shown below)), sc6 around this arm, skip two from where you last crocheted into on the body section, then sc12 around the body. Sc in the other arm in the second stitch before where the stitch marker is, then sc6 around this arm. Skip 2 on the body, then sc3 (36sc)

Rounds 20 - 21: (2 rounds) sc in each st
Round 22: sc10, sc2tog, sc17, sc2tog, sc5 (34sc)
Round 23: sc7, sc2tog, sc3tog, sc2tog, sc11, sc2tog, sc3tog, sc2tog (26sc)
Round 24: sc7, sc2tog, sc3tog, sc2tog, sc7, sc2tog, sc3tog (19sc)
Round 25: (this is a little more than one round) sc2tog, sc4, sc5tog, sc5, sc5tog (10sc)
Rounds 26 - 27: (2 rounds) sc in each st
Row 28: sc5, slip1. ch1, turn
Row 29: skip the slipped stitch, sc4, slip1. ch1, turn
Row 30: skip the first slip stitch, slip1, sc2, slip1
Fasten off
Add any extra stuffing if needed, then sew up the holes under the armpits
For the head (from the bottom up):
ch3
Round 1: sc in the 2nd loop from hook, 3sc in the neck chain st (the first one you made), then make 2sc into the back of the previous chain st you crocheted into (6sc)
Round 2: 2sc in each st (12sc)
Round 3: sc in each st
Round 4: (sc, 2sc in the next st) 3 times, sc6 (15sc)
Round 5: (sc2, 2sc in the next st) 3 times, sc6 (18sc)
Round 6: (sc3, 2sc in the next st) 3 times, sc6 (21sc)
Round 7: (sc4, 2sc in the next st) 3 times, sc6 (24sc)
Rounds 8 - 14: (7 rounds) sc in each st
Round 15: sc2, sc2tog, rep to end (18sc)
Round 16: sc, sc2tog, rep to end (12sc)
Stuff the head firmly
Round 17: sc2tog 6 times to end (6sc)
Fasten off
Sew the head to the body. The flatter section should be at the front (the sc6 between rounds 4 - 7)

For the breasts (make 2):
Make a magic loop with 6sc
Round 1: 2sc in each st (12sc)
Round 2: sc in each st
Stuff these and sew them to the body (Alternatively you may want to add them after you've made the shirt if you tend to crochet in public places)
For the face:
Use the image below as a reference throughout:

For the nose:
Make a magic loop with 2sc. Ch1, turn
Round 1: 2sc in the first st, sc (3sc)
Round 2: sc, 2sc in the next st, sc (4sc)
Round 3: slip1, ch1, sc2tog
Fasten off
Sew this to the face, shaping it to look like Missy's nose as much as possible. You should fold it in so that the end stitch of row 2 are almost touching the sides of the sc2tog on row 3.


For the ears:
For the right ear:
With a 2mm hook ch3
Round 1: 3sc in the 2nd loop from hook, 2hdc in the next st, then sc in this same st
Fasten off
For the left ear:For the right ear:
With a 2mm hook ch3
Round 1: 3sc in the 2nd loop from hook, 2hdc in the next st, then sc in this same st
Fasten off
with a 2mm hook ch3
Round 1: sc in the 2nd loop from hook, 2hdc in this same st, then 3sc in the next st
Fasten off
Sew the ears onto the head
 |
| Your ears will be smaller than those shown above (I revised the pattern after I took this picture but it still shows where they should be positioned) |
 |
| This image may also help with the placement of the ears |
Add eye sockets to the head by making repeated stitches either side of the nose.
 |
Embroider the whites of the eyes using two strands of white embroidery thread.

Embroider the irises using two strands of turquoise embroidery thread, then outline them using one strand of forest-green embroidery thread.

Add pupils using two strands of black embroidery thread

Add highlights to the eyes using one strand of white embroidery thread.

Add eyelids using peach 4ply (or dk, if you can't find any matching 4ply) yarn. The lower lids should be done with small, tight stitches, and the top lids should be done with longer, looser stitches.

Add eyelashes to the top lid using one strand of black embroidery thread.

For the mouth:
sew the mouth to the face using 2 strands of dark pink embroidery thread I did the outline first and then filled it in. You may also want to add highlights using a strand of a lighter pink embroidery thread if you mouth looks a little two-dimensional.


Sew the eyebrows to the face using the dark brown sewing thread. Sew them using repeated small stitches. Make sure they aren't too prominent - it is easier to add to them later than to make them smaller.
 |
| This is an example of eyebrows that are too prominent (you will be seeing these quite a bit since I didn't re-do them until after I'd added all the hair) |
 |
| Another copy of the reference above to help you with the eyebrows |
 |
| Try to make your eyebrows resemble the ones above/ below |
 |
For the hair:
cut the cardboard into a strip approx 17cm wide, and wrap the yarn around it approx. 53 times. Cut it at both ends to give you approx.106 strands of dark brown yarn the same length as the cardboard
Attach these to a knitting needle 2 at a time by folding the bundle of two in half and looping the yarn around the needle, then threading the loose ends through the looped end. You may need to use two knitting needles to allow the strands to be spread out.
Use a pet brush to brush out the yarn until it is smooth. Start at the ends and gradually work your way up until you have brushed all of the tangles out. It will be very fluffy.

To make it straighter boil a kettle full of hot water and empty it into a saucepan so that it fills right up to the top. Place the knitting needles with the yarn wefts on into the boiling water, then take them out and leave them to dry.

After you've done this take a paintbrush and some glue and apply glue to the top 0.5 - 0.75cm of all of the strands. Apply it to both sides all the way around, trying to get it into the middle if possible. Leave the glue to dry.


Once the glue is dry cut the top of the strands just underneath where they are/ were attached to the knitting needles so that you have 53 individual strands.
Next, you need to sew these to the head. Start by attaching the strands to the head just in front of the ear. Attach the strands to the head by sewing them on using a sewing needle and brown thread, and sewing over the glued section of each strand. Sew them so that they face downwards and the glued section is showing, then fold the strands back up to cover the glue.


Work your way from in front of the ears round to the top of the head, adding hair in the same way. After this, add the hair behind the ears and around the head to the back.
 |
| You may want to pin sections of the hair in place after you have sewn them on to keep them out of the way (Just make sure you don't keep the pins there for any extended periods of time since they can cause permanent creases to appear in the head.) |
 |
| Add hair behind the ears in the same way as you did before. |
 |
| The hairline should skirt around the ears |
 |
| continue adding hair around the edge of the head, always making sure that the loose end is on the inside (the hair will be scraped up over the top of the head so will hide the glue-y ends) |

After you have attached all of the hair strands, you need to start styling the hair. First pull all of the hair up so that it sticks up from the top of the head. Pin some of the hair at the back of the head in this position. Using small almost invisible stitches with the brown thread, try to sew the bottom 1/2 of the hair at the back of the hair in this position. Only sew only very small sections of hair at a time to try to keep the stitching invisible. It doesn't particularly matter if the hair isn't all sewn in place, it just needs to be enough that it holds its place without the pins.


Next, take a small section of hair at the front of the head and curl it over on itself, as shown below. Sew it in place.


For the skirt:
with a 2mm hook and purple dk yarn ch24
Row 1: sc in the second loop from hook, sc22. ch1, turn (23sc)
Row 2: 2bfsc in the first st, bfsc21, 2bfsc in the last st (25sc)
Row 3: sc6, 2sc in the next st, sc11, 2sc in the following st, sc6 (27sc)
Row 4: bfsc8, 2bfsc in the next st, rep to end (30sc)
Row 5: sc9, 2sc in the next st, rep to end (33sc)
Round 6: sc in the first st of the last round, then sc in every following st to make a loop (as shown below) (33sc)

Round 7: sc in each st
Round 8: sc10, 2sc in the next st, rep to end (36sc)
Rounds 9 - 10: (2 rounds) sc in each st
Round 11: sc11, 2sc in the next st, rep to end (39sc)
Rounds 12 - 13: (2 rounds) sc in each st
Round 14: sc12, 2sc in the next st, rep to end (42sc)
Rounds 15 - 16: (2 rounds) sc in each st
Round 17: sc13, 2sc in the next st, rep to end (45sc)
Rounds 18 - 19: (2 rounds) sc in each st
Round 20: sc14, 2sc in the next st, rep to end (48sc)
Rounds 21 - 22: (2 rounds) sc in each st
Round 23: sc15, 2sc in the next st, rep to end (51sc)
Round 24: (2 rounds) sc in each st
Round 25: sc16, 2sc in the next st, rep to end (54sc)
Fasten off
Sew a black button to one side of the waistband of the skirt, then sew a small loop of thread to the other side to fasten it.

For the jacket:
For the first lower section:
With purple dk yarn and a 2.5mm hook ch20
Row 1: sc in the 2nd loop from hook, sc17, 2sc in the last st. ch1, turn (20sc)
Row 2: 2bfsc in the first st, bfsc19. ch1, turn (21sts)
Row 3: sc in each st. ch1, turn
Row 4: 2bfsc in the first st, bfsc20. ch1, turn (22sts)
Row 5: sc in each st. ch1, turn
Row 6: bfsc10, bfsc2tog, bfsc10. ch1, turn (21sts)
Row 7: sc9, sc2tog, sc10. ch1, turn (20sc)
Row 8: bfsc9, bfsc2tog, bfsc9. ch1, turn (19sc)
Row 9: sc8, sc2tog, sc9. ch1, turn (18sc)
Row 10: bfsc8, bfsc2tog, bfsc8. ch1, turn (17sc)
Row 11: sc7, sc2tog, sc8. ch1, turn (16sc)
Row 12 :bfsc7, bfsc2tog, bfsc7. ch1, turn (15sc)
Row 13: sc in each st
Fasten off
With black 4ply yarn and a 2mm hook attach the yarn to the left-hand corner of the cast-off edge of this section (looking at the right side). Sc around the curved edge of this section to the right-hand corner, crocheting in the holes between each of the rows. This should require around 45sts.
For the second lower section:
With purple dk yarn and a 2.5mm hook ch20
Row 1: 2sc in the 2nd loop from hook, sc18. ch1, turn (20sc)
Row 2: bfsc19, 2bfsc in the last st, . ch1, turn (21sts)
Row 3: sc in each st. ch1, turn
Row 4: bfsc20, 2bfsc in the last st, . ch1, turn (22sts)
Row 5: sc in each st. ch1, turn
Row 6: bfsc10, bfsc2tog, bfsc10. ch1, turn (21sts)
Row 7: sc10, sc2tog, sc9. ch1, turn (20sc)
Row 8: bfsc9, bfsc2tog, bfsc9. ch1, turn (19sts)
Row 9: sc9, sc2tog, sc8. ch1, turn (18sc)
Row 10: bfsc8, bfsc2tog, bfsc8. ch1, turn (17sts)
Row 11: sc8, sc2tog, sc7. ch1, turn (16sc)
Row 12 :bfsc7, bfsc2tog, bfsc7. ch1, turn (15sts)
Row 13: sc in each st
Fasten off

With black 4ply yarn and a 2mm hook attach the yarn to the right-hand corner of the cast-off edge of this section (looking at the right side). Sc around the curved edge of this section to the left-hand corner, crocheting in the holes between each of the rows as you did before.
swap to a 2mm hook
Row 14: sc15 across the cast-off edge the second upper section you made (starting at the edge that is curved at the bottom and crocheting along to the other edge that is straight all the way down), sc through the black edging of this section and the black edging of the other section simultaneously (the black edging at the top of the straight edges), then sc15 across the fasten-off edge of the first section you made. ch1, turn (31sc)


Row 15: bfsc in each st. ch1, turn
Row 16: ch1, skip1, sc30. ch1, turn

For the shirt:
With white 4ply yarn and a 2mm hook ch31
Row 1: sc in the 2nd loop from hook, sc29. ch1, turn (30sc)
Row 2: bfsc30. ch1, turn
Row 3: sc30. ch1, turn
Row 4: bfsc30. ch1, turn
Row 5: ch1, skip1, sc29. ch1, turn
Row 6: bfsc28, skip1, 2bfsc in the hole made by the ch1, ch1, turn
Row 7: sc8, 2sc in the next st, sc12, 2sc in the following st, sc8. ch1, turn (32sc)
Row 8: bfsc8, 2bfsc in the next st, bfsc14, 2bfsc in the following st, bfsc8. ch1, turn (34sts)
Row 9: ch1, skip1, sc8, 2sc in the next st, sc14, 2sc in the following st, sc9. ch1, turn (36sc)
Row 10: bfsc9, 2bfsc in the next st, bfsc16, 2bfsc in the following st, bfsc7, skip1, 2bfsc in the hole made by the ch1. Ch1, turn (38sts)
Row 11: sc10, 2sc in the next st, sc16, 2sc in the following st, sc10. ch1, turn (40sc)
Row 12: bfsc10, 2bfsc in the next st, bfsc18, 2bfsc in the following st, bfsc10. ch1, turn (42sts)
Row 13: ch1, skip1, sc10. ch1, turn
Row 14: bfsc9, skip1, 2bfsc in the hole made by the ch1. Ch1, turn (11sts)
Row 15: sc11. ch1, turn
Row 16: bfsc4, bfsc2tog, bfsc2tog, bfsc3. ch1, turn (9sts)
Row 17: ch1, skip1, sc2, sc2tog, sc4. ch1, turn (8sc)
Row 18: bfsc6, skip1, 2bfsc in the ch1 hole. ch1, turn
Row 19: sc7, 2sc in the next st. ch1, turn (9sc)
Row 19.5: slip9. ch1, turn
Row 20: in the sitches you just slipped: sc4, hdc2, 2hdc in the next st, hdc, sc
Fasten off
rejoin yarn to row 12 in the 3rd st after this section.

Row 13: sc in this st, sc15. Ch1, turn (16sc)
Row 14: bfsc2tog, bfsc12, bfsc2tog. ch1, turn (14sc)
Row 15: sc6, sc2tog, sc6. ch1, turn (13sc)
Row 16: bfsc13. ch1, turn
Row 17: sc13. ch1, turn
Row 18: 2bfsc in the first st, bfsc11, 2bfsc in the last st. ch1, turn (15sts)
Row 19: sc, hdc2, ch1, sc8, ch1, hdc2, sc. ch1, turn
Row 20: bfsc3, ch1, slip10 (including the chain sts on the previous row), bfsc3
Fasten off
rejoin yarn to row 12 in the 3rd st after this section.
Row 13: sc in this st, sc10. ch1, turn (11sc)
Row 14: bfsc11. ch1, turn
Row 15: sc11. ch1, turn
Row 16: bfsc3, bfsc2tog, bfsc2tog, bfsc4. ch1, turn (9sts)
Row 17: sc4, sc2tog, sc3. ch1, turn (8sc)
Row 18: bfsc8. ch1, turn
Row 19: 2sc in the first st, sc7. ch1, turn (9sc)
Row 19.5: slip9. ch1, turn
Row 20: In the stitches you just slipped: sc, hdc, 2hdc in the next st, hdc2, sc4
Fasten off
For the sleeves:
Fasten on yarn to the top left edge of the back section (looking at it from the right side (as shown below))

Round 1: sc in where you fastened on, then sc19 around the armhole section, finishing at the top right corner of the neighbouring front section to where you fastened on (as shown below) (20sc)

Rounds 2 - 5: (4 rounds) slip the first st of the last round, ch2, hdc in this same st, hdc3, sc3, slip6, sc3, hdc3
Round 6: slip the first st of the last round, sc in the next 3sts, slip1
Fasten off
For the other arm rejoin yarn to the top left corner of the opposite front edge (as shown below) and sc20 around to the top right corner of the back section.

Work rows 2 - 6 as you did for the first sleeve.

Crocheting up the side of the shirt in the gaps between the the rows: sc where you fastened on, sc3, skip1, 3sc in the first buttonhole (the hole made on row 5 by the ch1 gap), skip1, sc, skip1, 3sc in the next buttonhole, skip1, sc, skip1, 3sc in the next buttonhole, skip1, sc, skip1, 3sc in the last buttonhole, skip1, sc, 3sc in the first st of the neckline, sc26 around the rest of the neckline, 3sc in the last st of the neckline, sc20 down the left front edge.
Fasten off

For the boots:
For the left boot:
With black 4ply yarn and a 2mm hook ch7
Round 1: sc in the 2nd loop from hook, sc in each of the next 5 chain sts, 3sc in the lats chain st (the first one you made), sc in the back of the previous 5 chain sts you crocheted into in turn, then mak2 2sc into the back of the first chain st you crocheted into (14sc)
Round 2: 2sc in the first st, sc5, 2sc in each of the next 3sts, sc5, 2sc in each of the last 2sts, make another hdc st in the same st as the last 2sc you did) (21sts)
Round 2.5: hdc, ch1, sc. Fasten off neatly
Rejoin yarn to the 15th st after the 'new' st you created when fastening off (the stitch that tightens when you pull the yarn end).
Row 3: sc in this same st, sc8(the chain st counts as a stitch), slip1. ch1, turn
Row 4: bfsc in the slip st, bfsc3, sc3tog, bfsc4, slip1. Ch1, turn
Row 5: sc in the slip st, sc2, sc4tog, sc3, slip1. ch1, turn
Row 6: bfsc in the slip st, bfsc2, bfsc2tog, bfsc3, slip1.
Row 7: sc in the slip st, sc2, sc2tog, sc13 (17sc)
Round 8: sc17 around the edge of the boot
Row 9: sc3, sc2tog, sc11, slip1. ch1, turn
Row 10: bfsc6, slip1. ch1, turn
Row 11: sc2, sc3tog, sc3, sc in the front loop only of the next 2sts. ch1, turn
Row 12: bfsc14, bfsc in the outermost loop only of the next 2sts. ch1, turn (16sc)
Row 13: sc16. ch1, turn
Row 14: bfsc16. ch1, turn
Row 15: sc16. ch1, turn
Row 16: bfsc16. ch1, turn
Row 17: sc16. ch1, turn
Row 18: bfsc16. ch1, turn
Row 19: sc16. ch1, turn
Row 20: 2bfsc in the first st, bfsc14, 2bfsc in the last st. ch1, turn (18sts)
For the right boot:
With black 4ply yarn and a 2mm hook ch7
Round 1: sc in the 2nd loop from hook, sc in each of the next 5 chain sts, 3sc in the lats chain st (the first one you made), sc in the back of the previous 5 chain sts you crocheted into in turn, then mak2 2sc into the back of the first chain st you crocheted into (14sc)
Round 2: 2sc in the first st, sc5, 2sc in each of the next 3sts, sc5, 2sc in each of the last 2sts, make another hdc st in the same st as the last 2sc you did) (21sts)
Round 2.5: hdc, ch1, sc. Fasten off neatly
Rejoin yarn to the 15th st after the 'new st.
Row 3: sc in the same st, sc8 (the chain st counts as a stitch), slip1. ch1, turn
Row 4: bfsc in the slip st, bfsc3, bfsc2tog, bfsc4, slip1. Ch1, turn
Row 5: sc in the slip st, sc2, sc4tog, sc3, slip1. ch1, turn
Row 6: bfsc in the slip st, bfsc2, bfsc2tog, bfsc3, slip1. ch1, turn
Row 7: sc in the slip st, sc2, sc2tog, sc13 (17sc)
Round 8: sc17
Row 9: sc3, sc2tog, sc11, slip1. ch1, turn
Row 10: bfsc in the slip st, bfsc5, slip1. ch1, turn
Row 11: sc in the slip st, sc, sc3tog, sc6, sc in the front loop only of the next 2sts. ch1, turn
Row 12: bfsc14, bfsc in the outer loop only of the next 2sts. ch1, turn
Row 13: sc16. ch1, turn
Row 14: bfsc16. ch1, turn
Row 15: sc16. ch1, turn
Row 16: bfsc16. ch1, turn
Row 17: sc16. ch1, turn
Row 18: bfsc16. ch1, turn
Row 19: sc16. ch1, turn
Row 20: 2bfsc in the first st, bfsc14, 2bfsc in the last st. ch1, turn (18sts)
With a 2mm hook and 4ply yarn make a magic loop with 5sc
Fasten off neatly.
Rejoin yarn to the back loop only of one the these stitches
Round 1: sc in the back loop only of each st
Round 2: sc in both loops of each st, then ch6
Round 3: sc in the second loop from hook, sc4 down the remaining chain sts, 2sc in the stitch after the one you made before the chain section, 2sc in each of the next 4sts, sc in the back loop of the next 4 chain sts, make 2sc in the last chain st (21sc)
Round 4: 2sc in the first st, sc5, slip8, sc5, sc, hdc in the same st, 2dc in the next st (27sts)
Round 5: ch1, hdc in the first st, sc in the same st, slip the next st
Fasten off
Trace around this section onto black card, then trim the card slightly so that it fits just inside the crochet.


Take a section of card 1x5cm and roll it up tightly into a tube 1cm high. Secure with sellotape
Tape the cardboard heel section (the tube) one the end of the sole (a little bit in from the actual end though)

Place this heel inside the crocheted sole section.
Sew this sole/heel section to the underside of the boot

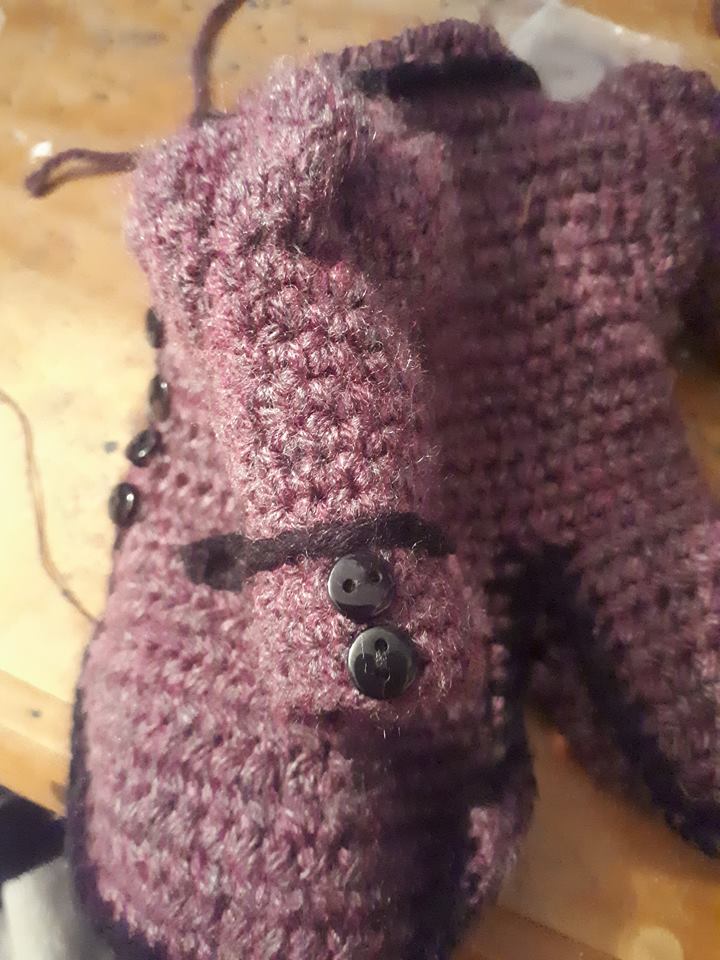
Sew a line of beads to the edge of each boot (to the right side from the right boot and the left side of the left boot) and then use these to fasten the boots by poking them through the holes in the stitching of the opposite side of the boot. I sewed five to each boot.


Do the same with the hair around the sides of the hair, particularly the strands in front of the ears.
 |
| The hair that is flat on the head in the image above needs to be sewn to the scalp using small almost-invisible stitches |


Repeat this for another section of hair slightly behind the first one

Continue in this way around the top of the head and top 1/2 of the back of the head with all of the strands that haven't been sewn down, as well as the ends of the ones that have. Each time you do this take a strand of the hair, curl it over into a loop, and then sewing it in place. Make sure you only take small-ish sections at a time, and try to focus the loops so that they centre around the centre/upper back section of the head.


For the skirt:
with a 2mm hook and purple dk yarn ch24
Row 1: sc in the second loop from hook, sc22. ch1, turn (23sc)
Row 2: 2bfsc in the first st, bfsc21, 2bfsc in the last st (25sc)
Row 3: sc6, 2sc in the next st, sc11, 2sc in the following st, sc6 (27sc)
Row 4: bfsc8, 2bfsc in the next st, rep to end (30sc)
Row 5: sc9, 2sc in the next st, rep to end (33sc)
Round 6: sc in the first st of the last round, then sc in every following st to make a loop (as shown below) (33sc)

Round 7: sc in each st
Round 8: sc10, 2sc in the next st, rep to end (36sc)
Rounds 9 - 10: (2 rounds) sc in each st
Round 11: sc11, 2sc in the next st, rep to end (39sc)
Rounds 12 - 13: (2 rounds) sc in each st
Round 14: sc12, 2sc in the next st, rep to end (42sc)
Rounds 15 - 16: (2 rounds) sc in each st
Round 17: sc13, 2sc in the next st, rep to end (45sc)
Rounds 18 - 19: (2 rounds) sc in each st
Round 20: sc14, 2sc in the next st, rep to end (48sc)
Rounds 21 - 22: (2 rounds) sc in each st
Round 23: sc15, 2sc in the next st, rep to end (51sc)
Round 24: (2 rounds) sc in each st
Round 25: sc16, 2sc in the next st, rep to end (54sc)
Fasten off
Sew a black button to one side of the waistband of the skirt, then sew a small loop of thread to the other side to fasten it.

For the jacket:
For the first lower section:
With purple dk yarn and a 2.5mm hook ch20
Row 1: sc in the 2nd loop from hook, sc17, 2sc in the last st. ch1, turn (20sc)
Row 2: 2bfsc in the first st, bfsc19. ch1, turn (21sts)
Row 3: sc in each st. ch1, turn
Row 4: 2bfsc in the first st, bfsc20. ch1, turn (22sts)
Row 5: sc in each st. ch1, turn
Row 6: bfsc10, bfsc2tog, bfsc10. ch1, turn (21sts)
Row 7: sc9, sc2tog, sc10. ch1, turn (20sc)
Row 8: bfsc9, bfsc2tog, bfsc9. ch1, turn (19sc)
Row 9: sc8, sc2tog, sc9. ch1, turn (18sc)
Row 10: bfsc8, bfsc2tog, bfsc8. ch1, turn (17sc)
Row 11: sc7, sc2tog, sc8. ch1, turn (16sc)
Row 12 :bfsc7, bfsc2tog, bfsc7. ch1, turn (15sc)
Row 13: sc in each st
Fasten off
With black 4ply yarn and a 2mm hook attach the yarn to the left-hand corner of the cast-off edge of this section (looking at the right side). Sc around the curved edge of this section to the right-hand corner, crocheting in the holes between each of the rows. This should require around 45sts.
For the second lower section:
With purple dk yarn and a 2.5mm hook ch20
Row 1: 2sc in the 2nd loop from hook, sc18. ch1, turn (20sc)
Row 2: bfsc19, 2bfsc in the last st, . ch1, turn (21sts)
Row 3: sc in each st. ch1, turn
Row 4: bfsc20, 2bfsc in the last st, . ch1, turn (22sts)
Row 5: sc in each st. ch1, turn
Row 6: bfsc10, bfsc2tog, bfsc10. ch1, turn (21sts)
Row 7: sc10, sc2tog, sc9. ch1, turn (20sc)
Row 8: bfsc9, bfsc2tog, bfsc9. ch1, turn (19sts)
Row 9: sc9, sc2tog, sc8. ch1, turn (18sc)
Row 10: bfsc8, bfsc2tog, bfsc8. ch1, turn (17sts)
Row 11: sc8, sc2tog, sc7. ch1, turn (16sc)
Row 12 :bfsc7, bfsc2tog, bfsc7. ch1, turn (15sts)
Row 13: sc in each st
Fasten off

With black 4ply yarn and a 2mm hook attach the yarn to the right-hand corner of the cast-off edge of this section (looking at the right side). Sc around the curved edge of this section to the left-hand corner, crocheting in the holes between each of the rows as you did before.
swap to a 2mm hook
Row 14: sc15 across the cast-off edge the second upper section you made (starting at the edge that is curved at the bottom and crocheting along to the other edge that is straight all the way down), sc through the black edging of this section and the black edging of the other section simultaneously (the black edging at the top of the straight edges), then sc15 across the fasten-off edge of the first section you made. ch1, turn (31sc)


Row 15: bfsc in each st. ch1, turn
Row 16: ch1, skip1, sc30. ch1, turn
Row 17: bfsc7, 2bfsc in the next st, bfsc15, 2bfsc in the following st, bfsc5, skip1, 2bfsc in the hole made by the chain sts. ch1, turn(33sts)
Row 18: ch1, skip1, sc32. ch1, turn
Row 19: bfsc8, 2bfsc in the next st, bfsc15, 2bfsc in the following st, bfsc6, skip1, 2bfsc in the hole made by the chain sts. ch1, turn (35sts)
Row 20: ch1, skip1, sc34. ch1, turn
Row 21: bfsc3, 2bfsc in the next st, bfsc27, 2bfsc in the following st, bfsc1, skip1, 2bfsc in the hole made by the chain sts. ch1, turn (37sts)
Row 22: ch1, skip1, sc7. ch1, turn
Row 23: bfsc2tog, bfsc4, skip1, bfsc in the hole made by the chain sts. ch1, turn (6sts)
Row 24: sc in each of these 6sts. ch1, turn
Row 25: bfsc4, bfsc2tog. ch1, turn (5sts)
Row 26: sc4, turn
Row 26.5: (this doesn't add any height, hence why it isn't counted as a row) slip4. ch1, turn
Row 27: ch1. In the sts you just slipped: hdc, sc2, slip1
Fasten off
Attach yarn to the opposite end of row 21
Row 22: bfsc8. ch1, turn
Row 23: sc2tog, sc4, sc2tog. ch1, turn (6sc)
Row 24: bfsc in each of these 6sts. ch1, turn
Row 25: sc4, sc2tog. ch1, turn (5sc)
Row 26: bfsc4, turn
Row 27: slip1, sc2, hdc
Fasten off
Row 22: bfsc8. ch1, turn
Row 23: sc2tog, sc4, sc2tog. ch1, turn (6sc)
Row 24: bfsc in each of these 6sts. ch1, turn
Row 25: sc4, sc2tog. ch1, turn (5sc)
Row 26: bfsc4, turn
Row 27: slip1, sc2, hdc
Fasten off
Attach yarn to row 21 to the 4th st from the first of these sections you made

Row 22: sc in this st, sc14. ch1, turn
Row 23: bfsc6, bfsc3tog, bfsc6. ch1, turn (13sts)
Row 24: sc2tog, sc9, sc2tog. ch1, turn (11sc)
Row 25: bfsc11. ch1, turn
Row 26: sc11. ch1, turn
Row 27: 2bfsc, bfsc9, 2bfsc. ch1, turn (13sts)
Row 28: sc13. ch1, turn
Row 29: bfsc13. ch1, turn
Row 30: sc4, slip5, sc4
Fasten off
Sew up the shoulder seams

For the left sleeve:
join yarn to the shoulder seam of the left armhole (looking at it from the front)

Round 1: sc22 around the edge of the armhole.
Round 2: 2sc in aech of the first 4sts, sc6, slip3, sc6, 2sc in each of the next 3sts (29sc)
Round 3: (sc, 2sc in the next st) 3 times, sc7, slip6, sc6, (sc, 2sc in the next st) twice (34sc)
Round 4: sc12, slip16, sc6
Round 5: (sc, sc2tog) 3 times, sc2, slip17, (sc, sc2tog) twice (29sc)
Round 6: sc2tog 4 times, sc3, slip12, sc2tog 3 times (22sc)
Round 7: sc3tog, sc5, slip11, sc3 (20sc)
Round 8: sc2tog, sc2, slip16, (19sc)
Round 9: sc2tog, sc5, slip7, sc5 (18sc)
Round 10: sc2tog, sc4, slip7, sc4, hdc (17sc)
Round 11: hdc2, sc4, skip1, sc, skip1, sc, skip1, sc6 (14sc)
Rows 12 - 19: (8 rows) sc14
Fasten off
For the collar:
rejoin purple dk yarn to the right side to the upper corner of the 9th st above where the black edging stops.

Using a 2mm hook:
Row 1: around the neckline: sc3, slip1, sc20, slip1, sc3 (ending in the top buttonhole on the left side). Turn
Row 2: slip1, bfsc2, ch1, slip1, ch2, bfsc20, ch1, slip1, ch1, bfsc2, slip1. Ch1, turn
Row 3: skip1, slip1, sc, ch1, slip3 (including the chain sts on the row before), ch1, sc20, ch1, slip3 (including the chain sts on the row before), ch1, sc, slip1.
Fasten off
For the pocket trim:
Ch14. Join with a slip stitch
Fasten off
Sew this to the side of the jacket


For the sleeve trim (make 2):
ch17
Fasten off
Sew this to each sleeve approximately 1 3/4 cm in from the edge

To the outer edge of each sleeve sew two black buttons in between the trim you just made and the egde of the sleeve (as shown below)

Finally, sew four black buttons to the front of the jacket opposite the buttonholes to fasten it.
For the left sleeve:
join yarn to the shoulder seam of the left armhole (looking at it from the front)

Round 1: sc22 around the edge of the armhole.
Round 2: 2sc in aech of the first 4sts, sc6, slip3, sc6, 2sc in each of the next 3sts (29sc)
Round 3: (sc, 2sc in the next st) 3 times, sc7, slip6, sc6, (sc, 2sc in the next st) twice (34sc)
Round 4: sc12, slip16, sc6
Round 5: (sc, sc2tog) 3 times, sc2, slip17, (sc, sc2tog) twice (29sc)
Round 6: sc2tog 4 times, sc3, slip12, sc2tog 3 times (22sc)
Round 7: sc3tog, sc5, slip11, sc3 (20sc)
Round 8: sc2tog, sc2, slip16, (19sc)
Round 9: sc2tog, sc5, slip7, sc5 (18sc)
Round 10: sc2tog, sc4, slip7, sc4, hdc (17sc)
Round 11: hdc2, sc4, skip1, sc, skip1, sc, skip1, sc6 (14sc)
Rows 12 - 19: (8 rows) sc14
Fasten off
For the right sleeve:
join yarn to the shoulder seam of the right armhole (looking at it from the front)
Round 1: sc22 around the edge of the armhole.
Round 2: 2sc in aech of the first 4sts, sc6, slip3, sc6, 2sc in each of the next 3sts (29sc)
Round 3: (sc, 2sc in the next st) 3 times, sc7, slip6, sc6, (sc, 2sc in the next st) twice (34sc)
Round 4: sc12, slip16, sc6
Round 5: (sc, sc2tog) 3 times, sc2, slip17, (sc, sc2tog ) twice (29sc)
Round 6: sc2tog 4 times, sc3, slip12, sc2tog 3 times (22sc)
Round 7: sc3tog, sc7, slip11, sc (20sc)
Round 8: sc2, sc2tog, sc2, slip14, (19sc)
Round 9: slip2, sc2tog, sc6, slip7, sc2 (18sc)
Round 10: sc3, sc2tog, sc5, slip7, sc, (17sc)
Round 11: sc4, hdc2, sc4, skip1, sc, skip1, sc, skip1, sc2 (14sc)
Round 12: sc4, hdc, sc9
Rows 13 - 19: (7 rows) sc14
Fasten off
For the collar:
rejoin purple dk yarn to the right side to the upper corner of the 9th st above where the black edging stops.

Using a 2mm hook:
Row 1: around the neckline: sc3, slip1, sc20, slip1, sc3 (ending in the top buttonhole on the left side). Turn
Row 2: slip1, bfsc2, ch1, slip1, ch2, bfsc20, ch1, slip1, ch1, bfsc2, slip1. Ch1, turn
Row 3: skip1, slip1, sc, ch1, slip3 (including the chain sts on the row before), ch1, sc20, ch1, slip3 (including the chain sts on the row before), ch1, sc, slip1.
Fasten off
Fasten yarn on to the first st of the sc20 on the previous row, then crocheting around the neckline: slip this st, sc18, slip1
Fasten off
Fasten off
For the trim:
Attach black yarn to the left side to the same st as the end of the black lacing bit you have already made.

crocheting up the side of the jacket and using each hole between consecutive rows as if they were stitches:
sc in this same st, sc, skip1, 3sc in the hole made by the chain sts, skip1, 3sc in the hole made by the chain sts, skip1, 3sc in the hole made by the chain sts, skip1, 3sc in the shole made by the chain sts. Fasten off.
Rejoin yarn to the stitch underneath where you fastened on when you started making the collar section on the jacket.

Sc in this st, then sc8 down the side of the jacket, finishing in the same st as the black lacing finishes.
Fasten off
Sc in this st, then sc8 down the side of the jacket, finishing in the same st as the black lacing finishes.
Fasten off
Rejoin yarn to the same st as you joined it to when doing the last section, but in the oppoite direction.

sc in this st, sc in the same st as where you started the collar, sc2 up the side of the first triangular bit of the collar, 3sc at the 'point' of this triangle (Image1), sc in the next 5sts (including chain sts), then make 3sc in the following slip st (the one where you fastened on for the last bit of the collar) (Image2) . sc18 around the collar, 3sc in the next slip st, sc5 (including the chain sts), 3sc at the peak of the next section, sc2 down the other side of this triangular bit, then sc in the top buttonhole.
Fasten off
Sew the collar in place using small stitches with the purple dk yarn so that it doesn't stand up.
sc in this st, sc in the same st as where you started the collar, sc2 up the side of the first triangular bit of the collar, 3sc at the 'point' of this triangle (Image1), sc in the next 5sts (including chain sts), then make 3sc in the following slip st (the one where you fastened on for the last bit of the collar) (Image2) . sc18 around the collar, 3sc in the next slip st, sc5 (including the chain sts), 3sc at the peak of the next section, sc2 down the other side of this triangular bit, then sc in the top buttonhole.
Fasten off
 |
| Image1 |
 |
| Image2 |
For the pocket trim:
Ch14. Join with a slip stitch
Fasten off
Sew this to the side of the jacket


For the sleeve trim (make 2):
ch17
Fasten off
Sew this to each sleeve approximately 1 3/4 cm in from the edge

To the outer edge of each sleeve sew two black buttons in between the trim you just made and the egde of the sleeve (as shown below)

With white 4ply yarn and a 2mm hook ch31
Row 1: sc in the 2nd loop from hook, sc29. ch1, turn (30sc)
Row 2: bfsc30. ch1, turn
Row 3: sc30. ch1, turn
Row 4: bfsc30. ch1, turn
Row 5: ch1, skip1, sc29. ch1, turn
Row 6: bfsc28, skip1, 2bfsc in the hole made by the ch1, ch1, turn
Row 7: sc8, 2sc in the next st, sc12, 2sc in the following st, sc8. ch1, turn (32sc)
Row 8: bfsc8, 2bfsc in the next st, bfsc14, 2bfsc in the following st, bfsc8. ch1, turn (34sts)
Row 9: ch1, skip1, sc8, 2sc in the next st, sc14, 2sc in the following st, sc9. ch1, turn (36sc)
Row 10: bfsc9, 2bfsc in the next st, bfsc16, 2bfsc in the following st, bfsc7, skip1, 2bfsc in the hole made by the ch1. Ch1, turn (38sts)
Row 11: sc10, 2sc in the next st, sc16, 2sc in the following st, sc10. ch1, turn (40sc)
Row 12: bfsc10, 2bfsc in the next st, bfsc18, 2bfsc in the following st, bfsc10. ch1, turn (42sts)
Row 13: ch1, skip1, sc10. ch1, turn
Row 14: bfsc9, skip1, 2bfsc in the hole made by the ch1. Ch1, turn (11sts)
Row 15: sc11. ch1, turn
Row 16: bfsc4, bfsc2tog, bfsc2tog, bfsc3. ch1, turn (9sts)
Row 17: ch1, skip1, sc2, sc2tog, sc4. ch1, turn (8sc)
Row 18: bfsc6, skip1, 2bfsc in the ch1 hole. ch1, turn
Row 19: sc7, 2sc in the next st. ch1, turn (9sc)
Row 19.5: slip9. ch1, turn
Row 20: in the sitches you just slipped: sc4, hdc2, 2hdc in the next st, hdc, sc
Fasten off
rejoin yarn to row 12 in the 3rd st after this section.

Row 13: sc in this st, sc15. Ch1, turn (16sc)
Row 14: bfsc2tog, bfsc12, bfsc2tog. ch1, turn (14sc)
Row 15: sc6, sc2tog, sc6. ch1, turn (13sc)
Row 16: bfsc13. ch1, turn
Row 17: sc13. ch1, turn
Row 18: 2bfsc in the first st, bfsc11, 2bfsc in the last st. ch1, turn (15sts)
Row 19: sc, hdc2, ch1, sc8, ch1, hdc2, sc. ch1, turn
Row 20: bfsc3, ch1, slip10 (including the chain sts on the previous row), bfsc3
Fasten off
rejoin yarn to row 12 in the 3rd st after this section.
Row 13: sc in this st, sc10. ch1, turn (11sc)
Row 14: bfsc11. ch1, turn
Row 15: sc11. ch1, turn
Row 16: bfsc3, bfsc2tog, bfsc2tog, bfsc4. ch1, turn (9sts)
Row 17: sc4, sc2tog, sc3. ch1, turn (8sc)
Row 18: bfsc8. ch1, turn
Row 19: 2sc in the first st, sc7. ch1, turn (9sc)
Row 19.5: slip9. ch1, turn
Row 20: In the stitches you just slipped: sc, hdc, 2hdc in the next st, hdc2, sc4
Fasten off
For the sleeves:
Fasten on yarn to the top left edge of the back section (looking at it from the right side (as shown below))
Round 1: sc in where you fastened on, then sc19 around the armhole section, finishing at the top right corner of the neighbouring front section to where you fastened on (as shown below) (20sc)

Rounds 2 - 5: (4 rounds) slip the first st of the last round, ch2, hdc in this same st, hdc3, sc3, slip6, sc3, hdc3
Round 6: slip the first st of the last round, sc in the next 3sts, slip1
Fasten off
For the other arm rejoin yarn to the top left corner of the opposite front edge (as shown below) and sc20 around to the top right corner of the back section.

Work rows 2 - 6 as you did for the first sleeve.
For the shirt collar:
join yarn to bottom right corner of the shirt (as shown below).
join yarn to bottom right corner of the shirt (as shown below).
Crocheting up the side of the shirt in the gaps between the the rows: sc where you fastened on, sc3, skip1, 3sc in the first buttonhole (the hole made on row 5 by the ch1 gap), skip1, sc, skip1, 3sc in the next buttonhole, skip1, sc, skip1, 3sc in the next buttonhole, skip1, sc, skip1, 3sc in the last buttonhole, skip1, sc, 3sc in the first st of the neckline, sc26 around the rest of the neckline, 3sc in the last st of the neckline, sc20 down the left front edge.
Fasten off
rejoin yarn to the 22nd st of the last row


Row 1: around the neckline: sc8, sc3tog, sc3, sc2tog, sc3, sc3tog, sc8. ch1, turn (25sc)
Row 2: bfsc7, bfsc2tog, bfsc7, bfsc2tog, bfsc7. ch1, turn (23sts)
Row 3: slip4, sc2, sc4tog, sc3, sc4tog, sc, slip1. ch1, turn
Row 4: Skip the slipped st, slip1, bfsc7, slip1. ch1, turn
Row 5: skip the slipped st, slip2, sc3, slip1
Fasten off
Row 2: bfsc7, bfsc2tog, bfsc7, bfsc2tog, bfsc7. ch1, turn (23sts)
Row 3: slip4, sc2, sc4tog, sc3, sc4tog, sc, slip1. ch1, turn
Row 4: Skip the slipped st, slip1, bfsc7, slip1. ch1, turn
Row 5: skip the slipped st, slip2, sc3, slip1
Fasten off
Rejoin yarn to the outer loop only of the right- hand side of the collar when looking at it as it would be on the doll.

Row 6: sc17 around the neckline to the other side, crocheting in only the outermost loops when possible (such as at the front and back). ch1, turn
Row 7: bfsc17
Fasten off
Don't sew this collar down in place (at least not for the minute)
Sew a line of buttons down the front of the shirt opposite the buttonholes to fasten it.

For the neckband:
With white 4ply yarn and a 2mm hook ch22
Row 1: sc in the 2nd loop from hook, sc20 (2
Row 1: sc in the 2nd loop from hook, sc20 (2
Fasten off
For the button:
Cut a small oval out of black cardboard (approx. 10mm in height and 8mm in width)
Cut a small oval out of black cardboard (approx. 10mm in height and 8mm in width)
Cut a small section of black fabric (approx. 2.5cm x 3cm). Place the piece of cardboard in the centre of this and sew around the edge of where the cardboard is to mark its size


Inside this white circle use white/ cream embroidery thread to embroider the design below. It is up to you how detailed you want to make it.


After you are happy with your embroidery, remove the white stitches indicating the edge of where the embroidery should be.
Place the black oval inside the centre back of the black fabric. Use black thread to sew on the black fabric an oval approx. 4mm wider than the cardboard oval in the centre on all sides. Sew this using running stitch, leaving both ends of the thread free, and then pull the stitches tight so that the fabric tightens around the cardboard oval in the centre. Tie up the ends of the thread and eccure it usenig a sew stitches. Trim off some of the spare fabric at the back, making sure not to trim it too close to the stitching that it unravels.


After the glue has mostly dried, sew the button to one end of the neckband (the end that doesn't have the loose ends on)
If you think your doll is likely to get handled a lot add a dab of PVA or fray-check glue to the back of the button to stop it fraying.
If you think your doll is likely to get handled a lot add a dab of PVA or fray-check glue to the back of the button to stop it fraying.
Make a loop of yarn at the other end of the neckband using one of the loose ends. Make this loop big enough that the button you just made can fit through it.
Place the neckband around the neck under the collar of the shirt, and fasten it using the button and the loop made by the loose end.

For the boots:
For the left boot:
With black 4ply yarn and a 2mm hook ch7
Round 1: sc in the 2nd loop from hook, sc in each of the next 5 chain sts, 3sc in the lats chain st (the first one you made), sc in the back of the previous 5 chain sts you crocheted into in turn, then mak2 2sc into the back of the first chain st you crocheted into (14sc)
Round 2: 2sc in the first st, sc5, 2sc in each of the next 3sts, sc5, 2sc in each of the last 2sts, make another hdc st in the same st as the last 2sc you did) (21sts)
Round 2.5: hdc, ch1, sc. Fasten off neatly
Rejoin yarn to the 15th st after the 'new' st you created when fastening off (the stitch that tightens when you pull the yarn end).
Row 3: sc in this same st, sc8(the chain st counts as a stitch), slip1. ch1, turn
Row 4: bfsc in the slip st, bfsc3, sc3tog, bfsc4, slip1. Ch1, turn
Row 5: sc in the slip st, sc2, sc4tog, sc3, slip1. ch1, turn
Row 6: bfsc in the slip st, bfsc2, bfsc2tog, bfsc3, slip1.
Row 7: sc in the slip st, sc2, sc2tog, sc13 (17sc)
Round 8: sc17 around the edge of the boot
Row 9: sc3, sc2tog, sc11, slip1. ch1, turn
Row 10: bfsc6, slip1. ch1, turn
Row 11: sc2, sc3tog, sc3, sc in the front loop only of the next 2sts. ch1, turn
Row 12: bfsc14, bfsc in the outermost loop only of the next 2sts. ch1, turn (16sc)
Row 13: sc16. ch1, turn
Row 14: bfsc16. ch1, turn
Row 15: sc16. ch1, turn
Row 16: bfsc16. ch1, turn
Row 17: sc16. ch1, turn
Row 18: bfsc16. ch1, turn
Row 19: sc16. ch1, turn
Row 20: 2bfsc in the first st, bfsc14, 2bfsc in the last st. ch1, turn (18sts)
Row 21: sc18. ch1, turn
Row 22: bfsc2tog, bfsc14, bfsc2tog.
Fasten off
For the right boot:
With black 4ply yarn and a 2mm hook ch7
Round 1: sc in the 2nd loop from hook, sc in each of the next 5 chain sts, 3sc in the lats chain st (the first one you made), sc in the back of the previous 5 chain sts you crocheted into in turn, then mak2 2sc into the back of the first chain st you crocheted into (14sc)
Round 2: 2sc in the first st, sc5, 2sc in each of the next 3sts, sc5, 2sc in each of the last 2sts, make another hdc st in the same st as the last 2sc you did) (21sts)
Round 2.5: hdc, ch1, sc. Fasten off neatly
Rejoin yarn to the 15th st after the 'new st.
Row 3: sc in the same st, sc8 (the chain st counts as a stitch), slip1. ch1, turn
Row 4: bfsc in the slip st, bfsc3, bfsc2tog, bfsc4, slip1. Ch1, turn
Row 5: sc in the slip st, sc2, sc4tog, sc3, slip1. ch1, turn
Row 6: bfsc in the slip st, bfsc2, bfsc2tog, bfsc3, slip1. ch1, turn
Row 7: sc in the slip st, sc2, sc2tog, sc13 (17sc)
Round 8: sc17
Row 9: sc3, sc2tog, sc11, slip1. ch1, turn
Row 10: bfsc in the slip st, bfsc5, slip1. ch1, turn
Row 11: sc in the slip st, sc, sc3tog, sc6, sc in the front loop only of the next 2sts. ch1, turn
Row 12: bfsc14, bfsc in the outer loop only of the next 2sts. ch1, turn
Row 13: sc16. ch1, turn
Row 14: bfsc16. ch1, turn
Row 15: sc16. ch1, turn
Row 16: bfsc16. ch1, turn
Row 17: sc16. ch1, turn
Row 18: bfsc16. ch1, turn
Row 19: sc16. ch1, turn
Row 20: 2bfsc in the first st, bfsc14, 2bfsc in the last st. ch1, turn (18sts)
Row 21: sc18. ch1, turn
Row 22: bfsc2tog, bfsc14, bfsc2tog.
Fasten off
For the heel and sole (make 2):With a 2mm hook and 4ply yarn make a magic loop with 5sc
Fasten off neatly.
Rejoin yarn to the back loop only of one the these stitches
Round 1: sc in the back loop only of each st
Round 2: sc in both loops of each st, then ch6
Round 3: sc in the second loop from hook, sc4 down the remaining chain sts, 2sc in the stitch after the one you made before the chain section, 2sc in each of the next 4sts, sc in the back loop of the next 4 chain sts, make 2sc in the last chain st (21sc)
Round 4: 2sc in the first st, sc5, slip8, sc5, sc, hdc in the same st, 2dc in the next st (27sts)
Round 5: ch1, hdc in the first st, sc in the same st, slip the next st
Fasten off
Trace around this section onto black card, then trim the card slightly so that it fits just inside the crochet.


Take a section of card 1x5cm and roll it up tightly into a tube 1cm high. Secure with sellotape
Tape the cardboard heel section (the tube) one the end of the sole (a little bit in from the actual end though)

Place this heel inside the crocheted sole section.
Sew this sole/heel section to the underside of the boot

Sew a line of beads to the edge of each boot (to the right side from the right boot and the left side of the left boot) and then use these to fasten the boots by poking them through the holes in the stitching of the opposite side of the boot. I sewed five to each boot.

I hope you have enjoyed this pattern. If you have any questions about this or any of my other patterns or have any suggestions of future patterns you would like to see, please feel free to get in contact with me, either by leaving a comment below or visiting my Instagram or Ravelry pages.
Please do not re-post this pattern or claim it as your own. I also ask that you don't sell finished products, since whilst I don't personally have any problem with you doing this, Doctor who is copyrighted by the BBC so you may get into trouble if you try to sell anything Doctor-Who related. However, I do have many other patterns for which you are very welcome to sell finished products (anything not of a known brand). Thank you!


No comments:
Post a Comment