


Difficulty:

Easy - medium
You will need:
- Four 9mm red buttons
- dk yarn in peach
- 4ply yarn in red, black, and fluffy white
- stuffing
- A darning needle
- A small section of cardboard
- A pair of scissors
Note:
- 'fasten off neatly' refers to a special way of fastening off which is neater and makes it easier to see where you should be crocheting on the next round (also known as invisible fastening off). This involves pulling up your yarn through your stitch, threading the yarn underneath the second stitch from where you pulled your yarn up, then threading your yarn back through the top of this stitch and down through the back of the work. There is a very helpful site that explains it clearly found here. Just make sure when you do this that you thread your needle through the SECOND stitch after the last stitch you made, otherwise you will end up with an extra stitch which may mean that all of the following rounds are out of line with each other.
- The 'loop behind the back loop' refers to the loop known as the 'third loop' in the diagram below


For the head and body (starting from the base):
Make a magic loop with 6sc
Round 1: 2sc in each st (12sc)
Round 2: sc in the first st, 2sc in the next st, rep to end (18sc)
Round 3: sc in the first 2 sts, 2sc in the next st, rep to end. ch1, turn (24sc)
Rounds 4 - 8: (5 rounds) sc in each st (24sc)
Round 9: sc in the first 2 sts, sc2tog, rep to end (18sc)Round 10: sc in the first st, sc2tog, rep to end (12sc)
Round 11: sc in the first st, sc2tog, rep to end (8sc)
Round 12: 2sc in each st (16sc)
Round 13: sc in each st
Round 14: sc in the first 3 sts, 2sc in the next st, rep to end (20sc)
Round 15: sc in each st
Round 16: sc in the first 4 sts, 2sc in the next st, rep to end (24sc)
Rounds 17 - 18: (2 rounds) sc in each st
Round 19: sc in the first 2 sts, sc2tog, rep to end (18sc)Round 12: 2sc in each st (16sc)
Round 13: sc in each st
Round 14: sc in the first 3 sts, 2sc in the next st, rep to end (20sc)
Round 15: sc in each st
Round 16: sc in the first 4 sts, 2sc in the next st, rep to end (24sc)
Rounds 17 - 18: (2 rounds) sc in each st
Round 20: sc in the first st, sc2tog, rep to end (12sc)
Round 21: sc2tog to end (6sc)
Fasten off
For the arms (make 2):
Make a magic loop with 6sc
Round 1: sc in the first st, 2sc in the next st, rep to end (9sc)
Rounds 2 - 3: (2 rounds) sc in each st (9sc)
Round 4: sc in the first st, sc2tog, rep to end (6sc)
Rounds 5 - 9: (5 rounds) sc in each st (6sc)
Fasten off
Sew the arms to the side of the body
Make a magic loop with 6sc
Round 1: sc in the first st, 2sc in the next st, rep to end (9sc)
Rounds 2 - 3: (2 rounds) sc in each st (9sc)
Round 4: sc in the first st, sc2tog, rep to end (6sc)
Rounds 5 - 9: (5 rounds) sc in each st (6sc)
Fasten off
Sew the arms to the side of the body
For the legs (make 2):
Make a magic loop with 6sc
Round 1: 2sc in each st (12sc)
Round 2: sc in the first 3 sts, 2cs in the next st, rep to end (15sc)
Rounds 3- 4: (2 rounds) sc in each st (15sc)
Round 5: sc2tog 3 times, sc in the last 9 sts (12sc)
Round 6: sc in the first 2 sts, sc2tog, rep to end (9sc)
Rounds 7 - 10: (4 rounds) sc in each st (9sc)
Rounds 3- 4: (2 rounds) sc in each st (15sc)
Round 5: sc2tog 3 times, sc in the last 9 sts (12sc)
Round 6: sc in the first 2 sts, sc2tog, rep to end (9sc)
Rounds 7 - 10: (4 rounds) sc in each st (9sc)
Fasten off
Sew these legs underneath the body
For the nose:
with cream/peach make a magic loop with 6sc
Round 1: 3sc in the first st, sc in the next 5
Fasten off
Sew this nose to the middle of the face
For the hair:
Cut a section of cardboard 9cm wide and wind a section of white fluffy yarn around it to give a bundle. Cut the bundle at both ends so that you are left with a load of 9cm strands. Fold these in half and attach them to the head and face of the Santa to create the hair, beard and moustache. Attach them by pulling the looped end through a stitch in the head and then threading the loose ends through the loop created to secure.

For the trousers:
With red 4ply yarn and a 2mm hook ch28
Round 1: sc in the first chain st you made, then sc in every following chain st to end (28sc)
Rounds 2 - 10: (9 rounds) sc in each st (28sc)
Round 11: ch8, skip14, sc14. These 22sts (the ch8 and sc14) form a new round
Rounds 12 - 21: (10 rounds)sc in each of these 22 sts
Fasten off
rejoin yarn to row 10 to the stitch after the stitch you made before the ch8 on the first leg
Round 11: sc14 round the rest of the stitches on round 10, ch8. Round 12: sc in the first st you made on the last round, sc in every other stitch of the last round (22sc)
Rounds 13 - 21: (9 rounds)sc in each st
Fasten off
Sew up the crotch section of the trousers.
For the jacket:
ch31
Row 1: sc in the 2nd loop from hook, then sc in every following chain st to end. ch1, turn (30sc)
Row 2: sc in each st. ch1, turn
Row 3: sc, ch1, skip1, sc28. ch1, turn
Row 4: sc27, skip1, 2sc in the hole made by the ch1, sc. ch1, turn
Row 5: sc in each st. ch1, turn
Row 6: sc28, ch1, skip1, sc. ch1, turn
Row 7: sc, 2sc in the hole made by the ch1, skip1, sc27. ch1, turn
Row 8: sc in each st. ch1, turn
Row 9: sc, ch1, skip1, sc28. ch1, turn
Row 10: sc4, sc2tog. ch1, turn (5sc)
Row 11: sc5. ch1, turn
Row 12: sc5
Fasten off
Rejoin yarn to row 9 to the 4th st from this last section.
Row 10: sc12. ch1, turn
Row 11: sc2tog, sc8, sc2tog. ch1, turn (10sc)
Row 12: sc10
Fasten off
rejoin yarn to row 9 to the 4th st from this last section.
Row 10: sc2tog, sc, skip1, 2sc in the hole made by the ch1, sc. ch1, turn (5sc)
Row 11: sc5
Row 12: sc3, ch1, skip1, sc
Row 13: sc, 2sc in the hole made by the ch1, skip1, sc2, ch4, (sc2tog, sc6, sc2tog) along the next section, ch4, sc5 along next section.
Fasten off
Join fluffy white yarn to one of the bottom corners of the jacket, and crochet around the bottom edge to the opposite bottom corner
For the sleeves (make 2):
Join the yarn to one of the armholes
Round 1: sc17 around the edge of the armhole
Rounds 2 - 12: (11 rounds) sc in each of these 17 sts
Fasten off
Fasten on fluffy white yarn to one of these sts
Row 13: sc in each st
Fasten off
Sew four buttons to the front of the jacket to fasten
For the hat:
With red 4ply yarn and a 2mm hook ch33
Round 1: sc in the first chain st you made, then sc in each of the next 32 chain sts (33sc)
Rounds 2 - 5: (4 rows) sc in each st
Round 6: Sc9, sc2tog, rep to end (30sc)
Rounds 7 - 9: (3 rounds) sc in each st
Round 10: Sc3, sc2tog, rep to end (24sc)
Round 11: Sc in each st
Round 12: Sc2, sc2tog, rep to end (18sc)
Rounds 13 - 15: (3 rounds) sc in each st
Round 16: Sc, sc2tog, rep to end (12sc)
Rounds 17 - 19: (3 rounds) sc in each st
Round 20: Sc2tog to end (6sc)
Round 21: Sc in each st
Rounds 22 - 24: (3 rounds) Slip2, sc, hdc2, slip1
Round 25: Sc in each st
Round 26: Sc2tog to end (3sc)
Fasten off
With white fluffy yarn sc33 along the cast on edge of the hat.
For the bobble:
With white fluffy yarn make a magic loop with 6sc
Round 1: sc in each st
Fasten off
Sew this to the top of the hat
If necessary sew the hat to the top of the head of your Santa using white fluffy yarn.
For the boots (make 2):
With 2mm hook and black dk yarn ch4
Round 1: sc in the 2nd loop from hook, sc in the next chain st, 3sc in the next chain st (the first one you made), sc in the back of the previous chain st you crocheted into, 2sc into the back of the first chain st you crocheted into (8sc)
Round 2: 2sc in the first st, sc, 2sc in each of the next 3sts, sc, 2sc in each of the next 2sts (14sc)
Round 3: sc, 2sc in the next st, sc2, (2sc in the first st, sc) 3 times, sc, 2sc in the next st, sc, 2sc in the last st (20sc)
Fasten off neatly
Fasten on yarn to the loop behind the back loop of the 'new' stitch you created when fastening off neatly
Round 4: sc in the loop behind the back loop of this st and the next 19 sts
Round 5: sc in both loops of each st
Round 6: sc6, sc2tog 3 times, sc8 (17sc)
Round 7: sc5, sc2tog 3 times, sc6 (14sc)
Round 8 - 10: (3 rounds) sc in each st
Fasten off
For the belt:
With 2mm hook and black dk yarn ch3
Row 1: sc in the 2nd loop from hook, then sc in the following chain st. ch1, turn (2sc)
Rows 2 - 33: (32 rows) sc in each st. ch1, turn
Row 34: sc in each st
Fasten off
For the buckle:
with yellow dk yarn and a 2mm hook ch4
sc in the 2nd chain st from hook, sc in each of the next 2 chain sts, ch5, make a slip stitch in the opposite end of this section, as shown below

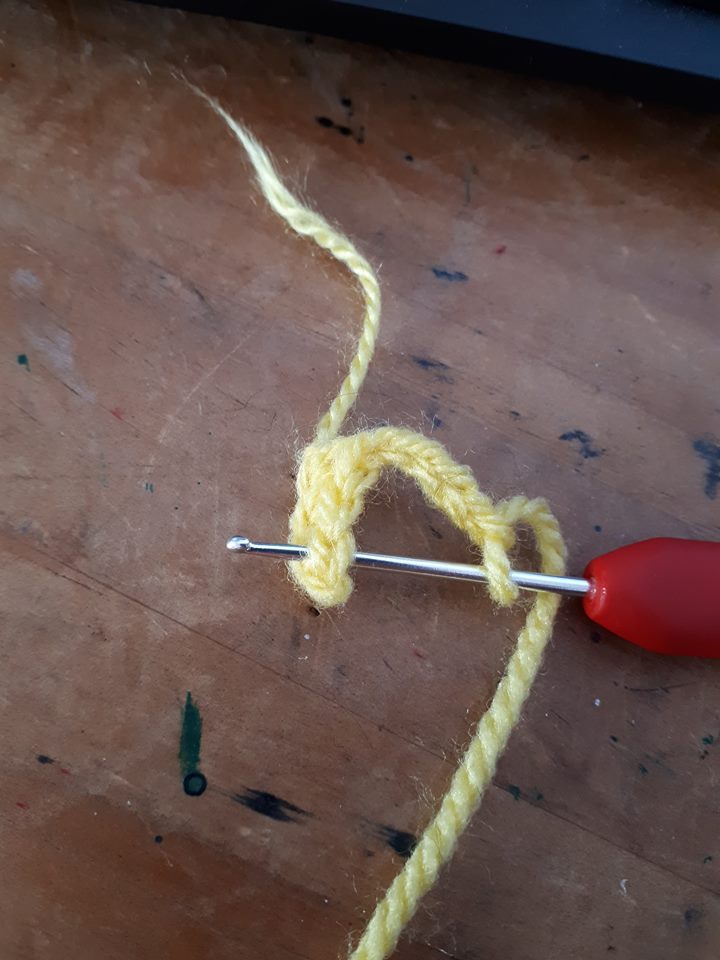

ch5, make a slip stitch in the opposite end of this section in the same way as you did before (as shown below)


Fasten off
Sew the middle section of this to one end of the belt. Loop it around the middle of your doll and thread the other end of the belt through the buckle
I hope you have enjoyed this pattern. Please feel free to contact me either below or via my
Instagram or Ravelry pages if you have any queries or suggestions for future patterns. You are very welcome to sell finished products but I do ask that you don't re-post this pattern or claim it as your own. Thank you!


No comments:
Post a Comment